
How to Make a Leather Journal Cover: The Pattern-Free Guide
This post contains affiliate links. As an Amazon Associate, we earn from qualifying purchases.
This post contains affiliate links. As an Amazon Associate, we earn from qualifying purchases.
To make a leather journal cover, you need three core measurements from your notebook, a piece of leather 1.5–2mm thick, contact cement, and tools for cutting and stitching. The process is measuring, cutting, gluing internal panels, and hand-stitching the perimeter. The most common failure is an incorrect width measurement, you must wrap the tape around the entire closed book, not just measure a flat cover.
Most guides start with a pattern you download and trace. That works until your notebook is a slightly different size. The real skill isn’t tracing; it’s understanding the three measurements that dictate every cut. Get those right, and you can build a cover for any book on your shelf without searching for a matching template.
What follows: the measuring method that guarantees a fit, the glue-versus-stitch debate settled, and the tool you can skip buying for your first project.
Key Takeaways
- Measure your notebook’s closed width by wrapping a tape around the spine, this single number prevents a cover that’s too tight or loose.
- Use 1.5–2mm (2-3oz) vegetable-tanned leather for structure without bulk; thicker leather fights the fold, thinner leather won’t hold shape.
- Glue internal panels first with contact cement, then stitch the perimeter; reversing this order creates alignment headaches you can’t fix.
- A **wing divider set to 3.A 5mm seam allowance is essential for marking a consistent stitching line; guessing the distance leads to wobbly, amateur seams.
- Burnish the edges before you stitch the cover closed; trying to burnish a fully assembled cover is awkward and produces inferior results.
The Critical First Cut: Measuring Your Notebook
Grab your notebook and a flexible measuring tape. Do not use a metal ruler. This is the only step where the wrong tool guarantees a misfit.
You need three numbers. The first is the closed width. Wrap the tape snugly around the entire book, front cover, spine, and back cover as one unit. Note that measurement. For a standard A5 hardcover, this is usually between 300mm and 320mm. The second is the height, measured from top to bottom of the closed book. The third is the thickness of the book block at its fattest point, which is often the spine.
Common mistake: Measuring the front cover flat and doubling it. A book’s spine adds bulk, and pages curve when closed. Your flat measurement will be short by 5-10mm, producing a cover that strains at the seams.
Now, add your margins. For the main cover piece, add 12-15mm to your closed width and 10mm to your height. This creates a wrap-around flap. For internal pocket panels, the width is typically one-third of your closed width, and the height matches your main cover piece’s height minus 2mm.
If this sounds like math, it is. But it’s simple math. For a 300mm x 210mm x 20mm notebook: – Main cover: 315mm wide x 220mm tall. – Two inside panels: 100mm wide x 218mm tall each.
Cut these pieces from poster board or cereal box cardboard first. Assemble them with tape around your actual notebook. This 20-minute paper mock-up saves you from wasting leather. If the paper version fits snugly but closes easily, your leather dimensions are correct.
Choosing Your Leather: Thickness Beats Color
A beautiful, deep-dyed leather is tempting. Ignore it for now. For a functional cover, thickness is your primary filter.
1.5–2mm leather (often labeled 2-3oz) is the sweet spot. It’s substantial enough to provide structure for a hardcover book but pliable enough to fold without cracking at the spine. Thinner leather (under 1mm) will flop and feel insubstantial unless it’s lined, which is a more advanced technique. Thicker leather (over 3mm) is for belts and bags; it will resist folding and make your journal feel like a brick.
Vegetable-tanned leather is the default choice for a first project. It’s firm, easy to burnish, and accepts stains and finishes predictably. Chrome-tanned leather is softer and more water-resistant, but it’s also floppier and doesn’t burnish to a clean edge. For a structured cover, vegetable-tan wins.
I’ve stuck with a simple wooden slicker for burnishing edges for years. It’s inexpensive, gives me perfect control over the pressure and angle, and consistently produces a glassy, professional finish. You don’t need a fancy machine. A dab of water and friction are the only real ingredients.
Tools You Actually Need (And One You Don’t)
You can spend hundreds on specialized leather tools. For this project, you need about six.
- Utility knife and metal ruler: For straight cuts. Replace the blade when it drags.
- Wing divider: This scribes a parallel line from the edge of your leather. Set it to 3.5mm for your stitching line.
- Diamond chisel or pricking iron: Creates consistent, angled holes for stitching. A 4-tooth and a 2-tooth for corners will do.
- Contact cement (like Barge): Bonds leather without soaking through. Apply to both surfaces, let it dry until tacky, then press together for a permanent hold.
- Stitching needles and waxed thread: John James needles and 0.8mm polyester or linen thread are standard.
- Wooden slicker or edge burnisher: For finishing the raw edges.
The tool you can skip? A stitching pony. For a flat panel like a journal cover, you can weight the piece on a table. A pony is helpful but not essential for a first build. Put that money toward better leather instead.
| Tool | Essential Job | Budget Alternative |
|---|---|---|
| Wing Divider | Marks a straight, parallel stitching line. | A compass set to width, held carefully. |
| Diamond Chisel | Punches clean, consistent holes for the needle. | An awl to poke each hole individually (slow, less uniform). |
| Contact Cement | Creates a strong, flexible bond without moisture warping. | Rubber cement (weaker bond, may release over time). |
| Wooden Slicker | Polishes raw edges to a smooth, sealed finish. | A polished piece of hardwood or the back of a spoon. |
Assembly: Glue First, Stitch Second
Dry-fit all your pieces, main cover and two internal panels, around your notebook. The panels should sit on the inside of the front and back covers, leaving a gap in the center for the spine. Once you’re happy with the placement, pick up the glue.
Apply a thin, even layer of contact cement to the back of a panel and the corresponding area on the main cover. Let both surfaces dry until they are no longer wet to the touch but still tacky, about 3-5 minutes. This waiting period is critical; pressing wet glue squeezes it out and creates a mess. Align the panel carefully and press it down firmly. Use a roller or the back of a spoon to ensure full contact.
Repeat for the second panel. Once both are glued, trim any overhang from the top and bottom edges with your utility knife so the panels are flush with the main cover.
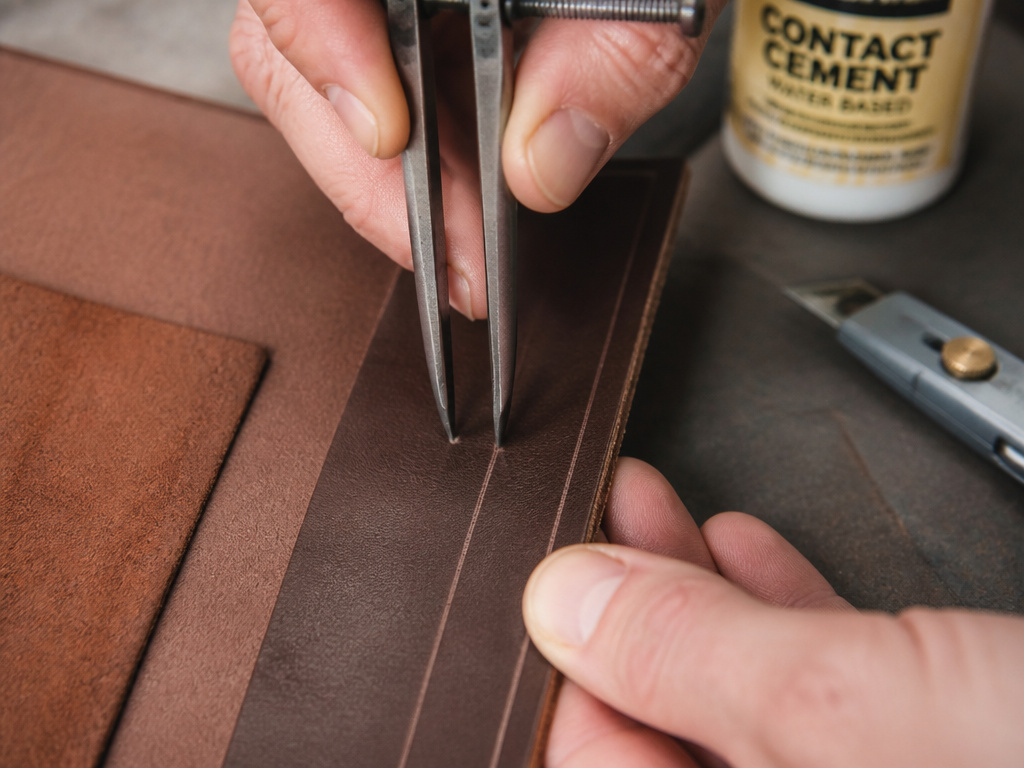
Now, take your wing divider. Set it to 3.5mm and run it along all edges of the glued panels. This scribes a guideline for your stitches that is perfectly parallel to the edge. Without this line, your stitching will wander.
Hand-Stitching: The Saddle Stitch That Lasts
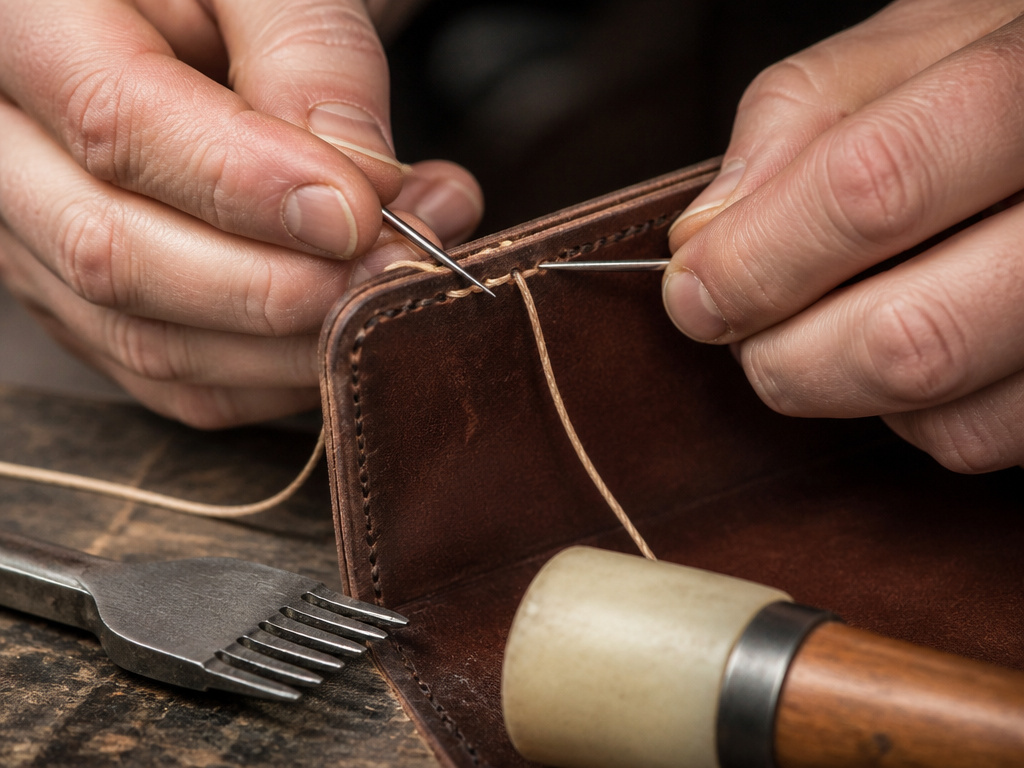
Machine stitching leather is possible with the right equipment, but a hand-sewn saddle stitch is stronger and more repairable. It’s also quiet, methodical, and the part of the process many makers come to love.
Thread your two needles onto opposite ends of a waxed thread about four times the perimeter length of your panel. Start your first hole in the middle of a long side, not at a corner. Push your diamond chisel through all layers, following your scribed line. Use a mallet for a clean punch.
The saddle stitch uses two needles passing in opposite directions through the same hole. It locks every stitch upon itself. If one section of thread wears through, the rest of the seam won’t unravel.
Pull your stitches snug, but don’t yank. The thread should sit flush in the hole, not cut into the leather surface. When you reach a corner, use your 2-tooth chisel to punch the angled holes. This keeps the spacing consistent. After your final stitch, backstitch through the last two holes, then trim the thread tails and tap them flat with a hammer.
The rhythm is slow. A steady pull, the whisper of thread through leather, the faint click of the needle against a thimble. Rushing here shows in uneven tension.
Finishing: Edges and Patina
Your cover is stitched, but it’s not finished. The raw, layered edges look rough and will collect dirt. Burnishing seals and polishes them.
Lightly sand the edges with 400-grit sandpaper until they are smooth and even. Dampen a cloth and rub it along the edge to raise the fibers. Then, using your wooden slicker or burnisher, apply firm pressure and rapid strokes. The friction generates heat, melting the natural fibers and waxes in the leather to create a sealed, glossy edge. A dab of beeswax during the final passes adds durability and a deeper shine.
This is also the time to apply any dye or finish to the leather surface if you’re using untreated vegetable-tan. Use a sponge or dauber for an even coat. Let it dry completely before handling.
Your new cover is done. Slide your notebook in. The fit should be snug but not forced. The spine will soften with use, developing creases that match your book’s opening habits. This is the start of its patina. Unlike the brittle cracking of poor-quality genuine leather, a well-made vegetable-tanned cover will simply grow darker and richer where your hands touch it most.
Proper leather journal care from the start means this cover will outlast the notebook inside. When the pages are full, you’ll slide in a fresh one and begin the cycle again. The cover is the permanent part.
Frequently Asked Questions
What is the best leather for a beginner making a journal cover?
Vegetable-tanned leather in the 2-3oz (1.5–2mm) weight range is ideal. It is firm, easy to cut and punch, burnsishes beautifully, and allows you to practice dyeing and finishing. Avoid supple chrome-tanned or garment leathers for your first attempt, as they are harder to keep aligned during assembly.
Can I make a cover without any special leather tools?
You can manage with a very sharp utility knife, a metal ruler, a push pin for holes, and a heavy-duty needle and thread. However, the results will be visibly less polished. Investing in a wing divider and a diamond chisel dramatically improves precision and is worth the cost for even one project.
How do I make a cover for a softcover or traveler’s-style notebook?
The construction is different. For a softcover or “traveler’s notebook” style, you make a single-piece cover with no internal panels. You then punch holes in the spine and thread an elastic cord through to hold removable notebook inserts. The measuring principle is the same, but the calculator at MakeSupply.co is invaluable for determining hole placement for the elastic.
How do I keep my stitching straight?
Use a wing divider to scribe a guideline. This is non-negotiable for clean work. Set the points to 3.5mm, hold the tool perpendicular to the leather edge, and pull it steadily toward you. The scribed line is your roadmap; your diamond chisel or awl follows it for every hole.
My leather is very stiff. How do I soften it for folding?
If your vegetable-tanned leather is too rigid, you can gently condition it before assembly. Apply a light coat of a pure oil like neatsfoot or a dedicated product for stiff leather, let it absorb fully, and then flex the spine area repeatedly by hand. Do not oversaturate, as it can weaken the fibers.
Before You Go
The one measurement that matters more than any other is the closed width. Get that wrong, and no amount of skillful stitching will save the project. Get it right, by actually wrapping the tape around the book, and everything else is a matter of careful execution.
Choose your leather thickness first, color second. A 2mm vegetable-tanned side will serve you better than the most beautifully dyed 1mm skin. This project is a foundation. Once you’ve made one cover that fits perfectly, you’ll understand the principles of creating leather patterns for any item.
Now, make the paper mock-up. It feels like a delay, but it’s the step that separates a one-time attempt from the first of many. The cover you make will develop its own leather patina over years of use, something no store-bought item can truly replicate.
