
How to Paint a Leather Jacket | The Pro Method That Lasts
This post contains affiliate links. As an Amazon Associate, we earn from qualifying purchases.
This post contains affiliate links. As an Amazon Associate, we earn from qualifying purchases.
To paint a leather jacket, you need the right paint, thorough surface preparation, and a protective seal. Use a dedicated leather paint like Angelus, deglaze the surface with a product like Angelus Leather Preparer, apply 3-6 thin layers, and finish with an acrylic sealer. Skipping the deglazer or the finisher is how a beautiful design cracks and flakes within months.
That prep step is the whole game. The factory finish on a leather jacket is there to resist stains and wear, which means it also resists your paint. A deglazer with a high concentration of isopropyl alcohol breaks that barrier so the paint can form a mechanical bond with the leather itself.
What follows is the method that works on everything from a vintage moto jacket to a modern bomber. This guide details the specific paints, essential preparation steps, painting method, and the required sealant for a finish that lasts over a year.
Key Takeaways
- Use paint formulated for leather, like Angelus acrylics. Standard craft acrylics will crack without a fabric medium.
- Deglazing is mandatory. Wipe the entire painting area with a leather deglazer or isopropyl alcohol to remove the factory finish.
- Apply multiple thin layers. Build color with 3-6 coats, letting each dry for 15-30 minutes.
- Seal your work. A finisher like Angelus Acrylic Finisher protects the paint from scuffs and moisture.
- Test everything first. Always do a test run on an inside seam or tag with your paint and deglazer combination.
Paint vs. Dye: Knowing What You’re Actually Doing
Let’s be clear about one thing. Most people asking about painting a leather jacket are really asking about coloring it. The method you choose changes the result and the jacket’s future.
Leather dye is an alcohol-based solution that penetrates and stains the leather fibers themselves. It becomes part of the material. A dyed jacket will still show the natural grain and will develop a patina over time. It’s more permanent but requires more skill to apply evenly.
Leather paint is an acrylic-based coating that sits on top of the leather. It creates a solid, opaque layer that can cover the original color completely. This is what you use for detailed artwork, logos, or a total color change.
The part nobody mentions: If you use an alcohol-based dye and don’t seal it, the color will bleed onto your clothes for weeks. Paint needs a sealant to avoid cracking; dye needs a sealant to avoid transferring.
For custom artwork and designs, acrylic leather paint is the practical choice. It’s more forgiving and offers the opacity you need. For a full, even color change where you want the leather’s character to show through, a professional-grade dye is the better path. Our guide on the difference between dye and paint breaks down this choice in detail.
Choosing Your Paint and Tools
Your material choices here decide whether your project is a lasting custom piece or a temporary experiment.
The Paint: Angelus Leather Paint
This is the default for a reason. Angelus paint is an acrylic formulated to bond to leather and remain flexible. It’s much thinner than standard craft acrylic, which helps it lay down smoothly without obscuring detail. A 1-ounce jar costs about $3 and goes a long way.
The Deglazer: Angelus Leather Preparer & Deglazer
This is your prep work in a bottle. It removes waxes, silicones, and the factory topcoat. Isopropyl alcohol (90% or higher) can work in a pinch, but a dedicated deglazer is more consistent and less drying on the leather.
The Finisher: Angelus Acrylic Finisher
This is not optional. It comes in Matte, Satin, Gloss, and Normal finishes. The finisher creates a protective, flexible shield over your paint. Without it, the painted surface is vulnerable to every scuff and scrape.
| Tool | Purpose | What Happens If You Skip It |
|---|---|---|
| Deglazer | Removes factory finish for paint adhesion | Paint chips off in sheets within weeks; no permanent bond. |
| Soft-Bristle Brushes (1/4″ flat, detail round) | Applies paint smoothly without streaks | Brush marks set permanently; uneven color coverage. |
| Acrylic Finisher | Seals and protects the painted surface | Paint remains tacky, attracts dirt, and cracks with flexing. |
| Lint-Free Rags | Applies deglazer and finisher | Lint gets embedded in wet paint or finish, ruining the surface. |
| Painter’s Tape (low-tack) | Masks off areas you don’t want to paint | Paint bleeds onto seams or zippers; clean lines are impossible. |
If your jacket will see rain or snow, add a waterproofer like Scotchgard or Mod Podge Outdoor over the dried finisher. The finisher is only water-resistant; a waterproofing spray adds an extra barrier.
The 8-Step Process for Painting a Leather Jacket
This isn’t art class. It’s a process of preparation, patience, and protection. Rushing any step shows up later as a flaw.
1. Clean the Jacket Thoroughly
Every speck of dirt becomes a bump under your paint. Use a damp cloth with a mild leather cleaner. Don’t soak it. Let the jacket dry completely, overnight is best. This is the same foundational step you’d take if you needed to clean a leather jacket for general care.
2. Deglaze the Painting Area
Shake the deglazer bottle well. Pour a small amount onto a lint-free rag. Wipe the area you plan to paint using firm, even pressure. You’ll see the rag pick up color, that’s the factory finish coming off. Let this dry for 10 minutes. The surface should feel slightly tacky, not slick.
Where this goes sideways: Using a deglazer on vinyl panels. If your jacket has vinyl sections (common on side panels or accents), skip the deglazer. Vinyl doesn’t have a finish to remove, and the chemicals can damage it. Just clean it and go straight to masking.
3. Mask Off Everything Else
Use low-tack painter’s tape to protect zippers, buttons, lining, and any leather you don’t want to paint. Press the tape edges down firmly to prevent bleed-through. For complex designs, this is where you’d create stencils.
4. Apply the First Thin Coat of Paint
Stir your paint; don’t shake it, to avoid bubbles. Load your brush, then wipe off the excess on the jar’s rim. Apply the paint in smooth, single-direction strokes. Don’t go back over wet paint, you’ll create streaks. This first coat will look translucent and uneven. That’s correct.
5. Build Layers with Patience
Let the first coat dry until it’s not tacky to the touch, about 15-30 minutes in a warm, dry room. Then apply the next thin coat, brushing in a direction perpendicular to the first. Repeat. You need 3 to 6 coats for solid, even coverage. The clock is your friend. Rushing and applying thick coats leads to cracking as the outer layer dries faster than the core.
6. Let the Paint Cure
After the final coat, let the jacket rest for at least 24 hours. The paint may feel dry, but it needs time to fully set and off-gas. Hang it in a well-ventilated area, away from dust.
7. Apply the Acrylic Finisher
Once cured, apply the finisher exactly like the paint. Use a clean brush or rag to spread a thin, even coat over the entire painted area. One coat is usually sufficient. Let it dry for another 24 hours. This sealant is what makes your painting process durable.
8. Recondition the Leather (Optional but Recommended)
The deglazing and painting process can dry out the surrounding leather. Once the finisher is fully dry, apply a small amount of leather conditioner to unpainted areas to keep them supple. This is a key part of long-term leather jacket care.
The Biggest Mistakes and How to Avoid Them
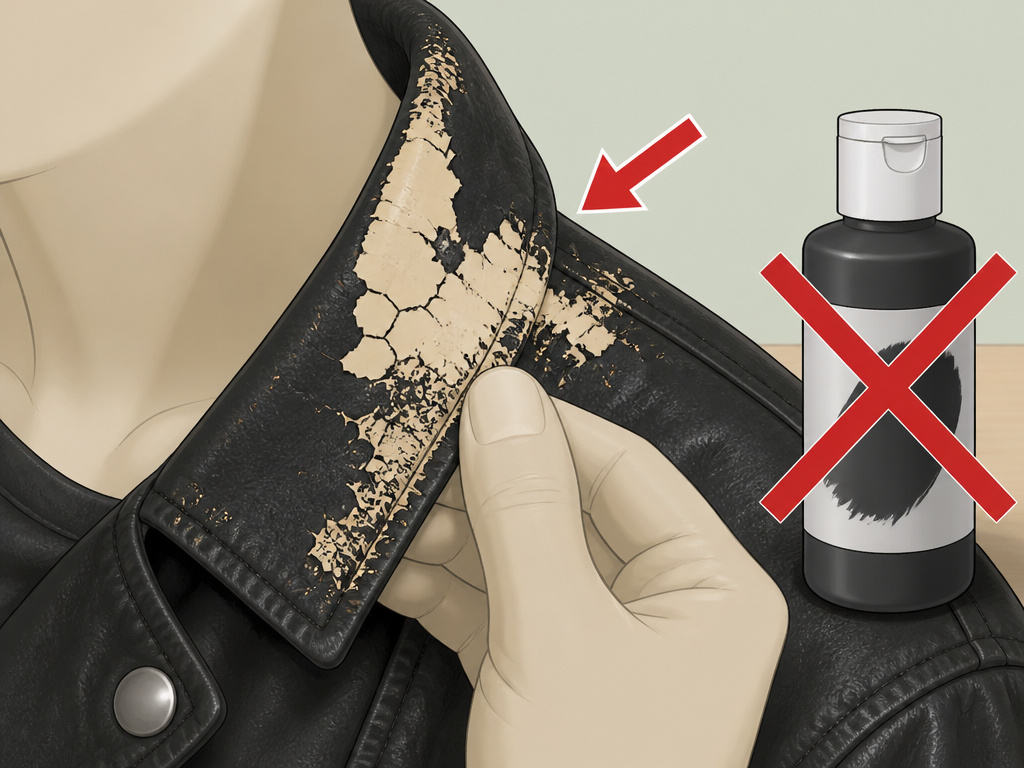
I see the same errors repeated in forums and repair shops. They’re all preventable.
Mistake 1: Using the Wrong Paint
Standard acrylic craft paint is too thick and rigid. On a flexible material like leather, it will crack at the first bend. If you must use it, you must mix it with a fabric medium (one part medium to two parts paint) to add flexibility.
Mistake 2: Skipping the Deglazer
Wiping the jacket with water isn’t enough. That factory sealant is designed to repel liquids. If your paint is beading up on the surface, you didn’t deglaze properly. Go back to step two.
Mistake 3: Applying Paint Too Thickly
Impatience creates gloppy, wrinkled paint that never dries properly. Thin coats win. If you make a mistake or get a drip, let it dry completely, then sand it lightly with 600-grit sandpaper before applying the next thin coat to level the surface.
Common mistake: Not sealing painted areas that will rub. The inside of the collar, cuffs, and where a bag strap sits need extra attention with the finisher. These high-friction areas fail first.
What if your design cracks after a few months? The fix is involved. You must lightly sand the entire cracked area to rough it up, deglaze again, and repaint. It’s often more work than the original project. Doing it right the first time is the only real fix. For physical damage to the jacket itself, that’s a different guide to leather jacket repair.
Special Cases: Dry Leather, Different Jacket Types
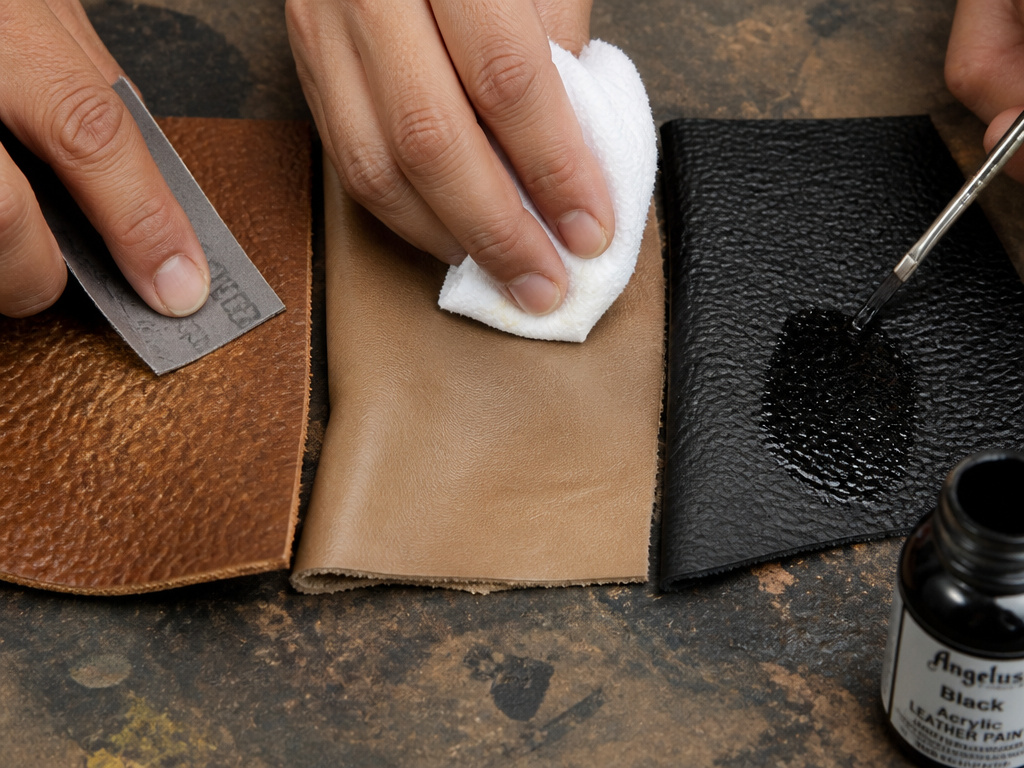
Not all leather is the same. Your jacket’s material changes the prep work.
Very Dry or Old Leather
If the leather is powdery or produces a lot of dust when sanded, it’s severely dry. After deglazing, wipe it down again with a deglazer-dampened rag to pick up the dust. You might need to condition the jacket lightly and let it absorb for a day before you even start painting.
Type of Leather Matters
The type of leather jacket you have sets expectations. * Cowhide: Tough and grainy. It holds paint well but may need a light sanding with 800-grit paper after deglazing for the best bond. * Lambskin/Sheepskin: Incredibly soft. Use a very light hand when deglazing to avoid damaging the delicate surface. Test first. * Goatskin: Has a distinct pebble grain. Paint will naturally settle into the low spots, so plan for an extra coat or two for full coverage.
Understanding these differences is crucial, similar to knowing the distinction when comparing lambskin vs cowhide for a purchase.
Frequently Asked Questions
Can I use spray paint on a leather jacket?
You can, but it’s riskier. Spray paint is great for all-over color or large stencils, but it’s easy to apply too heavily. Use light, misting coats from 12 inches away and follow the same prep and sealing steps. Always spray in a well-ventilated area.
How long does painted leather last?
With proper prep and sealing, the paint should last for years of normal wear. It will eventually show wear at high-stress points like elbows, just like any finish. The longevity has more to do with your overall care than the paint itself.
Can I remove paint from a leather jacket?
It’s difficult. You can try gentle scraping after softening the paint with a leather-safe solvent like deglazer, but you risk damaging the underlying dye. Often, the best fix is to paint over it with a new design or embark on a full process for recoloring leather.
Do I need to use a primer?
Not with dedicated leather paints like Angelus. The deglazer provides the “tooth” the paint needs to adhere. Using a standard primer can create a stiff layer that cracks.
How do I make my painted design less stiff?
The flexibility comes from the paint formulation and thin layers. Adding a product like Angelus 2-Soft to the paint can increase flexibility, which is especially useful for jackets that need to drape softly.
Before You Go
The one step that guarantees failure is skipping the finisher. That acrylic sealer is what turns a layer of colored plastic into a durable, wearable surface. No matter how perfect your design looks after the last coat of paint, it’s not finished until it’s sealed.
If you’re changing the color of a whole jacket, consider dye. It’s a more advanced technique, but the result is more integrated with the leather. Painting is for artistry and coverage; dyeing is for transformation. Both are valid paths in the wider world of leather painting.
Start small. Find an old belt or a wallet and practice the full cycle, deglaze, paint, seal, before you touch your favorite jacket. The muscle memory you build on a throwaway piece is the best insurance you can buy.
