
How to Prepare Leather for Tooling | The 5 oz Sweet Spot
This post contains affiliate links. As an Amazon Associate, we earn from qualifying purchases.
This post contains affiliate links. As an Amazon Associate, we earn from qualifying purchases.
To prepare leather for tooling, you must case it: evenly dampen 5 oz or thicker vegetable-tanned leather until it feels cool and returns to a honey color, which allows fibers to compress without tearing. This requires matching three things: the right leather thickness, a controlled moisture level that penetrates about one-third of the way, and a taped or stabilized back to prevent stretch and distortion during stamping.
That “cool and honey-colored” state is the target, but the path to it trips up more beginners than any carving technique. Leather isn’t a sponge; it’s a collagen matrix that swells and moves when wet. If the moisture isn’t even or the backing isn’t stable, your tool strikes push the material sideways instead of forming a crisp impression.
What follows: why 5 oz leather is the practical floor, the three proven casing methods (and the one that wastes a day), the tool you should tape before you even wet the piece, and the sensory check that tells you it’s ready before you make the first cut.
Key Takeaways
- Start with 5 oz (2.0mm) or thicker vegetable-tanned leather; thinner stock tears under tool pressure and won’t hold depth.
- Tape the back of your workpiece with clear packing tape before dampening to lock the fibers and prevent stretch that ruins design proportions.
- The casing sweet spot is when the leather feels cool to the touch and has returned to its light, honey-brown color, not dark and soggy.
- Avoid all metal contact on damp leather; even brief touch with tools or containers causes permanent, dark oxidation stains.
- If your leather feels mushy and tools push it around, stop and let it dry for 20-30 minutes; over-casing is fixable, under-casing isn’t.
The Right Leather & Tools: It’s Not Just Veg Tan
Let’s be clear about one thing. You need vegetable-tanned leather. Chrome-tanned or oil-tanned leathers won’t hold a stamped impression because their fibers are permanently lubricated and locked. Vegetable tanning leaves the collagen fibers open and receptive to water, which is what allows them to be reshaped and then hold that new shape as they dry. This is the essential foundation of all leather tooling.com/how-to-tool-leather/).
But within the veg-tan category, thickness decides your success before you pick up a sponge. Leather thickness is measured in ounces, where 1 ounce equals 1/64 of an inch. A common beginner mistake is grabbing whatever scrap is handy, often 2-3 oz leather meant for lining. That’s a guaranteed way to tear through your piece on the first beveler strike.
Where this goes sideways: Using leather under 5 oz for tooling. The tool cuts or tears through the shallow fiber bed instead of compressing it, leaving ragged edges and zero depth. Your design looks flat and damaged immediately.
My advice is simple: buy 5-6 oz vegetable-tanned leather for your first dozen projects. Brands like Hermann Oak, Tandy Leather’s craft sides, or Weaver Leather Supply’s tooling shoulders are consistent. The 5 oz weight (about 2.0mm thick) gives the swivel knife and stamp enough material to sink into without blowing out the back. It’s the sweet spot between workability and durability.
Your Three Essential Tools (Beyond the Leather):
- A Swivel Knife. This isn’t a utility knife. It pivots for curved cuts. A sharp one is non-negotiable; a dull blade drags and tears fibers instead of slicing them.
- A Smooth, Hard Surface. A marble slab or granite tile at least 3/4″ thick. A wooden table or cutting mat is too soft; it absorbs the impact of your mallet strike, robbing your stamp of force.
- Clear Packing Tape (Mid-grade). Not the dollar-store kind. You’ll use this before wetting the leather, not after.
Here’s a straightforward guide to the thicknesses you’ll encounter and what they’re actually for:
| Leather Weight (Ounces) | Approx. Thickness | Best Use in Tooling |
|---|---|---|
| 2-3 oz | 0.8 – 1.2 mm | Avoid for tooling. Use for lining, inlays, or practice cuts only. |
| 4-5 oz | 1.6 – 2.0 mm | Minimum for reliable tooling. Good for keychains, card holders, thin wallets. |
| 6-8 oz | 2.4 – 3.2 mm | Ideal range. Perfect for belts, notebook covers, bags. Holds deep impressions. |
| 9-10 oz+ | 3.6 mm+ | For heavy-duty items like sheaths or saddles. Requires more skill to case evenly. |
Why You Tape the Back Before Getting It Wet
Most guides tell you to wet the leather, then start stamping. They skip the single step that prevents the most common physical distortion. Before a single drop of water touches the grain side, turn your piece over and cover the entire back with clear packing tape.
Press it down firmly, ensuring full contact. This is about creating a stable, non-stretch backing for the collagen fibers.
When you strike a stamp into damp leather, the force has to go somewhere. The fibers compress downward, but without a restraint, they also push outward laterally. This causes the entire piece to slowly expand and warp as you work, your perfectly measured pattern for a leather sheath becomes an ill-fitting mess. The tape locks those fibers in place. The stamp’s force is forced into compressing the fibers vertically, which is what creates deep, sharp impression depth.
I learned this the hard way on an early belt project. I didn’t tape it. After an hour of stamping a border pattern, the belt was a full inch longer and the spacing between stamps looked stretched and irregular. The tape isn’t a hack; it’s part of the tooling process.
The Casing Process: Wetting vs. Soaking
Casing is the controlled addition of moisture. The goal is to dampen the leather evenly so that water penetrates roughly one-third of the way through the thickness from the grain side. This softens the fibers just enough to be malleable but leaves a firm core so the leather doesn’t turn to mush.
A properly cased piece of 5-6 oz leather will feel cool to the touch, not cold and soggy, and will have returned to its original light tan, “honey” color after the initial dark wet spot fades. This takes 5-15 minutes, not 24 hours.
There are three common methods, but one is mostly a time-waster for the projects you’re doing.
1. The Spray Bottle / Sponge Method (Recommended)
This is the go-to for 90% of tooling work. Use a clean spray bottle with a fine mist or a damp (not dripping) sponge. – Mist or wipe the flesh side (rough back) first. This slows moisture loss from the grain side later. – Then, evenly dampen the grain side (smooth front). Make a single pass, then wait 30 seconds. Watch the dark spot recede. – Repeat until the leather no longer darkens quickly. When water takes 4-5 seconds to absorb, you’re close. – Let it sit. When the surface color is uniform and honey-brown, and it feels cool, test it.
2. The Quick Dunk
For slightly thicker pieces (7-8 oz) where you want to ensure deep moisture, submerge the leather in room-temperature water for 2-3 seconds. Pull it out, let the excess drip off, and place it on a towel. It will be ready in 20-30 minutes. This beats the old-school “soak until bubbles stop” method, which can over-saturate 5 oz leather and leave you waiting a full day.
3. The Long Soak (Mostly Overkill)
The traditional “soak until bubbles stop, bag it, fridge it overnight” method. It’s reliable for very thick saddle skirting (10 oz+), but for the 5-8 oz leather used in creating raised designs, it’s unnecessary. You’ll spend more time waiting for it to dry back to the correct state than you will tooling.
| Method | Best For Leather Weight | Ready-to-Tool Time | Risk |
|---|---|---|---|
| Spray/Sponge | 4-8 oz | 5-15 minutes | Under-casing if rushed. |
| Quick Dunk | 6-10 oz | 20-30 minutes | Over-saturation if dunked too long. |
| Long Soak | 9 oz+ (Saddles) | 12-48 hours | Mold if stored damp too long. |
How to Know It’s Ready: The Sensory Tests
You can’t go by time alone. Humidity, leather density, and thickness change the equation. Your senses are the final gauge.
The Color Test. Overly wet leather stays dark greyish-brown. Bone-dry leather is pale and feels warm. Ready leather is a uniform, warm honey color. It’s the shade it was when you took it off the shelf, but now it’s cool.
The Touch Test. Press the back of your finger or your wrist (sensitive skin) to the grain surface. It should feel distinctly cool, like a ceramic mug that’s been sitting in a cool room. Not cold, not neutral.
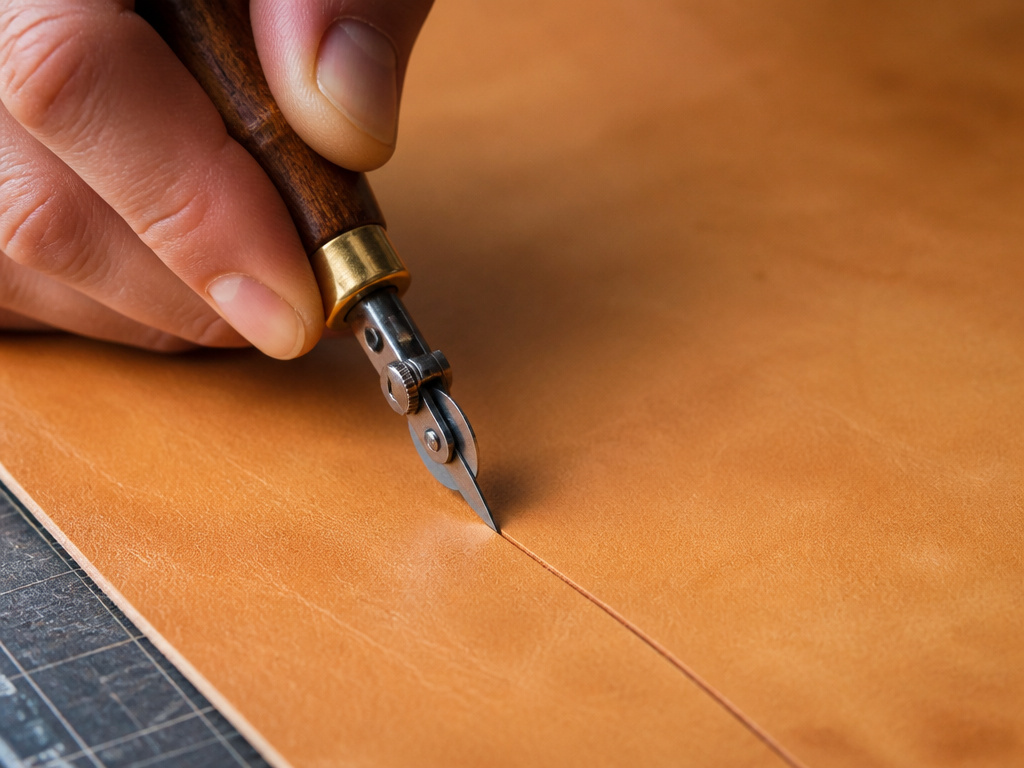
The Swivel Knife Test. This is the truth teller. Make a short, light practice cut in a margin. – If the blade drags, catches, and the cut line looks white and frayed, the leather is too dry. The fibers are brittle. – If the blade slides with no resistance, the cut closes up behind itself like it’s cutting soft clay, and the leather wells up on the sides, it’s too wet. – If the blade moves smoothly with slight resistance, makes a clean hiss, and the cut line stays open with slightly darkened edges, it’s perfect.
Easy to miss: If you get a water droplet on a dry area of your project, it will leave a permanent dark ring. To fix it, dampen the entire piece evenly again, blending the wet spot outward. Let it dry back uniformly.
What to Do When It’s Wrong (And How to Avoid Stains)
You will misjudge the moisture. Everyone does. Here’s the fix, based on what you feel.
If it’s too dry: Don’t just wet the surface. Lightly re-dampen the entire piece using the sponge method, wait five minutes, and test again. The fibers need time to absorb.
If it’s too wet: This is the easier fix. Stop. Set the leather aside on a towel at room temperature. For 5 oz leather, check it every 10 minutes. It can take 20-30 minutes to dry back to the correct state. This is why starting slightly dry is better than sopping wet, you can add water in seconds, but waiting half an hour breaks your workflow.
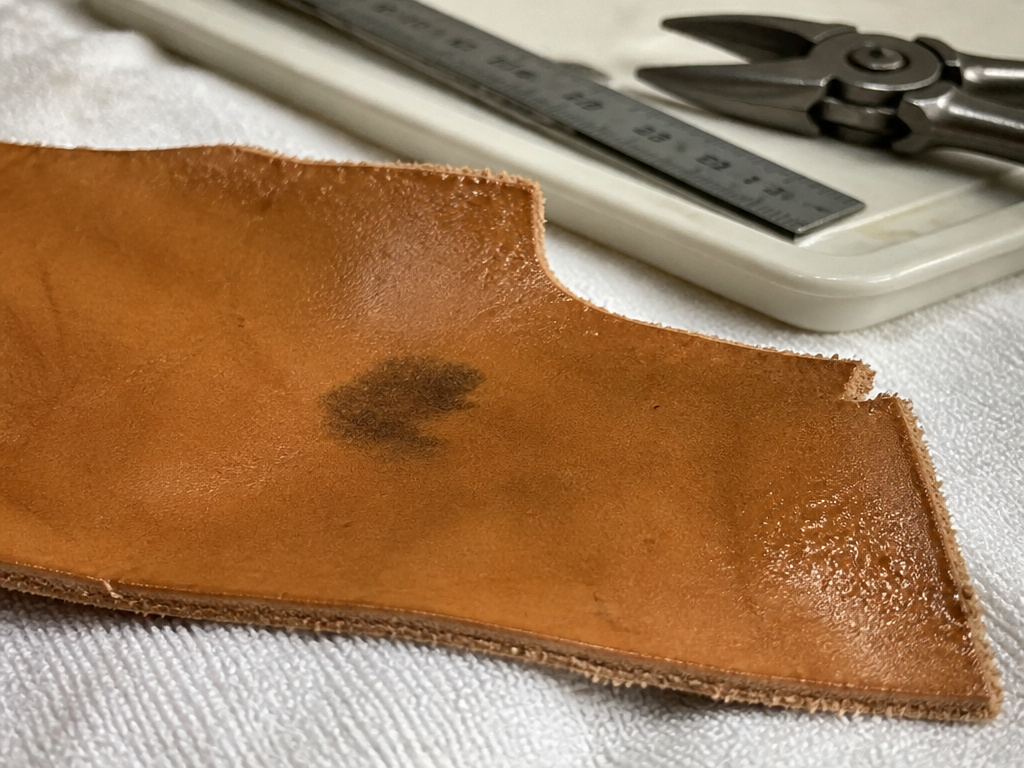
The Stain You Can’t Fix: Metal Contact.
This is a non-negotiable warning. Damp vegetable-tanned leather reacts with iron and other metals. If you leave it on a steel table, set a metal ruler on it, or even get a tiny bit of steel wool on it, a dark grey or black oxidation stain forms immediately. It won’t sand out. It won’t dye out. It’s permanent. – Always work on a stone, glass, or plastic surface. – Use plastic or wooden rulers. – Keep all metal tools on a separate tray, not on the leather.
Your First Practice Project
Understanding leather tooling basics is one thing. Feeling it is another. Skip the complex floral patterns for now.
Grab a 4×4 inch square of your 5 oz leather. Tape the back. Case it using the sponge method. When it passes the cool-touch test, use a ruler and a stylus to draw a simple geometric grid. Practice your swivel knife cuts on the lines. Then, pick one simple stamp, a backgrounder like a pebble or a seeder, and practice striking it with consistent, medium force from a mallet.
This is muscle memory, learning how the leather responds.This square is your gauge for how your specific leather behaves with your specific moisture level. This practice is more valuable than jumping straight into a keychain project and getting frustrated.
A sharp swivel knife is essential for smooth, flowing cuts in leather carving. Hold the knife vertically and guide it with your fingers, not your wrist. Keep your blade sharp and stropped for clean cuts that follow your design lines.
As you work, the leather will dry. You’ll need to re-case. This is called “working the leather.” Just a light pass with a damp sponge, waiting for the color to return, is all it takes. A large project might need this 3 or 4 times.
Frequently Asked Questions
Can I use a hair dryer or heat gun to dry leather faster?
Never. Applying heat cooks the collagen fibers, making them brittle and weak. It can also cause the leather to warp or shrink uncontrollably. If your leather is too wet, patience is the only tool. Let it air dry at room temperature.
How long can I store cased leather?
You can store dampened leather in a sealed plastic bag in the refrigerator for 2-3 days to prevent mold. For longer storage, let it dry completely. Re-case it when you’re ready to work again. A piece that’s been damp for a week at room temperature will likely develop mildew.
Is taping the back always necessary?
For any tooling project where dimensional accuracy matters, belts, sheaths, fitted panels, yes. For a small, decorative coaster project where a little stretch won’t hurt, you can skip it. But developing the habit is good practice.
My leather feels right but my stamps aren’t sharp. Why?
Three likely causes. First, your striking surface is too soft (use marble). Second, your mallet is too light; a 12-16 oz poly or rawhide mallet transfers energy better than a tiny craft hammer. Third, you might be using low-quality stamps with poorly machined faces. Invest in a few stamps from Weaver or Tandy.
Can I prepare chrome-tanned leather for tooling?
No. The chemistry is different. Chrome tanning fills and lubricates the fibers permanently, making them resistant to water and unable to hold a compressed impression. Your stamps will just bounce off or leave a faint, temporary mark. Embossing chrome-tan requires heat and pressure, a different process entirely.
Before You Go
The real secret lies in recognizing that leather is a responsive material, not a passive canvas. Preparing it correctly is a dialogue.You add moisture, it changes state. You test, it gives feedback. You adjust.
Start with 5 oz vegetable-tanned leather, this alone cuts 80% of beginner frustration. Tape the back. Dampen it until it’s cool and honey-colored, not soaked. And keep every piece of metal away from it while it’s damp. That’s the foundation. Everything else, the intricate stamping, the deep carving, the beautiful dye work, builds on this one, well-prepared surface.
Your first piece won’t be perfect. Mine weren’t. But if the leather is properly cased, your mistakes will be clean, and you’ll be able to see exactly what to change next time. That’s progress you can build on.
