
Learn How to Emboss Leather for Sharp, Lasting Stamp Designs
This post contains affiliate links. As an Amazon Associate, we earn from qualifying purchases.
To emboss leather, you apply pressure, and often heat, to dampened leather using a stamp, die, or roller to create a raised or recessed pattern. The leather must be at 10±2% moisture content for crisp results. The three core methods are pressing (industrial), rolling (industrial), and stamping (manual), with the technique chosen based on the scale of the project and the leather type.
That moisture window is the whole game. Get it wrong by a few percent and your stamp goes fuzzy, the edges bleed, and the pattern loses definition before it even dries. Most guides say “dampen the leather” and leave you guessing. I’ll give you the number.
What follows is a breakdown of the three methods, the essential prep step, the tools that matter more than the brand name, and the one storage mistake that flattens your work within a year.
Key Takeaways
- Aim for 10±2% moisture content in the leather before stamping; a surface spray that absorbs in 3-5 seconds usually hits this mark.
- For manual work, a solid maple or poly mallet (like a Barry King) matters more than an expensive stamp; it transfers clean force without vibrating your hand numb.
- Vegetable-tanned, unfinished leather is the most receptive to pressure; chrome-tanned or finished leathers resist deep, crisp impressions.
- Never store embossed leather in plastic; maintain 40–60% humidity in a breathable cotton bag to prevent the embossing from relaxing and flattening.
- If you only wet part of a panel, an “aureole” or permanent water line will form around the damp area, always wet the entire surface evenly first.
The Three Core Methods: Press, Roll, and Stamp
Industrial leather production uses presses and rollers. Hand craft uses stamps. The machine you don’t own still tells you something about how leather behaves under ideal force.
A hydraulic press applies sustained, even pressure and heat across a large hide. The leather sits between two plates, the bottom plate holds the negative of your pattern. Because the pressure is total and the dwell time is controlled (often 2-5 seconds), the embossing is intense and uniform. This is how you get that perfect, consistent corrected grain leather on a mass scale. The press is why a brand-new belt has that sharp, all-over texture.
Roller embossing works like an old-fashioned mangle. A heated cylinder engraved with a pattern rolls over the damp hide. It’s faster for continuous patterns but can produce a slightly less deep impression than a press. You’ll see this method used for creating long runs of embossed leather for upholstery or garments.
Then there’s stamping. This is the manual method. You position a metal die on the leather and strike it with a mallet or apply pressure with a clamp. This is where you have direct control. The variables are your arm, your tool, and your prepared leather. A study on grain side leather decoration notes that parameters must be adapted to the specific leather for a durable result, something you do by feel and test strikes when you’re at the bench.
The part nobody mentions: On a hydraulic press, the standard test parameters are 120–140 °C at 2–5 MPa of pressure for 2-5 seconds. Your manual stamp will never hit those numbers, which is why perfect leather preparation is your only leverage.
Preparing the Leather: The 10±2% Rule
The leather will tell you what it needs. You just have to know how to listen. The universal signal is moisture content.
For embossing, the ideal range is 10±2% moisture. How do you hit that without a moisture meter? You case the leather. Spray or sponge water evenly across the entire grain side. Wait. The water should soak in within 3 to 5 seconds, leaving a dark spot that quickly fades to a cooler, damp feel. If it beads up or sits on the surface, the leather is too heavily finished or oily. If it disappears instantly, it was too dry.
I learned this the hard way on a custom belt project. I was in a hurry and only misted the area around my stamp. The result was a crisp bison motif surrounded by a faint, permanent halo where the dry leather met the damp. That’s the “aureole” George de Récy describes in his 1913 manual The Decoration of Leather, an uneven water line that embeds itself as a stain. Now I wet the whole panel, every time.
| Leather Type | Preparation Method | Risk If Skipped |
|---|---|---|
| Unfinished Vegetable-Tanned | Even surface spray; absorbs in 3-5 sec. | Stamp impression will be weak and fuzzy. |
| Chrome-Tanned / Finished | Heavier misting; may require longer soak. | Pattern will not hold; leather may resist. |
| Very Thick Leather (>4mm) | Submerge or wet both sides thoroughly. | Only the surface compresses, creating a shallow, distorted impression. |
This process of wetting is the first, most critical step in how leather is made pliable for transformation. It opens up the fiber structure so it can accept and retain a new shape. The water acts as a temporary lubricant between the collagen fibers, letting them slide and compact into the new form you’re pressing onto them.
Tools You Actually Need
You can spend a fortune on specialized stamps. Start with the hammer. A cheap, poorly balanced mallet transfers shock back into your hand and forearm, causing fatigue and inconsistent strikes. It’s the vibration that ruins your line work.
For consistent tooling, a solid maple or poly mallet from a brand like Barry King is the foundation. The weight is forward, the strike is clean, and your hand isn’t buzzing after fifty hits. That’s more important than owning every stamp in the Craftool Pro catalog. My go-to set is a basic Tandy Leather tooling kit, the stamps are fine, but I replaced the mallet immediately.
Here’s what a functional starter kit looks like: – A solid face mallet (12-16 oz) – A set of basic geometric stamps (background, beveler, seeder) – A modeling spoon or stylus – A sturdy, flat pounding surface (marble slab or poly board) – A C-clamp for pressure-based embossing – A natural sponge and spray bottle
The underrated hero in that list is the modeling spoon. After you’ve stamped, you use this rounded tool on the back of the leather to smooth and raise the design from behind. This is how you get that high, rounded relief on traditional cuir bouilli work without crushing the grain. It’s a finesse step that most beginners skip.
Step-by-Step: Manual Stamping Technique
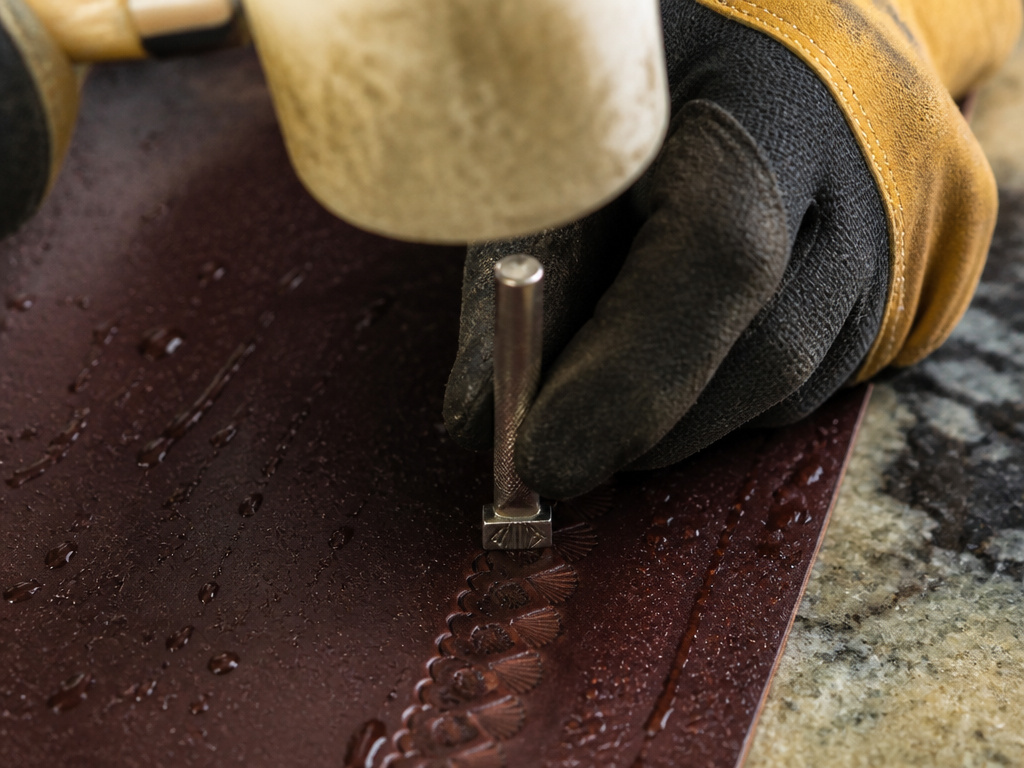 Let’s walk through a manual stamping job on a piece of vegetable-tanned leather. This is where the theory meets the bench.
1. Case the Entire Piece.
Mist the leather evenly until it reaches that 10±2% window, dark, absorbed, cool to the touch. Let it sit for a minute or two until the surface sheen disappears. This is called “airing up.”
2. Position the Stamp.
Place your metal stamp exactly where you want the impression. Hold it perfectly vertical. Any tilt will give you a shadow impression on one side.
3. Strike with Control.
Don’t try to crush it in one blow. Use a series of lighter, controlled strikes with your mallet, working around the edges of the stamp to ensure every corner gets even pressure. Listen for a change in sound, a solid “thud” means you’re hitting a well-supported, damp hide; a sharp “crack” means the leather is too dry.
4. Check and Re-strike.
Lift the stamp carefully. If the impression is faint, the stamp can often be placed back in its own indent for a second, precise hit. If the leather seems to be swelling back, it’s too wet. Wait five minutes.
5. Model from the Back (Optional).
For high relief, flip the leather. Use a modeling spoon to gently burnish and stretch the flesh side from behind the stamped area, pushing the design upward. This is how you get dramatic depth without over-compressing the grain.
6. Let it Dry Flat.
Resist the urge to speed-dry it with heat. Let the leather air-dry at room temperature, pressed flat under a weight if necessary. This sets the new fiber arrangement.
Where this goes sideways: Using a hair dryer or heat gun to dry embossed leather. The heat can melt the topcoat on finished leathers into a plastic-like layer that traps moisture underneath and clouds the finish. I’ve seen pieces where this “quick fix” created a permanent blotch that no conditioner could fix.
Why Leather Type Dictates Your Results
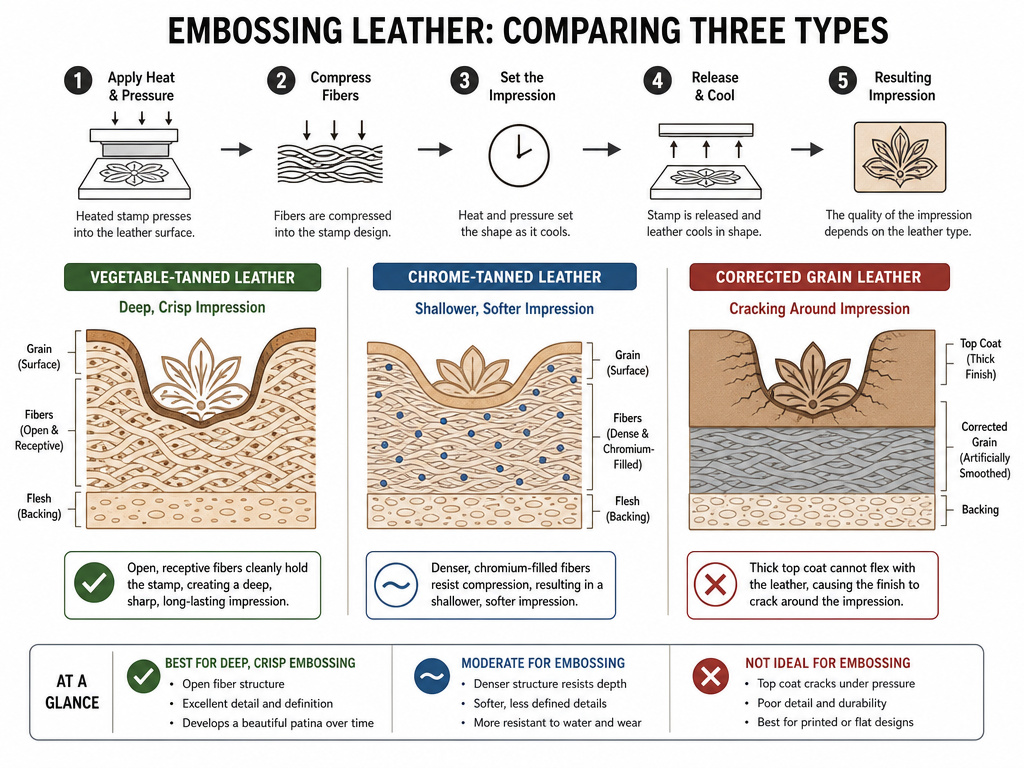 Not all leather is created equal for embossing. The tanning process fundamentally changes how the hide reacts to pressure and moisture.
Vegetable-Tanned Leather: This is the gold standard. The natural tannins leave the fiber structure open and receptive. It’s why this leather is used for 95% of hand-tooling and carving. It takes a crisp impression and holds it as it dries. An analysis of vegetable-tanned leather research confirms its superior shape retention under embossing parameters.
Chrome-Tanned Leather: This is the soft, pliable leather in most jackets and bags. The chromium salts fill the fibers, making them more water-resistant and less malleable. You can emboss it, but the impression will be shallower and may relax over time. It often requires more moisture and pressure.
Corrected Grain or Finished Leathers: These have a surface coating or pigment layer. Embossing can crack this finish if done too dry or too cold. The pattern might look good initially but chip away with flexing. This is a key difference when testing leather quality, a top coat that cracks isn’t a flaw in the hide, but a mismatch of technique and material.
| Goal | Recommended Leather | Reason |
|---|---|---|
| Deep, permanent tooling | Full-Grain Vegetable-Tanned | Open fibers, no finish, best shape retention. |
| Subtle, decorative stamping | Top-Grain Chrome-Tanned | Can accept a clean impression with proper prep. |
| Simulating exotic textures | Corrected Grain Cowhide | Dense, uniform surface ideal for roller embossing of patterns like crocodile. |
Troubleshooting Common Embossing Problems
Your stamp looks muddy. The edges aren’t sharp. The leather is sticking to the die. These are feedback, not failure.
Problem: Fuzzy, indistinct impression.
Likely Cause: Leather is too dry. The fibers aren’t lubricated enough to move and compact cleanly. The Fix: Re-wet the leather thoroughly and let it return to the 10±2% window. The water must penetrate, not just sit on top.
Problem: Stamp sinks in too deep, edges bleed.
Likely Cause: Leather is too wet. The fibers have turned to mush and offer no resistance. The Fix: Let the leather “air up” until the surface loses its sheen and feels cool and damp, not wet. This could take 10-20 minutes.
Problem: Leather sticks to the stamp.
Likely Cause: The stamp is too hot (for heated methods) or the leather has a sticky finish. The Fix: For heated stamps, lower the temperature. For all stamps, dust the leather surface with a tiny amount of talc or use a stamp release agent.
Problem: Embossing flattens out over time.
Likely Cause: Insufficient pressure during stamping, or the leather was stored in a dry or overly humid environment. The Fix: Ensure your strikes are firm and even. For storage, maintain 40–60% relative humidity and use a breathable cotton bag, never plastic. Plastic traps moisture and can lead to mold, which stains and weakens the fibers.
Preserving Your Embossed Work
An embossed pattern is a physical deformation of the leather grain. To keep it, you must maintain the leather’s condition.
After the piece is completely dry, you can apply dyes or finishes. If you’re dyeing leather, do it after embossing. The dye will settle into the recesses and highlight the pattern. Then, apply a light coat of a non-silicone conditioner to keep the fibers supple.
For storage, think steady-state. A cool, dry place with 40–60% humidity is ideal. Fluctuations in humidity cause leather to expand and contract, which slowly relaxes the embossed shape. Don’t stack heavy items on top of embossed pieces, as sustained pressure can permanently flatten the relief.
Easy to miss: The filling behind deep embossed motifs in historical pieces. Very high relief was often stabilized with paper fillers or hot glues on the backside to support the shape. For a modern project, a flexible acrylic filler can do the same job if you need the design to withstand handling.
Frequently Asked Questions
Can you emboss leather at home without a machine?
Yes, absolutely. Manual stamping with a mallet or using a simple C-clamp to apply pressure are effective home methods. The key is using the right leather (unfinished vegetable-tanned is best) and perfecting the moisture content. A C-clamp can apply steady pressure for 20 minutes, often yielding a deeper, more durable impression than a mallet strike.
What’s the difference between embossing and debossing?
Embossing raises the design, creating a raised pattern against a recessed background. Debossing presses the design down into the leather, creating an indented pattern. The techniques are similar, but debossing uses a male die that pushes into the leather, while embossing often uses a female die that pushes the leather around the design upward.
Can you remove an embossed pattern from leather?
Not completely. You can dampen the leather and try to smooth it out from the back, but the compressed fibers will always retain some memory of the deformation. The original grain side leather decoration will be permanently altered. It’s far better to test on scrap first.
Is embossed leather lower quality?
Not inherently. Embossing is a decorative technique. However, embossing is sometimes used to cover imperfections on corrected grain leather. The quality depends on the underlying hide. A full-grain leather that is lightly embossed retains its durability, while a heavily corrected leather embossed with a deep pattern might have less structural integrity.
How do you keep the stamp from slipping?
Ensure the leather surface is damp, not wet and slippery. Hold the stamp firmly in a perfectly vertical position. For complex or multi-strike patterns, you can use a simple stamp positioning tool or lightly tape the stamp in place for the first guiding strike.
The Bottom Line
Embossing leather boils down to controlling one variable: moisture. Hit the 10±2% window, and even basic tools will give you a crisp, lasting impression. Miss it, and the most expensive stamp in the world won’t save you.
For your first project, grab a piece of Herman Oak or Shaheen vegetable-tanned leather, a Barry King mallet, and a single background stamp. Practice the casing and striking rhythm on scrap until the impression looks clean and deep. That muscle memory is worth more than a shelf full of unused tools.
Remember, embossing is a commitment. You’re permanently rearranging the fibers. So wet the whole piece, strike with patience, and let it dry slowly. The leather will hold the story of your work for a long time.
