
Essential Leather Craft Basics: A Practical, Data-Driven Starter Guide
This post contains affiliate links. As an Amazon Associate, we earn from qualifying purchases.
This post contains affiliate links. As an Amazon Associate, we earn from qualifying purchases.
Start with two facts. Leather thickness is measured in ounces, where one ounce equals 1/64 of an inch. The current global quality benchmark, ISO 14931:2021(E), defines everything from tensile strength (minimum 12 N/mm²) to permissible chromium content (under 3 mg/kg). This is the language you’ll need.
The ISO spec isn’t abstract. It translates directly to what you feel and see. Tensile strength determines how a belt resists stretching; chromium limits matter for skin safety. Your first project tests your ability to read the material’s physical language, not your artistic vision.
What follows: the three essential tools every guide overcomplicates, the performance specs hidden on every hide’s tag, and the one simple first build that proves you can execute to standard. We’ll cut through the folklore.
Key Takeaways
- Skip the pre-packaged “starter kit.Invest first in three tools: a self-healing cutting mat, a sharp utility knife or round knife, and a stitching awl with a forged steel shaft and a comfortable handle.
- Understand “leather grades” are marketing, not quality tiers. Full-grain, top-grain, and corrected grain describe processing stages, with full-grain being the strongest and most durable.
- Your first material should be vegetable-tanned tooling leather, 4-5 ounces thick. It’s affordable, consistent, and forgives beginner carving and stitching errors.
- Leather conditioners are not universal. Using a heavy oil like mink oil on a delicate aniline-dyed leather will clog the pores and darken it unevenly within weeks.
- Practice the core skill, consistent hand-stitching, on scrap leather for an afternoon before starting any project. Muscle memory beats a complex pattern every time.
The Leather Basics: Terms, Standards, and Sensations
You can’t work a material you can’t name. Leather thickness, expressed in ounces, is your first tactile spec. A 4-5 ounce piece is 1/16 to 5/64 of an inch thick, stiff enough for a wallet body, thin enough to bend without fighting you. A 7-8 ounce leather feels substantial, a solid 1/8 inch you’d use for a belt.
The global standard, ISO 14931:2021(E), codifies what “quality leather” means for apparel. It mandates a minimum tear load of 15 Newtons and a tensile strength of 12 N/mm². These numbers determine whether a bag strap snaps under a laptop’s weight or lasts a decade.
Technical Snippet: ISO 14931:2021(E) is the international specification for apparel leather. It sets performance thresholds for mechanical properties (tear load ≥15 N, tensile strength ≥12 N/mm²), chemical safety (Chromium VI <3 mg/kg, formaldehyde ≤75 mg/kg for skin contact), and durability (pigmented leather must withstand ≥50,000 dry flex cycles). Compliance indicates material consistency, not necessarily artisan-grade quality.
Leather grain is the pattern of hair follicles and pores on the animal’s hide. It’s the source of natural strength and character. The side with the grain is smoother and more resistant to abrasion; the flesh side is fibrous and absorbent. Every cut and stitch decision starts with identifying the grain.
Forced analogy patterns are banned here. We don’t compare this to anything else. The material’s behavior is unique.
Tool Realities: Skip the Kit
Pre-packaged starter kits are a trap of false economy. You’ll use the cheap plastic mallet twice before its head deforms, the flimsy stamping tools won’t hold an edge, and the included “leather” is often split-grade suede. You’ll replace 80% of it within six months.
Here’s the practical takeaway. Begin with three quality tools, in this order: 1. A self-healing cutting mat, at least 18×24 inches. It protects your work surface and keeps your blade sharp. 2. A sharp cutting tool. A utility knife with replaceable blades (like an Olfa) is perfect for straight lines. A round knife (head knife) is the traditional choice for curves, but it requires regular honing. 3. A stitching awl. This is your primary joining tool for anything thicker than a wallet. The Tandy Leather Craftool Pro Stitching Awl is a reliable entry point. Machine stitching on leather requires specialized, expensive equipment and a steep learning curve.
Common mistake: Buying a $300 set of decorative stamping tools before you can cut a straight line or sew a square. Decoration is the last 10% of the craft. Fundamentals are the first 90%.
| Tool Category | Essential First Buy | What to Avoid Initially |
|---|---|---|
| Cutting | Utility knife, cutting mat | Rotary cutter, laser cutter |
| Joining | Stitching awl, needles, thread | Leather sewing machine |
| Finishing | Sandpaper (220, 400 grit), wooden burnisher | Electric edge paint applicator |
| Decoration | Scratch awl for marking | Full set of geometric stamping tools |
A sharp blade is a safe blade. A dull one requires more force, skips, and can cut you instead of the leather. Change your utility knife blade at the first sign of drag.
Material Selection: Decoding the Hide
Marketing terms like “genuine leather” are worse than useless. They’re deliberately misleading. That label simply means the product contains some real leather, often a heavily processed split layer bonded to vinyl. It tells you nothing about durability, breathability, or craftsmanship.
Real leather is categorized by its layer from the hide and its tanning method. This is the vocabulary that matters:
- Full-Grain Leather: The top layer of the hide, including the entire grain. It has the highest tensile strength and develops a rich patina over time. This is the gold standard for heirloom items.
- Top-Grain Leather: The same top layer, lightly sanded to remove minor imperfections. It’s more uniform in appearance but slightly less durable than full-grain.
- Corrected-Grain Leather: Heavily sanded and then embossed with an artificial grain pattern. It’s uniform and affordable but lacks the natural character and longevity.
For your first projects, reach for vegetable-tanned tooling leather. It’s firm, pale tan in color, and accepts dyes, stamps, and tooling beautifully. It’s also the most forgiving for beginners because it holds its shape. Chrome-tanned leather is softer, more water-resistant, and comes in colors, but it’s harder to tool and requires different adhesives.
The difference between full-grain and top-grain is a matter of surface treatment, not inherent quality. Both are excellent choices for different applications. Understanding this is part of learning how to assess leather quality before you buy.
Where this goes sideways: Choosing a first project with exotic leather like stingray or ultrathin lambskin. These materials require advanced techniques for skiving, gluing, and edge finishing. You’ll waste expensive stock.
The Real First Project: An ISO-Compliant Plan
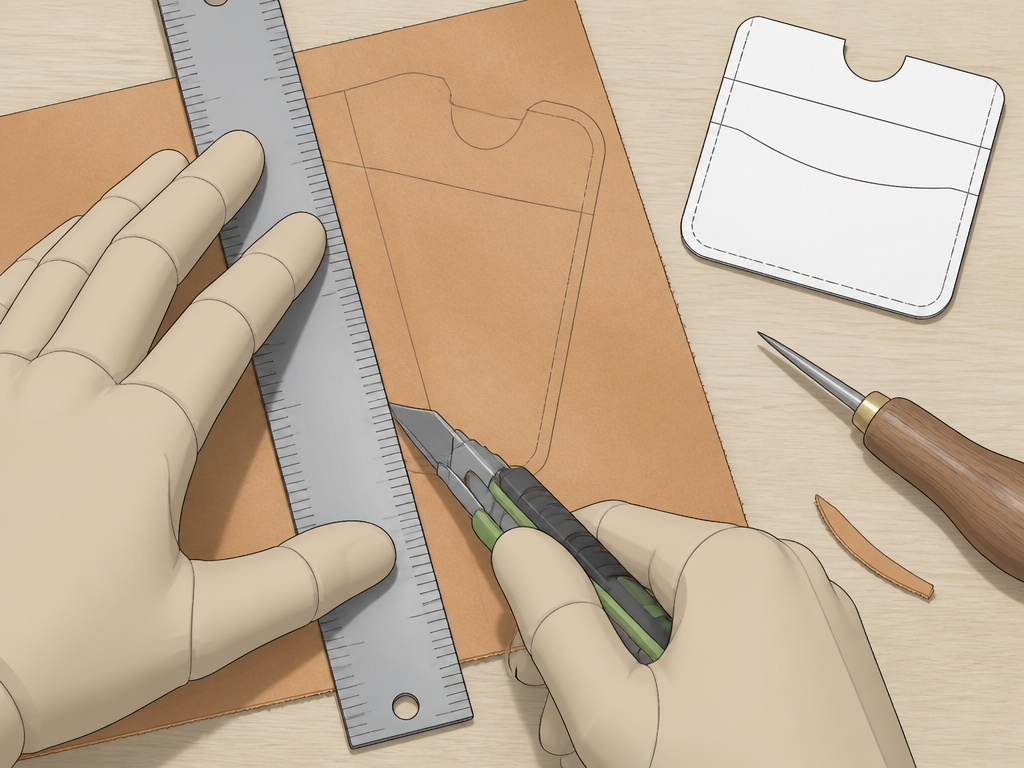 Your goal is to execute a simple object like a card holder or key fob with clean cuts, straight stitches, and finished edges.It uses a small amount of material, teaches you to work to a pattern, and results in a functional item.
Follow this progression: 1. Design & Pattern: Draw your design on paper. Include a seam allowance (typically 1/8 inch) around all edges that will be stitched. Card holder dimensions are roughly 4.5 inches tall by 3.75 inches wide, folded. 2. Transfer & Cut: Place your paper pattern on the flesh side of your 4-5 oz vegetable-tanned leather. Use a scratch awl or ballpoint pen to trace. Cut just outside your line with a sharp utility knife, using a metal ruler for straight edges. 3. Punch Stitching Holes: Mark your stitch lines. Use a diamond-point awl or pricking irons to punch holes. Consistent spacing (about 3mm) is crucial. 4. Stitch: Use a stitching awl with pre-waxed thread. The saddle stitch (using two needles) is the strongest hand-sewn seam, but a basic running stitch with an awl is fine for a first attempt. Pull each stitch tight with consistent tension. 5. Finish Edges: Sand the rough edges with 220-grit sandpaper, then 400-grit. Apply a dab of water and burnish with a wooden slicker or even a piece of canvas. The friction heats the leather fibers, creating a smooth, polished edge.
The Montana State University leathercraft manual and the Boy Scouts leatherwork merit badge pamphlet are classic guides that break down these fundamental steps without overcomplicating them. They’re timeless.
I stopped using metal edge creasers heated with a direct flame after one overheated and scorched a perfect piece of bridle leather. The burn went a millimeter deep, and the piece was ruined. I now use electric creasers for precise, safe temperature control. The lesson wasn’t about the tool. It was about respecting leather’s tolerance, it’s a natural material, not a plastic to be melted.
Process & Technique: The Why Behind the Hand Motion
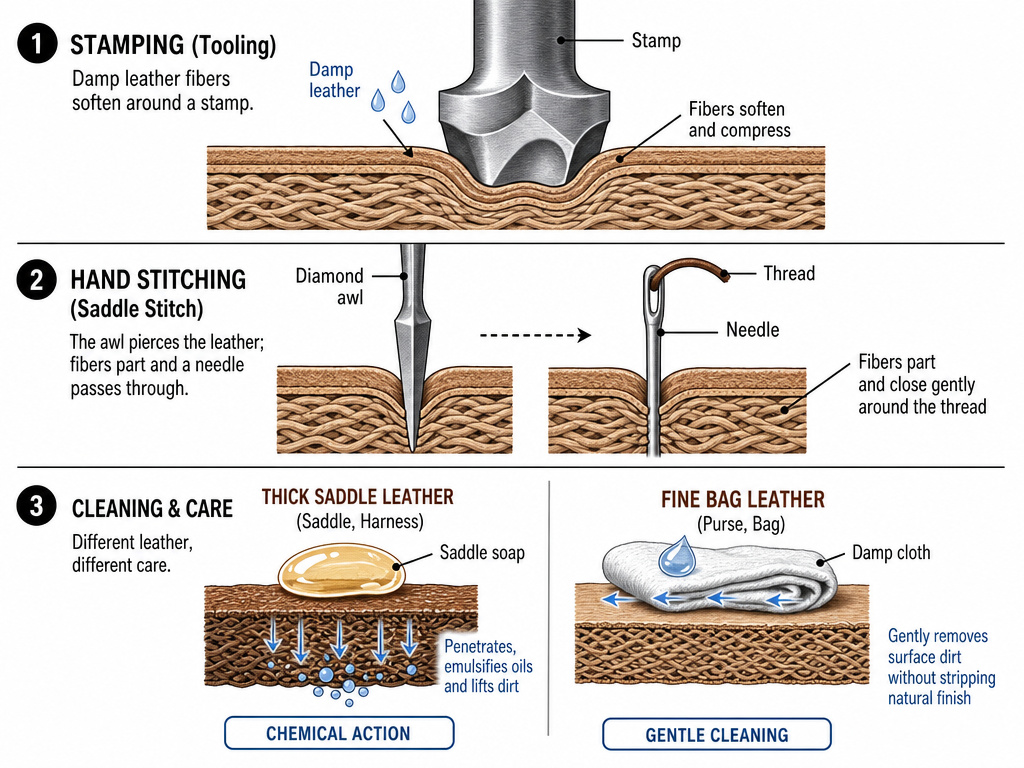 Every step in leatherworking has a physical reason. Understanding the “why” turns you from a follower of instructions into a craftsperson.
Why dampen leather before tooling or stamping?
Vegetable-tanned leather is like dense felt. Adding moisture (called “casing”) softens the collagen fibers, allowing them to be compressed and reshaped by a stamp without cracking the surface. The leather should feel cool and slightly soft to the touch, not wet.
Why use a diamond-shaped awl for stitching holes?
A diamond awl pushes the leather fibers apart, creating a slit. When the round thread passes through, the fibers close around it, creating a near-watertight seal that grips the thread. A round hole, punched or drilled, leaves fibers permanently severed, resulting in a weaker seam.
Why saddle soap is for saddles (and heavy boots only):
Saddle soap contains alkali salts designed to lift deep, ground-in dirt and sweat from thick, oil-rich work leathers. On a fine jacket or bag, those salts will strip away the natural oils and finish over time, leaving the leather stiff and dull. For general cleaning, a damp cloth is almost always better.
This is where conditioning leather becomes a chemical conversation, not a cosmetic one. You’re replacing the oils that evaporate or are cleaned away.
Adhesives, Dyes, and Finishes: A Chemical Primer
You can’t stitch everything. For some bonds, you need glue. Standard white or yellow wood glue doesn’t adhere well to leather’s oily surface and becomes brittle. Contact cement (like Barge Original) is the standard. It’s applied to both surfaces, allowed to become tacky, and then pressed together for a permanent, flexible bond.
For gluing leather to other materials like wood, the preparation of both surfaces is key. Lightly sanding the leather’s flesh side and the wood creates a better mechanical bond for the adhesive.
Leather dyes penetrate the fibers; leather paints sit on top. Alcohol-based dyes (like Fiebing’s) dry quickly and are durable but can bleed. Water-based dyes are easier to control for beginners. If you want to add color without obscuring the grain, dye is your choice. For opaque, graphic designs, you need specialized leather paints.
A finish protects your work. Acrylic resolene seals the surface and is water-resistant. Wax-based finishes (like beeswax) offer a more natural, matte look but require more upkeep. Never use a silicone-based spray; it creates a slippery film that prevents future conditioning or repair.
Beyond the Basics: Next Skills and Common Pitfalls
Once you’ve mastered a card holder, your next skill should be skiving, thinning the edge of leather to reduce bulk in a seam. A sharp skiving knife and a light touch are required. Your next project could be a simple zippered pouch, which introduces working with lining fabric and installing a zipper.
The most common pitfalls have predictable timelines: * Using a dull blade: Your cuts will be ragged, requiring more sanding, and you’ll fatigue your hand within twenty minutes. * Inconsistent stitch tension: Loose stitches collect dirt and fail first; overly tight stitches can cut the leather over months of flexing. * Skipping the edge-burnishing practice: Unfinished edges fray. A well-burnished edge lasts the life of the item.
The Ethiopian leather goods construction standard, ES 6847-2021, outlines industrial construction guidelines. While not needed for a hobbyist, it frames the craft as a series of measurable, repeatable steps, a useful mindset.
What most people get wrong: Believing a complex pattern is a sign of advanced skill. A perfectly executed simple pattern is the true mark of competence. Complexity often hides poor fundamentals.
Frequently Asked Questions
What is the absolute easiest leather craft for a beginner?
Rectangular key fob. It requires one straight cut, four hole punches, a basic stitch, and edge finishing. It teaches measuring, cutting, hole spacing, stitching, and burnishing in under an hour with minimal material waste.
Can I use regular scissors to cut leather?
No, not for anything thicker than 1 mm (about 2 oz). Household scissors will crush and tear the fibers, leaving a ragged edge. They will also dull quickly. A sharp utility knife or dedicated leather shears is the correct tool.
How do I fix a mistake like a misplaced stitch hole?
If the hole is minor and misplaced, you can often stitch through it and adjust your spacing for the remaining holes. For a major error, the cleanest fix is to cut a new piece. Leather doesn’t forgive like fabric; it documents every error.
Is it cheaper to make your own leather goods than to buy them?
Initially, no. The investment in tools and quality materials means your first wallet will be significantly more expensive than a store-bought one. The value comes in creating a custom, repairable, heirloom-quality item and acquiring a skill.
What’s the one tool I might not think I need but really do?
Stitching pony**. It’s a clamp that holds your work at a comfortable angle, leaving both hands free to manage the needles and thread. Your stitching consistency will improve dramatically, and hand fatigue drops to near zero.
How do I sharpen my tools?
Sharpening stone for your knives and a fine steel honing rod for your awls. Learn to maintain a burr-free edge. A sharp tool is safer, produces cleaner results, and is more enjoyable to use. Dull tools make you work against the material.
Before You Go
The threshold for moving from curious to competent is the first project you finish. Not the one you plan, or buy tools for, but the one you cut, stitch, and hold in your hand. That object, with its imperfect stitches, is the only credential that matters.
Your next step is to buy a square foot of scrap vegetable-tanned leather and practice cutting a perfect circle, punching a straight line of evenly spaced holes, and sewing a six-inch seam with consistent tension this week.The leather will tell you what you need to learn.
Everything changes if your goal is to produce items for sale. The calculus shifts from skill-building to time efficiency, material yield, and consistency, topics for another guide. For the hobbyist, the path is clear. Master the three tools. Learn the one material. Finish the simple project. The rest unfolds from there.
