
Leather Burnisher Explained: Your Guide to This Edge Tool
This post contains affiliate links. As an Amazon Associate, we earn from qualifying purchases.
This post contains affiliate links. As an Amazon Associate, we earn from qualifying purchases.
A leather burnisher is a hand-held or powered tool used to compress, smooth, and seal the cut edges of leather. It works by generating controlled friction and heat, which fuses the exposed fibers into a dense, polished, and durable edge. This process, called burnishing, is essential for finishing items like wallets, belts, and bags made from vegetable-tanned leather.
The physics are simple. You rub the tool against the raw edge. Friction creates heat. That heat, combined with slight moisture from a burnishing agent like water or gum tragacanth, softens the leather’s natural oils and waxes. The pressure from the tool then forces the loose fibers to lie down and bond together. The result is the leather’s own structure transformed into a sealed barrier.
What follows is a breakdown of the tool itself: the different materials (wood, glass, metal), the choice between hand-powered patience and machine-powered speed, and the one type of leather where this entire process falls apart. By the end, you’ll know what a burnisher is, exactly when to reach for it, and when to put it down and pick up a bottle of edge paint instead.
Key Takeaways
- Burnishing works by friction, heat, and compression, not by adding a layer. It changes the leather’s own fibers into a sealed edge.
- Vegetable-tanned leather burnishes beautifully; chrome-tanned leather typically does not and usually requires edge paint.
- Hand burnishers (wood, glass, bone) offer control for detailed work, while powered options (Dremel tools, dedicated machines) save time on long, straight edges. The most common mistake is skipping the preparatory steps: sanding the edge smooth and applying a bevel are essential for a professional result. A Barry King wooden hand burnisher.amazon.com/dp/B00UVBK0HQ?linkCode=osi&th=1&psc=1&tag=test-20) or a StryiCarving model, is the most versatile starting point for any leatherworker.
How a Leather Burnisher Works: Friction, Heat, and Compression
Think of a leather edge under a microscope. When you cut it, you expose a frayed mass of individual fibers. A burnisher doesn’t cut these away or glue them down. It convinces them to stick to each other.
The process relies on three elements working in sequence: friction from the tool generates heat, which softens the leather’s binders, allowing pressure from the burnisher to physically compress the fibers into a unified, glossy surface.
Here’s the practical takeaway. The heat generated is mild but critical, usually just enough to make the edge warm to the touch after 30 seconds of steady rubbing. Too little heat, and the fibers won’t fuse. Too much, from a powered tool spinning too fast, and you’ll scorch the leather, leaving a permanent dark burn mark that smells faintly of burnt toast. The sweet spot is a consistent, moderate warmth.
This is why the type of leather matters so much. Vegetable-tanned leather is packed with natural tannins and oils that react perfectly to this heat-and-pressure combo. Chrome-tanned leather, softened by mineral salts, has a looser fiber structure. When you try to burnish it, the fibers often just bend and spring back instead of melting together. That’s the leather telling you it needs a different finish.
Types of Leather Burnishers: Hand, Powered, and Everything In Between
Your choice here dictates the rhythm of your work. Hand tools demand patience and elbow grease but give you immense tactile control. Powered tools trade that control for consistency and speed on production runs.
Let’s break down the categories. This isn’t just about shape; it’s about the material’s relationship with heat and the leather.
| Burnisher Type | Best For | Heat Retention & Notes |
|---|---|---|
| Wood (e.g., Cocobolo, Maple) | Most projects, especially beginners. | Low heat retention. The natural grain provides gentle friction. The classic choice. |
| Glass (e.g., Regmar, Barry King) | Achieving a ultra-high gloss finish. | Very low heat retention. The slick surface polishes without adding friction. |
| Metal (Brass/Aluminum) | Heavy-duty burnishing on thick leather. | High heat retention. Risk of burning the edge if used too long in one spot. |
| Powered (Dremel with bit) | Long, straight edges on multiple items. | Variable heat based on speed. Requires a steady hand to avoid grooves or burns. |
Hand Burnishers: The Foundation
A basic wooden slicker is where everyone should start. A hardwood like cocobolo or maple is ideal, it’s durable, won’t splinter, and warms slowly in your hand. The shape is key: rounded for convex edges, grooved for fitting over specific thicknesses. I keep a simple StryiCarving wooden slicker on my bench for quick touch-ups. The wood warms with use, and you develop a feel for the pressure needed.
Glass burnishers, like the Regmar Glass Slicker, are a step up for final polishing. They glide almost frictionlessly, relying on pressure alone to burnish. You won’t feel the heat build up, which is the point, it eliminates the risk of scorching for that last, mirror-like pass.
Metal burnishers, such as the Daytesy Aluminum model, are tools you grow into. They work fast because metal holds heat. That’s also their danger. If you don’t keep the tool moving, you’ll transfer too much heat too quickly and cook the leather edge. I reach for brass only on thick belt ends or strap work, and I never let it sit.
Powered Burnishing: When Speed is the Goal
For powered work, a variable-speed rotary tool like the Dremel 3000 is the recommended entry point. The “variable speed” part is non-negotiable. You must be able to dial it down for delicate edges. A generic burnishing bit can work, but as noted in our research, cheap bits often have a wobble due to a off-center post. That wobble turns a smooth burnish into a choppy, uneven mess.
A dedicated bench-top burnisher, like a Cobra machine, is a serious investment for a high-volume workshop. It holds the tool steady while you manipulate the leather, a reversal that makes consistent results much easier. But for a hobbyist, clamping a Dremel to your bench is a solid middle ground. The key is fixing the tool, not your workpiece.
The Step-by-Step Burnishing Process (And Where It Goes Wrong)
Burnishing is the final act in a play that starts the moment you make your cut. Skip the opening scenes, and the finale will disappoint.
- Prepare the Edge. This means sanding. After cutting and beveling, you must sand the edge perfectly smooth with progressively finer grits, start at 400, move to 800. Any tiny nick or ripple left here will be magnified, not hidden, by burnishing. The edge should feel like polished stone to your fingertip before you add any moisture.
- Apply a Burnishing Agent. Dampen a sponge or cloth with water, gum tragacanth, or a product like Tokonole. Apply a thin coat to the edge. You want it damp, not wet. A soaked edge will swell the fibers and make them mushy, preventing a clean compression.
- Generate Friction. Now use your burnisher. For a hand tool, use firm, consistent pressure and move it back and forth along the edge. You’ll feel resistance at first, then a gradual slickness as the fibers compress. For a powered tool, use light pressure and keep the leather moving to avoid friction burns in one spot.
- Repeat and Polish. Let the edge dry for a minute. Apply another very light coat of your agent, then burnish again. This second pass is where the high gloss appears. For a glass-like shine, a third pass with a dry glass burnisher can be the final step.
Where this goes sideways: Using a hair dryer to speed up drying between steps. I recommend against it every time. The rapid, uneven heat can cause the leather to dry out and contract underneath the sealed edge, leading to micro-cracks weeks later. Patience is part of the process.
The entire sequence hinges on the initial prep. A poorly sanded edge will never burnish cleanly, no matter how expensive your tool is. That’s the part people rush. Don’t.
Leather Type Is Everything: When Burnishing Works (And When It Doesn’t)
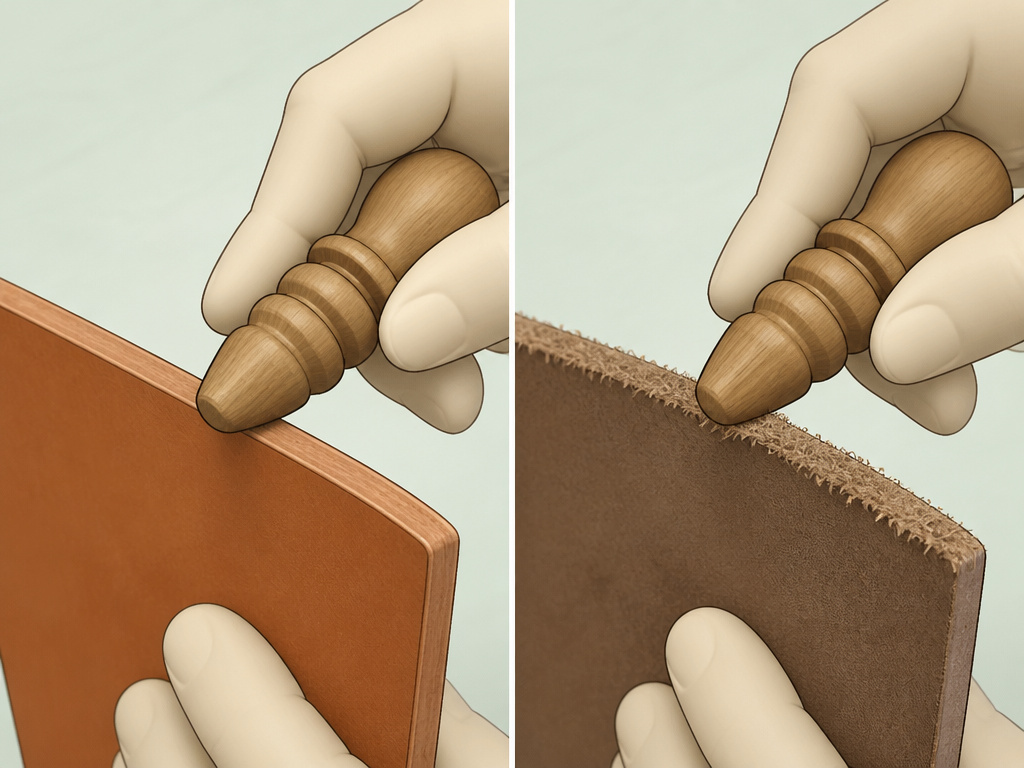
Your burnisher is not a universal tool. Its effectiveness is dictated by the leather’s tannage. This is the single most important filter for your project.
Vegetable-Tanned Leather is the burnisher’s best friend. Its dense, responsive fiber structure is designed to compress and polish. This is the leather you see in classic wallets, belts, and bags that develop a rich patina. The entire burnishing process is built for this material.
Chrome-Tanned Leather is the burnisher’s polite adversary. The chrome salts make it soft, supple, and water-resistant, but they also loosen the fiber web. When you try to burnish it, the fibers often refuse to fuse. You’ll get a slight polish, but the edge remains fuzzy and vulnerable. For chrome-tanned goods, you usually need to edge paint leather for a clean finish.
This distinction reshapes your entire edge finishing strategy. It’s not a minor detail. Choosing the wrong method for your leather type is the fastest way to an amateur-looking result.
Essential Companion Tools for Burnishing

A burnisher doesn’t work in isolation. It’s the star of a supporting cast. Trying to burnish without these tools is like trying to paint a wall without sanding or taping.
- Edge Beveler: This tool cuts a rounded profile on the sharp leather corner before you start. A rounded edge compresses more evenly than a square one. If you skip this, your burnished edge will look bulky. Understanding the purpose of a leather edge beveler is fundamental.
- Sanding Blocks & Paper: From rough shaping (180 grit) to final pre-polish (1000 grit), sanding creates the smooth canvas the burnisher works on. This is 80% of the effort.
- Burnishing Agents: Water is the simplest. Gum tragacanth is the traditional choice, a natural gum that helps bind fibers. Modern synthetic agents like Tokonole are popular for their consistency and quick drying time.
- Skiving Knife or Tool: For folded edges or reducing thickness where layers meet, a clean skiving technique ensures edges are flush before burnishing begins. A sharp skiving knife is a precision instrument here.
These are the essential tools for leatherworking that make your burnisher effective.Investing in a Barry King beveler and learning to sand properly will improve your edges more than buying the most expensive burnisher on the market.
Frequently Asked Questions
Can you burnish any type of leather?
No. Vegetable-tanned and some full-grain leathers burnish well. Chrome-tanned, oil-tanned, suede, and nubuck do not respond to traditional burnishing and require alternative finishes like edge paint.
What’s the difference between burnishing and edge painting?
Burnishing compresses and seals the leather’s own fibers. Edge painting applies an opaque, colored resin or paint over the edge. Burnishing shows the leather’s natural edge; edge painting covers it completely. They are different solutions for different looks and leather types.
Do I need a special compound to burnish leather?
Not necessarily. Water works for vegetable-tanned leather. Gum tragacanth or Tokonole will provide better results and more durability, especially on items that will see wear.
Is a powered burnisher better than a hand tool?
“Better” depends on your goal. Powered tools are faster and more consistent for long, straight edges on production work. Hand tools offer superior control for curved edges, corners, and detailed pieces, and they help you develop a feel for the material.
Why is my burnished edge still fuzzy?
Three likely causes: the leather is chrome-tanned (and won’t burnish cleanly), you didn’t sand the edge smooth enough before starting, or you’re using too much burnishing agent, which is swelling the fibers instead of helping them fuse.
Before You Go
The real value of a leather burnisher lies in understanding the transformation it facilitates. This is a fundamental process.It’s a mechanical process that rewards preparation and punishes haste.
If you remember one thing, let it be this: burnishing begins with your knife cut and your sanding block, not with the burnisher in your hand. The gloss is the reward for all the hidden work that came before it. For your first project, grab a piece of vegetable-tanned scrap, a wooden slicker, and some water. Sand it smooth, bevel the edge, and feel the change happen under your hands. That tactile lesson, the shift from rough to slick, from porous to sealed, is what turns a simple tool into a cornerstone of the craft.
