
Master How to Edge Paint Leather with Professional Results
This post contains affiliate links. As an Amazon Associate, we earn from qualifying purchases.
This post contains affiliate links. As an Amazon Associate, we earn from qualifying purchases.
To edge paint leather, you build up thin, sanded layers of specialized paint on a prepared edge, ending with a protective wax or topcoat. The critical choice is whether to bevel the edge first, as manufacturers like Le-Tech advise, or keep it sharp and square, as many experienced crafters recommend, this decision alone decides how your paint line will hold.
The manufacturer’s advice seems obvious: bevel the edge to create a recess for the paint to sit in. But a sharp, 90-degree corner creates a physical dam that stops paint from bleeding onto the grain surface. That dam is the single biggest factor in getting a crisp, straight paint line without masking tape. Sanding is your second tool, each coat gets smoothed before the next, building a perfectly uniform surface.
What follows is a breakdown of the tools, the contested steps, and the finishing touches that turn a raw leather edge into a sealed, professional finish. By the end, you’ll know why some paints peel, how to fix adhesion problems before they start, and when to reach for a creasing iron instead of a cloth.
Key Takeaways
- The biggest decision isn’t your paint brand, it’s whether to bevel the edge. Manufacturers say bevel; many pros keep a sharp, square corner to act as a natural paint barrier. Sanding between coats is essential. Skipping it leaves a lumpy, uneven finish that feels rough and looks amateur.
- A basecoat (like Tokonole Edge Gum) isn’t just for color matching. It fills the leather’s porous surface, creating a smooth canvas for your colored paint to adhere to.
- Peeling paint after a week usually means poor surface prep or using the wrong paint type for your leather. Chrome-tan often needs an adhesion promoter.
- Drying time is a lie. Most paints are dry to the touch in an hour, but full cure, where the paint won’t scratch off with a fingernail, takes a full 12 to 48 hours.
The Tool Bench: What You Actually Need
You don’t need a specialty roller pen to start. An awl or a small, stiff brush you already own will work. The real investments are in abrasives and a way to apply heat.
| Tool | Purpose | What Happens If You Skip It |
|---|---|---|
| 400 & 800 Grit Sandpaper | Levels the raw edge and smooths between paint layers. | The first coat of paint highlights every cut mark and fiber, creating a bumpy surface that successive layers can’t fix. |
| Awl or Edge Paint Applicator | Applies a thin, controlled bead of paint. | Using a brush often lays paint on too thick, creating runs and drips that take forever to sand flat. |
| Edge Creaser (S05 tip) | Melts and smooths the first layer of paint into the leather. | The first coat bonds weakly and can peel off in a strip when you sand the second layer. |
| Canvas Cloth | Burnishes wax and smooths paint between sanding stages. | The final finish lacks depth and shine, staying matte and slightly rough to the touch. |
| Paraffin Wax or Topcoat | Seals and protects the painted edge from scuffs and moisture. | The painted edge marks easily and will dull or scratch within a few weeks of handling. |
For the creaser, a single-edge S05 tip is the one to get. The flat side smooths paint, while the pointed edge can help define a crease line if you want one. A wood slicker and elbow grease can substitute in a pinch, but the control from a heated tool is worth it.
Before you start: Edge paints are not leather dyes. Dyes soak into the fibers; paints sit on top. Using a dye here will bleed into the grain and look splotchy. If you’re unsure, a quick test on a scrap piece saves the project.
The Core Steps in Six Rounds
This isn’t a one-and-done process. Think of it like polishing a stone, you apply a thin layer, then sand it back, repeating until the surface is perfectly smooth. Rushing a layer is the most common reason paint feels lumpy or peels.
- Prepare the Edge. Sand the cut edge with 400-grit paper until it’s flat and uniform. This is where the debate hits: do you bevel? If you follow Le-Tech’s instructions, you bevel now. If you side with the sharp-corner camp, you leave it square. The paint will adhere either way, but the square edge is far easier to keep clean.
- Apply the First Thin Coat. Load your awl or applicator with a tiny amount of paint. Drag it along the edge, aiming for a thin, even layer that just covers the leather. It will look streaky and awful. That’s correct.
- Heat-Set the First Coat. Use your edge creaser on a medium setting (around 250°C) or a wood slicker with serious pressure. Glide it along the painted edge. You’ll see the paint melt slightly and sink into the leather fibers. This step bonds the paint; skipping it means the first coat sands right off.
- Sand and Reapply. Once the coat is cool, sand it lightly with 400-grit paper. You’re not trying to remove all the paint, just knock down any high spots and create a slightly rough surface for the next layer to grip. Apply a second, slightly thicker coat.
- Repeat Until Smooth. Sand this second coat with 800-grit paper. The goal is a completely uniform surface with no visible leather underneath. Apply a third coat. For most edges, three coats are the minimum; thick or uneven leather might need four or five.
- Seal the Deal. After the final coat is fully cured (12 hours minimum), apply a thin layer of paraffin wax or a dedicated edge topcoat. Burnish it in with a canvas cloth for a shine, or leave it matte if you prefer.
The glossy version of professional-grade paints like SECTION LACQUER TOP DENSE can be applied in one or two coats “according to the degree of absorbency of the leather.” On dense veg-tan, one might suffice. On porous chrome-tan, you’ll need two.
The timeline surprise? Each “10-20 minute” drying window between coats is for touch-dry only. Sanding a coat that’s only touch-dry will gum up your sandpaper and pull the paint off in strings. Wait a full hour between coats if you can.
The Beveling Dispute: Why Your Edge Shape Matters
Le-Tech’s official instructions say to “cut the edges of the leather and give them a semicircle or rectangular shape with an edge beveller” before painting. Borderland Leather, a respected resource, states the opposite: “Do not bevel the edges! You want that sharp right-angle… To help ‘hold’ the paint.”
Who’s right? It depends on the look you want and your skill level. * Beveling (Manufacturer’s Way): Creates a recessed channel for the paint. This can give a very rounded, “bulleted” look that’s common on mass-produced bags. The risk is that paint can easily spill over the bevel’s upper lip onto the grain side, which is why many guides then tell you to use masking tape. * Square Edge (Artisan’s Way): The untouched, sharp corner acts as a built-in dam. When you run your applicator along the edge, the paint beads against this wall and doesn’t flow onto the face. It requires a steadier hand to apply the paint only on the edge, but it eliminates taping and can yield a sharper, more defined line.
For a beginner, beveling might feel safer because the recess seems like a guide. But that’s an illusion, controlling overflow is harder. Learning to bevel leather edges is a useful skill, but for edge painting, I start with a square edge every time. It’s one less variable to manage.
Water-Based vs. Solvent-Based: The Paint Under the Microscope
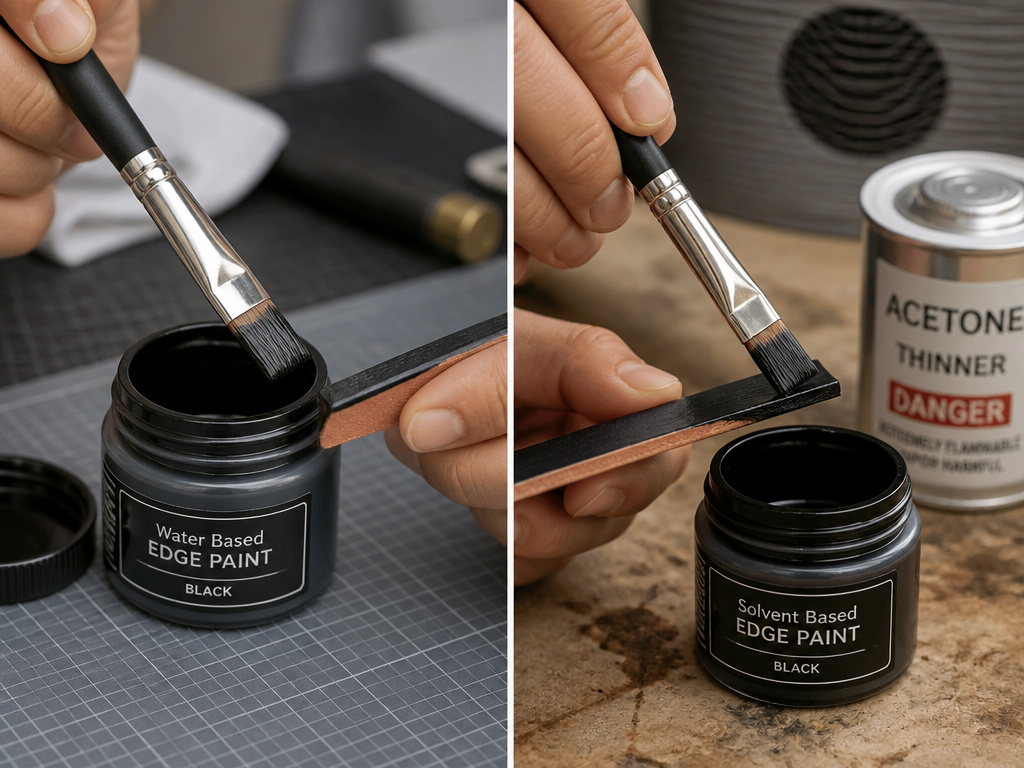 Not all edge paints are the same. The carrier liquid, what the paint is suspended in, changes how it behaves, smells, and adheres.
| Property | Water-Based (e.g., LeTech Edge Finish) | Solvent-Based (e.g., SECTION LACQUER) |
|---|---|---|
| Clean-up | Soap and water. | Requires specific thinners (like acetone). |
| Odor | Low, inoffensive. | Strong, chemical smell; needs ventilation. |
| Drying Time | Faster surface dry (10-20 min), slower full cure (12+ hrs). | Slower surface dry, but often cures harder. |
| Flexibility | Excellent; resists cracking on items that bend. | Can be more rigid; better for stiff edges. |
| Adhesion to Chrome-Tan | Can be poor without a basecoat or promoter. | Generally superior due to chemical etching. |
Water-based paints like LeTech Edge Finish are user-friendly and store safely at room temperature. Solvent-based options like SECTION LACQUER offer legendary durability, their TOP DENSE line is rated for 10,000 flexes without damage per the AFNOR NFG 52-020 standard, but they’re a commitment to work with. Your choice often comes down to your workspace: if you don’t have a well-ventilated area, water-based is the only responsible option.
Why a Basecoat Isn’t Just White Paint
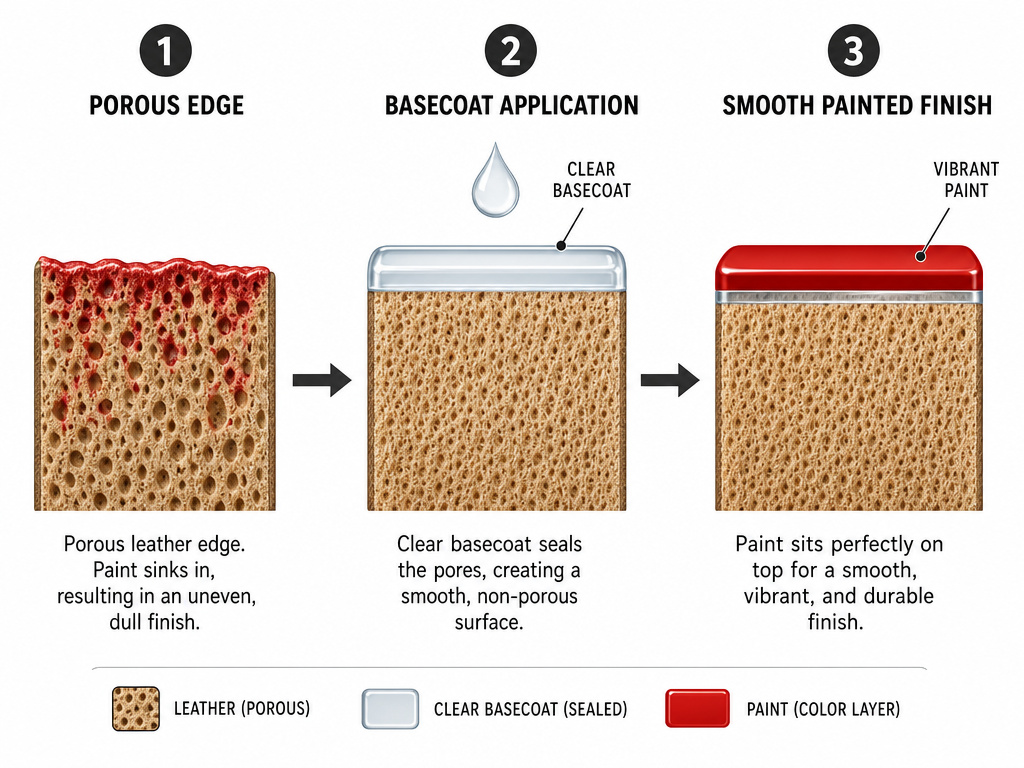 A basecoat is a colorless, sticky sealant applied before any colored paint. Its job is mechanical, not aesthetic. Think of the leather edge as a sponge full of tiny holes. Colored paint applied directly will sink into those holes, requiring more coats to build color and potentially leaving a weak, pitted surface.
A basecoat like Tokonole Edge Gum fills those holes. You apply one coat, let it dry, and sand it smooth. Now you have a non-porous, plastic-like surface. Your colored paint sits on top of this smooth plateau, building opacity and shine in fewer coats. It also solves a major headache: if your leather dye vs paint decision was close, a basecoat lets you use paint over a dyed edge without the colors muddying.
Common Edge Paint Problems (and Fixes)
Even with perfect technique, things go wrong. Here’s how to diagnose and repair the most common issues.
| Problem | Likely Cause | The Fix |
|---|---|---|
| Paint Peels Off in Strips | Poor adhesion. Common on chrome-tanned or oily leathers. | Strip the paint, sand thoroughly, and apply an adhesion promoter (like SECTION LACQUER’s UW 13/8) before repainting. |
| Lumpy, Uneven Finish | Skipped sanding between coats, or applied paint too thickly. | Let the paint cure fully (48 hrs), then sand the entire edge flat with 400-grit and restart from a thin coat. |
| Paint Bleeds onto Grain | Edge was beveled, or applicator was overloaded. | Let it dry completely. Gently scrape the bleed-off with a razor blade held flat, then recolor leather in that spot if needed. |
| Dull, Matte Finish | No final sealant (wax/topcoat), or over-sanding the final layer. | Apply a coat of paraffin wax or a glossy topcoat and burnish vigorously with a canvas cloth. |
| Cracks in the Paint | Paint is too rigid for a flexing item (e.g., a belt). | Switch to a more flexible, water-based paint, or ensure you’re not applying too many thick layers. |
Where this goes sideways: Storing paint in a garage or shed. SECTION LACQUER’s own specs warn that storage above 40°C or below 5°C compromises the product. Your paint will separate or thicken into a gel, and no amount of stirring will bring it back.
If you get paint where you don’t want it, act while it’s wet. A fingertip can often wipe a small spill away cleanly. Once it dries, you’re sanding or scraping.
When Edge Painting Isn’t the Answer
Edge painting is a specific solution. It’s not the only way to finish leather edges. Here’s when to choose a different path: * For a Natural, “Self-Healing” Edge: Burnishing is superior. Using water and friction with tools like a leather burnisher compresses the fibers into a glossy, hard edge that wears in, not off. * On Very Thin Leather (Under 2mm): Edge paint can overpower the delicate scale. A simple coat of edge gum or even clear glue, burnished smooth, looks more appropriate. * On Suede or Nubuck: Don’t even try. As LeTech states, their Edge Finish is “Not suitable for Suede and Nubuck leather.” The pile will wick the paint into a messy, stiff line. Stick to a clean, cut edge.
The same logic applies to decorative stitching. If your project features prominent stitches along the edge, painting over them will obscure the thread. In that case, burnish leather edges to complement the stitching, don’t cover it up.
Frequently Asked Questions
How many coats of edge paint are needed?
You need at least three thin coats, with sanding between each, to achieve a smooth, opaque finish. Very porous leather might require four or five. The rule is to stop when you can’t see any leather color or texture through the paint.
Can you use regular acrylic paint on leather edges?
You can, but you shouldn’t. Regular acrylic craft paint is designed for rigid surfaces like wood or canvas. It lacks the flex agents and specific adhesion promoters needed to bend with leather without cracking. It will peel off within weeks.
How do you fix peeling edge paint?
Strip all the loose paint, then sand the edge thoroughly back to bare leather. Apply a dedicated leather adhesion promoter (like UW 13/8 for SECTION LACQUER products) and let it dry. Then, restart your painting process with thin, sanded coats.
What’s the difference between edge paint and edge dye?
Edge paint is a opaque coating that sits on top of the leather, like nail polish. Edge dye is a translucent stain that soaks into the fibers. Dye is for a more natural look but offers little protection; paint builds a durable, sealed surface. For a deep dive, see our guide on the difference between dye and paint.
Do you need a special pen to apply edge paint?
No. While roller pens (like the Tarrago Leather Paint Roller Pen) are convenient, a simple scratch awl or even a small, stiff-bristled brush gives you more control over the amount of paint applied, which is the real key to avoiding drips and runs.
Before You Go
Edge painting is a test of patience, not skill. The most beautiful edges come from accepting that six rounds of paint-and-sand is normal, and that a “10-minute dry time” is a suggestion for the surface, not the bond.
If you only remember one thing, let it be this: the square, unbeveled edge is your best friend. It’s the guide the manufacturer doesn’t tell you about. Pair that with a quality water-based paint like LeTech Edge Finish for your first few projects, the lower odor and easier cleanup are worth it while you’re learning the rhythm of thin coats and incremental sanding. Once that feels automatic, the world of solvent-based durability opens up.
And if your paint does peel? Don’t see it as a failure. It’s the leather telling you it wasn’t ready. Sand it back, hit it with an adhesion promoter, and start again. That second attempt always sticks.
