
How to Burnish Leather Edges | The Tools That Actually Work
This post contains affiliate links. As an Amazon Associate, we earn from qualifying purchases.
To burnish leather edges, you need vegetable-tanned leather from a supplier like Tandy or Springfield Leather, an edge beveler, sandpaper (400-800 grit), a burnishing agent like Tokonole or gum tragacanth, and a wooden slicker or canvas cloth. The process compresses loose fibers through friction and heat, creating a smooth, sealed, and durable edge that resists moisture and wear. Chrome-tanned leather cannot be burnished.**
That 0.2mm of compressed fiber is what stops water from wicking into the leather’s core. A burnished edge is a functional barrier built through mechanical action, not merely cosmetic.
This guide covers the three essential prerequisites, the four core steps of the burnishing process, and the one agent that changed how I finish edges. By the end, you’ll know why some leathers simply won’t burnish and how to avoid the single biggest time-waster in the workshop.
Key Takeaways
- Burnishing only works on vegetable-tanned leather. Chrome-tanned leather fibers won’t compress, so you must use edge paint or a turned edge instead.
- A smooth, prepped edge is non-negotiable. Skipping the beveling and sanding steps guarantees a fuzzy, uneven finish no matter how long you burnish.
- Tokonole outperforms water and traditional gum tragacanth for most applications, acting as both a lubricant and a flexible binder for a harder, glossier edge.
- Let glued seams cure completely before you touch the edges. Burnishing wet glue pushes it into a visible, dark line that you cannot fix.
The One Leather Type That Actually Burnishes
Forget everything you’ve heard about universal edge finishing. The first, most critical rule concerns material, not technique. You can only burnish vegetable-tanned leather.The tannins used create long, interlocking fibers that compress and fuse under heat and friction.
Chrome-tanned leather is a different animal. The chemical process leaves shorter, slicker fibers that refuse to bond. No amount of rubbing will produce a glassy edge. For chrome-tanned projects, your options are a turned edge or edge paint. A turned edge thins the leather to a wafer, folds it over, and stitches it down. It looks clean but wears through faster. Edge paint is quick and colorful, but it peels. I’ve seen it flake off a wallet within a year.
The art of creating perfect hand burnished edges is probably the most time consuming procedure in making leather goods. There are no short cuts.
So your first step is always identification. Hold the edge. Vegetable-tanned leather will feel firm, dry, and slightly porous. Chrome-tanned feels supple, cool, and often has a synthetic feel. If you’re unsure, test leather quality before you commit hours to a finish it can’t hold.
The 3 Prerequisites You Can’t Skip
Burnishing is the last 10% of the work that relies on the first 90% being done right. Miss one of these, and you’re polishing a mistake.
1. All Construction is Complete
This seems obvious, but the temptation to “just tidy this edge” mid-project is strong. Resist it. Every cut, every punched hole, every stitch, and crucially, every dye application must be finished. Why? The burnishing agent, water, gum tragacanth, Tokonole, seals the leather fibers. If you try to dye afterwards, the stain will bead up and streak. The same goes for any final topcoat or conditioner. Apply those after you’ve sealed the edges.
2. Glue is Fully Cured
I learned this one the messy way. If you’re burnishing two glued pieces, the adhesive must be bone-dry. Not tacky, not set, dry. Burnishing applies pressure. If glue is still wet, you’ll press it into a thin, dark line right along the seam. It looks like a defect, and it is. You can’t sand it out without ruining the profile. Wait the full cure time, even if it means leaving the project overnight.
3. The Edge is Profiled and Smoothed
A ragged cut makes a ragged finish. You can’t burnish a jagged edge smooth. First, use an edge beveler to slice off the sharp 90-degree corner. This creates a rounded profile that sands evenly and feels better in the hand. Next, sand. Start with 400-grit paper to knock down any major imperfections, then move to 600 or 800 grit for a uniform surface. The goal is consistent smoothness. Any low spot will remain dull after burnishing.
The Core 4-Step Burnishing Process
Follow these steps in order. They’re a sequence, not a menu.
Step 1: Apply Your Burnishing Agent
Don’t drown the edge. For a water-based agent like Tokonole or gum tragacanth, a thin, even coat is plenty. I use a small brush or my fingertip. If you’re using straight water, you’ll need to reapply it frequently as it evaporates. The agent lubricates the fibers so they slide and compress rather than break.
Common mistake: Soaking the edge. Excess liquid seeps into the leather body, can cause warping, and dilutes the agent’s binding properties.
Step 2: Generate Friction and Heat
This is where the magic happens. Press the edge firmly against a wooden slicker, a canvas cloth, or the flat side of a wooden burnisher. Now pull the edge across it quickly, back and forth. You’re not sanding; you’re rubbing. The goal is to build up heat through friction. You’ll feel the tool get warm, and you’ll hear the sound change from a soft swish to a faint, high-pitched zing.
Speed matters more than pressure. Too much downward force can distort softer leathers. Let the speed of your strokes generate the heat.
Step 3: Inspect and Repeat
After 30-45 seconds of vigorous rubbing, stop. Feel the edge. Is it uniformly smooth and slightly warm? Or are there still fuzzy, cool patches? The patches need more work. Apply another tiny bit of agent to those spots only and repeat step 2. A perfect edge will feel almost like polished stone, hard and seamless.
Step 4: Final Polish
Once the edge is uniformly burnished, you can chase a higher gloss. A clean, dry canvas cloth buffed vigorously along the edge will add shine. Some crafters use a beeswax bar lightly dragged across the hot edge for a final seal. This last step is optional, but it’s what gives that professional, mirrored look.
Common Burnishing Agents Compared
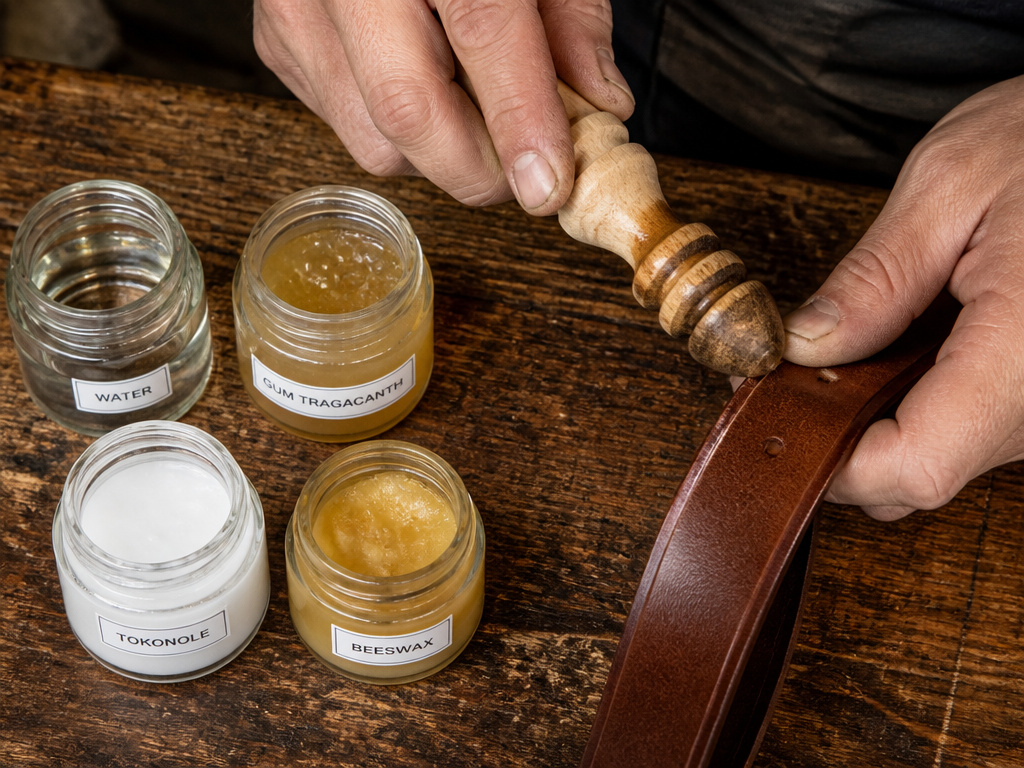 Your choice here changes the finish’s character, drying time, and durability. Don’t just reach for the water cup.
| Agent | Best For | Drying Time | Key Limitation |
|---|---|---|---|
| Water | Practice, quick seals on small items. | Fast (evaporates). | Offers no binding; edges can revert to fuzzy. |
| Gum Tragacanth | Traditional vegetable-tanned work. | Slow (hours to fully set). | Can prevent spirit dye penetration if used first. |
| Tokonole | Modern general use, high-gloss finishes. | Medium (sets as it cools). | Slightly more expensive. |
| Beeswax | Final sealing over a water/Tokonole base. | Very slow (remains slightly tacky). | Can attract dust; not a primary burnishing agent. |
Tokonole is my default now. It’s a Japanese compound that acts like a flexible glue. As you burnish, it melts into the fibers and sets as it cools, creating a harder, more durable edge than water or gum tragacanth alone. It’s the difference between a finished edge and a sealed edge.
When Burnishing Goes Wrong (And How to Fix It)

Even with the right steps, things can go sideways. Here’s what to look for.
The Edge Stays Fuzzy
This is the number one complaint. The cause is always one of three things: wrong leather type (chrome-tanned), insufficient sanding (grit too coarse or skipped), or not enough heat/friction during the burnishing step. Fix: Sand again with a higher grit (800+), ensure you’re using a vegetable-tanned leather, and focus on generating more heat with faster strokes.
The Edge Turns Dark and Sticky
You used too much agent, or you’re using a wax-based product in a warm room. The excess can’t be absorbed and sits on the surface. Fix: Wipe the edge clean with a dry cloth and let it dry completely (overnight). Re-sand lightly with 800-grit paper to remove the residue, then re-burnish with a minimal amount of agent.
A Dark Line Appears on a Seamed Edge
You burned too soon. The glue wasn’t fully cured and was forced into a visible line. Fix: This is a surgical operation. You must carefully skive leather along that seam line to remove the contaminated layer, re-glue, wait, and start the entire finish leather edges process over. It’s a powerful lesson in patience.
The Tools That Make the Difference
You can burnish with a piece of canvas and some water. But the right tool turns a chore into a quick, satisfying step.
- Wooden Slicker: The classic choice. It’s hard, smooth, and won’t overheat. The flat side is for edges, the rounded groove is for curved work.
- Canvas Cloth: An underrated champion. Durable, flexible, and it provides excellent friction. It’s my go-to for final polishing.
- Electric Burnisher (Dremel with attachment): A luxury for high-volume work or very soft leathers where hand pressure might distort the piece. The warning is real: it’s easy to over-burnish in one spot and create a rough, melted-looking patch.
Your leather burnisher doesn’t need to be expensive. It needs to be smooth and consistent. A polished bone folder or even the smooth handle of a screwdriver can work in a pinch. The agent and the prep work matter more.
Frequently Asked Questions
Can you burnish chrome-tanned leather edges?
No. The chrome tanning process alters the fiber structure, making it impossible to compress and seal the edges through friction. For chrome-tanned leather, you must use alternative methods like edge paint or a turned edge.
What is the best burnishing agent for beginners?
Start with Tokonole. It’s more forgiving than water (which provides no bond) and easier to use than traditional gum tragacanth. It gives a durable, glossy finish with a shorter learning curve, so you see good results faster, which builds confidence.
Why is my burnished edge not smooth?
The problem is almost always in the preparation. An unsmooth edge means you didn’t sand enough or you didn’t bevel leather edges first. Go back to 400-grit sandpaper, create a perfectly uniform rounded profile, and then move up through 600 and 800 grit before you attempt to burnish again.
How do you burnish curved leather edges?
The principle is the same, but the tool changes. Use the rounded groove on a wooden slicker or a small, flexible piece of canvas you can wrap around the curve. Apply the burnishing agent sparingly and use short, controlled strokes that follow the curve’s contour, ensuring even pressure all around.
Should you dye before or after burnishing?
Always dye first. The burnishing process seals the leather fibers, creating a barrier that will cause any subsequently applied dye to pool, streak, and fail to penetrate. For a clean, dark edge, apply your dye after sanding but before you apply any burnishing agent.
The Bottom Line
Burnishing is the final, functional lock on a well-made leather item, not a decorative trick. It tells you the crafter understood the material, respected the process, and built something meant to last.
The one tool you need above all else is patience. Patience to let glue dry, patience to sand through the grits, and patience to build the right heat with your own hands.Skip that, and you’ll always see the compromise in the finish.
If you take one thing from this, let it be this: burnish your next project twice. Once to learn the feel, and once to make it perfect. The second edge is always the one you keep.
