
How to Bevel Leather Edges | The Sharpness Rule Most Miss
This post contains affiliate links. As an Amazon Associate, we earn from qualifying purchases.
To bevel leather edges, you need a sharp tool, an understanding of leather thickness, and one continuous, controlled pull at a 45-degree angle. The process removes the sharp 90-degree corner from a cut edge, creating a chamfered profile that’s ready for sanding, dyeing, and burnishing. The single biggest mistake is using a dull beveler, which will tear the leather instead of slicing it cleanly.
Let’s be clear about one thing. Beveling isn’t decoration. It’s the functional first step that makes every other part of the finishing sequence possible. A clean bevel gives the burnishing compound a rounded shape to work with. Without it, you’re just polishing a square edge, and the final result will always look flat and amateurish, no matter how much elbow grease you apply.
What follows is a straightforward guide. I’ll break down the exact size-to-thickness match, the push-versus-pull mechanics, and the sharpness discipline that most hobbyists learn the hard way after ruining a few wallet edges. By the end, you’ll know when to reach for a #2 instead of a #3, how to strop a beveler in 30 seconds, and the one leather type where beveling barely helps at all.
Key Takeaways
- Match your beveler size to your leather’s thickness in ounces or millimeters. A #2 covers most 4-7oz small goods; a #3 is for 8-10oz belts.
- The tool must be razor-sharp. A dull beveler tears fibers, leaving a ragged edge that no amount of sanding can fix. Strop it before every project.
- Pull the tool in one continuous motion at a steady 45-degree angle. Starting and stopping creates a stepped, uneven profile.
- Beveling is the first step. Always do it before sanding, dyeing, or applying any edge finish.
- On chrome-tanned leather or hidden edges, you can often skip this step entirely. The material doesn’t burnish well, and invisible edges don’t need the profile.
The Edge Beveler: More Than a Blunt Blade
An edge beveler is a small, handheld tool with a V-shaped or U-shaped cutting channel at its tip. You rest that channel on the sharp corner of your leather and pull it along. The sharp inside edges of the channel slice off a thin, continuous ribbon of leather, rounding the hard 90-degree angle into a soft chamfer.
This chamfered profile is what allows burnishing to work. Friction from a burnisher compresses the bevelled fibres inward, forming a smooth, rounded seal. A square edge resists this compression, leaving a flat, unfinished look.
Think of it like preparing a board for painting. You wouldn’t paint over splintered, rough-sawn wood. You’d sand it smooth first. Beveling is that sanding step for leather. It prepares the raw, cut edge, which is full of exposed, fray-prone fibres, for the finishing steps that seal and protect it. Using a proper edge beveler is the fastest way to get a consistent, professional result.
I keep a set from #0 to #5 on my bench, but if you’re buying one tool to start, a Barry King #2 is the workhorse. It handles the 4-7 ounce leather used for 90% of wallets, cardholders, and small bags. The brand matters less than the edge condition. A cheap, sharp beveler beats an expensive, dull one every single time.
The Right Tool for the Right Thickness
You can’t use one beveler for everything. The width of its cutting channel determines how much material it removes. Use too small a tool on thick leather, and you’ll barely scratch the corner. Use too large a tool on thin leather, and you’ll carve an unsightly gouge, eating up half the edge’s width.
The sizing chart from makers like Mollies gives you the numbers. Memorize the middle range; the extremes are for specialists.
| Beveler Size | Cut Width | Leather Thickness (Oz) | Leather Thickness (mm) | Best For |
|---|---|---|---|---|
| #1 | 1.5mm (1/16″) | 1-3 oz | 0.4-1.2mm | Wallet linings, gussets, thin small goods. |
| #2 | 2.5mm (3/32″) | 4-7 oz | 1.6-2.8mm | Most versatile. Wallets, bags, sheaths, aprons. |
| #3 | 3mm (1/8″) | 8-10 oz | 3.2-4.0mm | Belts, dog collars, holsters, saddlebags. |
| #4 | 4mm (5/32″) | 10-13 oz | 4.0-5.2mm | Heavy belts, gun belts, harness straps. |
| #5 | 4.5mm (3/16″) | 14-16 oz | 5.6-6.4mm | Safety belts, saddle skirting, machine belting. |
Here’s the practical takeaway. If you mostly make wallets and key fobs, a #1 and a #2 will cover you. If belts and straps are your focus, get a #3. Before you make your first cut on a project, test the beveler on a scrap from the same hide. The curl should be a clean, unbroken ribbon. If it’s dust or breaks, the tool is either too large for the thickness or it’s dull.
Common mistake: Using a #3 beveler on a 5oz wallet body. The oversized channel will take a huge bite, leaving a deep, angular chamfer that looks disproportionate and is harder to burnish smoothly.
Your other main tool is the surface you work on. A hard, smooth surface like a marble slab or a thick piece of tempered glass is ideal. It supports the leather fully and prevents the beveler from accidentally digging into your bench, which instantly dulls the blade. For long, thin straps, clamp a metal ruler along the edge to keep it from wandering as you work.
Preparing the Leather and the Tool
A little preparation prevents a lot of frustration. Your goal is a clean cut, not a crushed tear.
First, ensure your leather edge is cut straight and clean. Ragged cuts from a dull knife or scissors make beveling much harder. If you’re struggling with this, our guide on how to cut leather straight covers the fundamentals. A good, clean cut is the foundation.
For vegetable-tanned leather, the type that burnishes best, a very light casing helps. Run a barely-damp sponge or your finger along the edge. You want the leather slightly supple, not soaked. This helps the blade slice a clean curl instead of crumbling the dry, brittle corner. Skip this step for chrome-tanned or oily leathers; it won’t help and can make a mess.
Now, address the tool. A sharp [edge beveler](https://leathergenesis.A leather edge beveler is essential. The blade dulls faster than you think because it’s shaving through an abrasive material. Before every project, I strop mine.
The 30-Second Strop Test:
- Charge a leather strop or a wooden dowel wrapped in canvas with a tiny amount of green polishing compound.
- Draw the beveler’s cutting channel along the strop 5-10 times, following the contour of the U-shape.
- Test it on a scrap edge. A sharp tool will produce one continuous, tight ribbon of leather. A dull tool will produce broken pieces, dust, or will grab and tear.
This isn’t just maintenance; it’s quality control. Starting with a dull tool guarantees a bad result. The sharpness is the whole game.
The Beveling Action: Angle, Pressure, and Pull
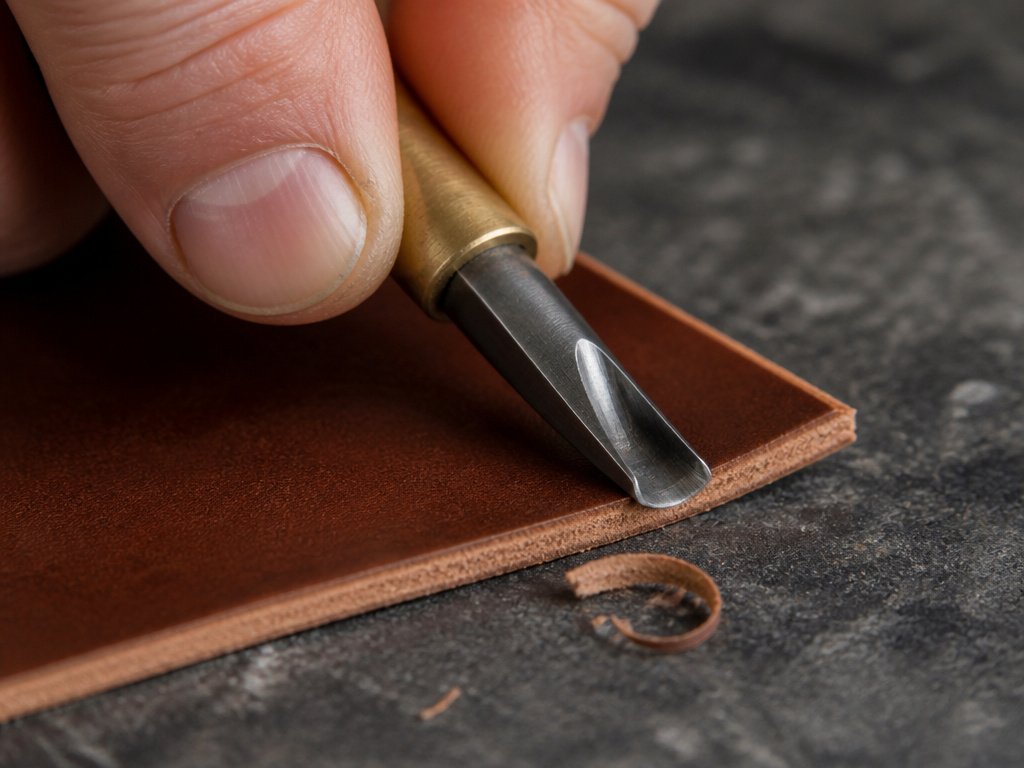 This is the moment of truth. The motion is simple, but it demands consistency.
Angle: Hold the beveler at roughly a 45-degree angle to the leather’s surface. The tool’s design naturally encourages this. The goal is to slice the corner off evenly, not to dig into the face or the back.
Pressure: Apply firm, even downward pressure so the tool’s channel seats fully on the edge. Too little pressure, and it skips. Too much, and it can dig or deflect on grainy leather.
Motion: Pull the tool toward you in one continuous, smooth stroke. Do not start and stop. One pass, from one end to the other. For a long belt, you might need to reposition your hand halfway, but try to maintain the rhythm.
I prefer to pull the tool toward me for control on smaller pieces. On a long belt edge, I sometimes push away for better body mechanics. The direction doesn’t matter as much as the consistency. Always go with the leather’s grain if you can detect it, the tool will glide one way and chatter the other.
Listen as you work. A sharp beveler pulling through cased veg-tan makes a quiet, crisp shhhhh sound. A dull one makes a gritty, chattering noise. Your hand will also feel the difference, a sharp tool glides with resistance; a dull one drags and grabs.
After the first pass, inspect the edge. You should see a uniform chamfer along its entire length. If there are missed spots or uneven depth, you can make a second, very light pass. It’s better than pressing harder on the first try, which can cause the tool to slip.
When Beveling Isn’t the Answer
 A sharp edge and a clean pull won’t fix every situation. Knowing when to skip this step saves time and material.
Chrome-Tanned Leather: Beveling chrome-tanned leather offers minimal benefit. The tanning process leaves the fibers slick and non-absorbent, so they won’t compress and fuse during burnishing. Most chrome-tan edges are finished with edge paint or left raw. Beveling it barely helps anyway.
Hidden Edges: If an edge will be concealed, tucked under a fold, hidden by whip stitching, or sandwiched between two layers, don’t waste time on it. A high-quality full-grain leather is structurally sound at the cut edge. The extra step adds no durability.
Very Thin or Glued Leather: Super-thin lining leather (under 2oz) can be too fragile for a metal beveler; it might just tear. And that “leather” you see on cheap goods that’s really glued leather dust on fabric? The decorative stitched edge is a cover-up, not a target for traditional edge finishing.
The DIY Sandpaper Method: Don’t have a beveler? For a one-off project, you can mimic the effect. Firmly wrap a strip of 80-100 grit sandpaper around a block. Run the leather edge along it at a 45-degree angle, using significant pressure. It’s slower and less precise, but it will round the corner. This is a great trick for understanding the goal before you invest in a Lie-Nielsen tool.
What Most People Get Wrong
You have the tool, you know the motion. Now, let’s avoid the classic errors that turn a clean edge into a salvage job.
Where this goes sideways: Using a beveler after sanding or dyeing. You always bevel first. Sanding smooths the freshly cut chamfer. Dyeing after beveling ensures the edge color matches the face. Reverse the order, and you’ll have to re-sand and re-dye, often with a blotchy result.
Dullness Denial. This is the number one culprit. You used the beveler on your last project two months ago, and it was fine. Leather is abrasive. It probably isn’t fine now. Test on scrap. Always.
Inconsistent Angle. Wobbling your wrist mid-pull creates a wavy, stepped chamfer. Burnishing later highlights every imperfection. It looks like a topographical map of your hesitation.
Skipping the Grain Check. Leather has a direction, like brushing a cat’s fur. On some veg-tan, it’s subtle. Pull the beveler one way. If it chatters or grabs, turn the piece around and pull from the opposite end. Going with the grain is the difference between a ribbon and a tear.
Forgotten Sides. Bevel both the top (grain) and bottom (flesh) edges of your piece. They both need the profile to burnish evenly. Missing the back edge leaves a sharp corner that feels rough in the hand.
Sharpening and Maintaining Your Beveler
A blade that lives on a bench needs a routine. Stropping before each project keeps it slicing. But eventually, even stropping won’t bring back a rolled or chipped edge.
For a standard U-channel beveler, you need a shaped slip stone or a narrow dowel wrapped in sandpaper. You’re only sharpening the two interior edges of the channel. Apply a drop of honing oil, match the stone to the bevel’s angle, and draw it through the channel a few times. Wipe it clean and strop.
For a “keen edge” style beveler with a rounded underside, you need a contoured strop or a special polishing board. The principle is the same: align the micro-edge.
Honestly, most crafters will never need to stone-sharpen a beveler if they strop it regularly. The frequent light touch keeps the edge aligned. Neglect is what forces a major sharpening. I treat it like any other blade in the shop, a minute of care prevents an hour of repair.
Next Steps After a Perfect Bevel
You’ve created a clean, chamfered profile. The hard 90-degree corner is gone. Now the real finish leather edges work begins.
- Sand: Use 400-grit sandpaper to smooth any minor ridges left by the beveler. Sand perpendicular to the edge, then lightly with the grain. This prepares a perfectly smooth surface for dye or finish.
- Dye (Optional): If you want the edge colored, apply dye now. Use a dauber or a fine brush, let it dry completely, and sand lightly with 600+ grit to remove any raised grain.
- Burnish: This is where you seal the edge. Apply a burnishing agent like Tokonole or gum tragacanth. Then, using a wood slicker, canvas cloth, or dedicated leather burnisher, apply rapid friction. The heat and pressure fuse the fibers, creating a glassy, sealed edge.
The bevel you made is the foundation for all of this. A bevel with a consistent 45-degree angle means less sanding, even dye absorption, and a round, professional-looking burnished result.
Frequently Asked Questions
Can I bevel leather without a special tool?
Yes, but it’s a compromise. You can use coarse sandpaper wrapped around a block, working at a 45-degree angle. It requires more pressure and time, and the result is less consistent than a sharp, dedicated tool. It’s a useful trick for a single project, but if you plan to do more leatherwork, an edge beveler is a fundamental investment.
What size beveler should a beginner buy?
Start with a #2. It handles the 4-7 ounce leather used for the vast majority of beginner projects like card holders, key fobs, and small pouches. It’s the most versatile size. Once you start making belts, add a #3.
Why does my beveler tear the leather instead of cutting it?
Three likely causes: the tool is dull (most common), you’re using too large a size for the leather thickness, or you’re pulling against the leather’s grain. Strop the tool, verify the size match on the chart, and try pulling from the opposite direction.
Do I need to bevel both sides of the leather?
Yes, for any edge that will be visible and finished. You should bevel the corner on both the top (grain) and bottom (flesh) sides. This creates a symmetrical profile that burnishes into an even, rounded edge. For a layered construction where one side is hidden, you can skip the hidden side.
Before You Go
The goal isn’t just to run a tool along an edge. It’s to create a specific profile that enables everything that comes after. So here’s the one filter to run your work through before you move to sanding.
Look at the curled ribbon your beveler produced. Is it one continuous, unbroken strand? If yes, your tool is sharp, your angle was steady, and your leather was prepared. That’s a successful bevel. If it’s dust or broken pieces, stop. Something in that equation is off, usually sharpness or pressure.
Everything in leathercraft builds on the previous step. A clean cut leads to a clean bevel. A clean bevel leads to a finish that looks and feels professional. Don’t rush the foundation. Get the edge beveler sharp, match it to the leather, and make that one confident pull. The leather will tell you what it needs, you just have to know how to listen.
