
What is a Leather Creaser: The Essential Edge Detailing Tool
This post contains affiliate links. As an Amazon Associate, we earn from qualifying purchases.
A leather creaser is a hand tool, sometimes heated, that presses a fine line or groove parallel to a leather edge. It compresses the fibers to create a decorative border, guide stitching, and harden the edge for a cleaner, more professional finish. The three main types are fixed manual creasers, adjustable screw creasers, and electric fileteuse machines.
That single line does more than look good. It changes the structure of the leather where it counts. Let’s be clear about one thing: this isn’t just decoration borrowed from saddlery. A proper crease densifies the edge, making it more resistant to scuffing and giving the whole piece a tailored silhouette.
What follows is a breakdown of the tool’s mechanics, the real choice between manual and electric, and the one rule for spacing that most beginners ignore. By the end, you’ll know which creaser fits your bench and how to make that first line straight.
Key Takeaways
- A creaser compresses leather fibers without cutting, creating a structural and decorative line, unlike a groover which removes material.
- The “beginner’s conundrum” is real: cheap manual creasers require more skill to heat and use, while easier electric models demand a higher initial investment.
- Correct spacing from the edge is about proportion, not a fixed number; a 2mm crease looks tailored on a wallet but cramped on a wide belt.
- For cold creasing, leather should be barely damp; for heated creasing, it must be completely dry to avoid steam pockets and inconsistent lines.
- An adjustable screw creaser is the most practical first purchase for most hobbyists, offering spacing versatility without the cost of a full fileteuse system.
What is a Leather Creaser?
Look at the edge of a well-made belt or wallet. See that crisp, parallel line running just inside the border? That’s the work of a creaser. The tool itself is simple: a hard, smooth tip, often made of polished steel or brass, attached to a handle. You draw it along the leather’s edge with pressure, and sometimes heat, to impress a permanent line.
The action is one of compression, not cutting. This is the critical difference between a creaser and a leather edge groover. A groover has a tiny blade to scoop out a channel for sinking stitches. A creaser smushes the fibers down, creating a densified channel that reflects light and frames the piece. Historically, this compression served a waterproofing function on saddle edges. Today, it’s our shorthand for a considered finish.
The Technical Snippet: A leather creaser employs a polished metal tip, typically between 0.5mm and 5mm wide, to displace and compress the collagen fibers in the top layer of the hide. This plastic deformation creates a permanent groove, often darkened by controlled heat application, which increases the surface density and refractive index along the crease line.
I learned the value of the right supporting tool early on. I once worked with a client who struggled terribly with hand-stitching. Their hands were all over the place, and the stitches were a mess. The moment they used a stitching pony to hold the work, everything clicked. That first neatly stitched belt was a revelation. A creaser works on the same principle, it’s a guide and an enabler. It doesn’t give you skill, but it provides the consistent, mechanical boundary that lets your existing skill produce clean, repeatable results.
Manual vs. Adjustable vs. Electric: Picking Your Path
You have three roads here, and the cheapest one is often the hardest to drive. Let’s break down the types.
The Fixed Manual Creaser is a single tip fixed to a handle. Common sizes are 1.0mm, 1.5mm, and 2.0mm, like those on the BG Fixed creaser with its cocobolo and brass handle. You heat the tip over an alcohol lamp or small torch, guess the temperature by experience, and draw your line. The pros are cost and simplicity. The con is the guesswork, underheated and the line is faint; overheated and you scorch the leather. It’s a skill-building tool, which creates the conundrum: beginners need practice, but their first attempts on good leather with an unmastered tool can be discouraging.
The Adjustable Screw Creaser is the problem-solver. It has two prongs: one rides the edge as a fence, the other presses the line. A screw adjusts the distance between them, typically from 0 to about 5mm.
| Feature | Fixed Manual Creaser | Adjustable Screw Creaser |
|---|---|---|
| Spacing Flexibility | One fixed distance (e.g., 1.5mm) | Continuously adjustable (0–5mm) |
| Heat Source | External flame (manual heating) | External flame (manual heating) |
| Best For | Production work with one consistent spacing | Projects requiring multiple spacing widths |
| Skill Floor | Higher (requires heat judgment) | Medium (mechanically guides spacing) |
This tool hands you consistency. You set the spacing with a ruler once, and every edge on that project matches perfectly. The fence does the guiding, so your hand just provides steady forward motion. It’s more expensive than a single fixed creaser but cheaper than a set of them. For a hobbyist making various items, it’s the most pragmatic first investment.
The Electric Fileteuse is the system. Units like those from Regad have a handle that plugs into a temperature-controlled base. You swap tips for different effects: creasing, edge painting, foil stamping. The heat is consistent and dialed-in, removing the biggest variable.
Where this goes sideways: Choosing a cheap manual creaser because you’re starting out, then burning a line into the front panel of your first wallet. The electric tool is easier to use but costs more, a classic craft investment puzzle.
The electric creaser makes easier work of softer leathers and is a powerhouse in a busy shop. But for a beginner, that cost is hard to justify. My take? Start with a quality adjustable creaser from a brand like C.S. Osborne or Barry King Tools. Learn the relationship between heat, pressure, and leather grain. If you find yourself creasing daily, then the fileteuse becomes a justifiable upgrade.
How to Crease a Leather Edge: The Steps
The process is straightforward, but the details determine a clean line from a ruined edge. Here’s a straightforward guide.
- Prepare the Edge. The crease must be the last step before final polishing. The edge must be sanded, burnished, or painted completely. Creasing over a rough edge magnifies every flaw. If you’re using a cold creaser on vegetable-tanned leather, a barely damp surface takes a cleaner impression. For heated creasing, the leather must be bone dry to prevent steam from bloating the fibers.
- Set Your Spacing. This is about proportion, not dogma. A 1mm crease on a slim cardholder looks precise. That same 1mm line on a 1.5-inch wide belt looks lost and timid. Use dividers or an adjustable creaser to mark a distance that feels balanced. The leather will tell you what it needs.
- Apply Heat (If Using). Heat the tip until a spit test sizzles gently on a scrap piece. You want a warm tool, not a red-hot one. Too much heat scorches and stiffens the leather, creating a weak point that can crack on a flexing edge.
- Make the Pass. Hold the leather firm. Place the guide fence or tip on the edge. Apply firm, even pressure and draw the tool in one smooth, continuous motion. Do not stop mid-stroke, a pause creates a visible divot. I prefer pushing forward so I can see the line forming. Some crafters pull backward; use what gives you control.
- Inspect and Deepen. After the first pass, you’ll have a faint line. Inspect it for consistency. If you need more depth, repeat the pass with the same heat. Build depth with multiple light passes. One heavy, grinding pass can tear the top-grain leather surface.
The sound of a good hot crease on dry veg-tan is a faint, consistent hiss. If you hear a crackle or see smoke, you’re too hot. If the tool drags and the line is pale, you’re too cold.
The One Rule for Crease Spacing Everyone Forgets
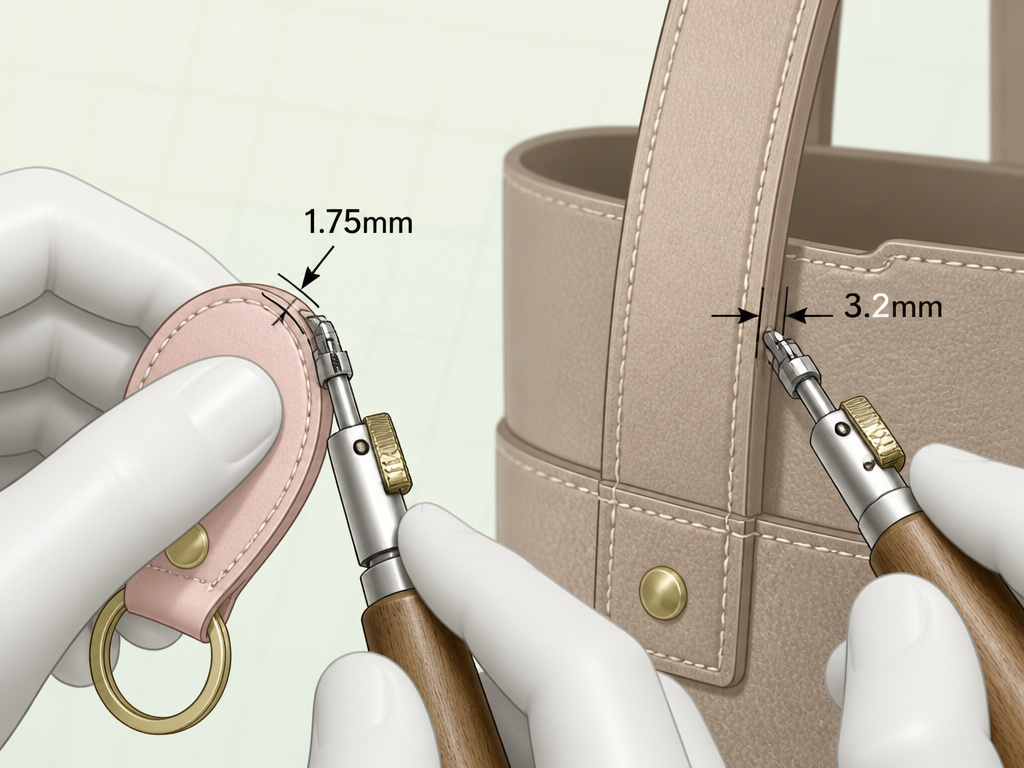
Most guides will give you a chart: wallets 1.5mm, belts 2mm, bags 2.5mm. Ignore that. Here’s the practical takeaway.
The correct distance is the one that feels proportional to the edge it frames and remains consistent across every edge on the piece. A fixed number ignores the object’s scale. A 2mm crease on a delicate key fob looks comically large. That same 2mm crease on a large tote bag strap can look faint and underwhelming.
This is why the adjustable creaser shines. You’re not locked into 0.5mm increments. You can set 1.75mm or 3.2mm to suit the specific piece in your hand. It forces you to make a design decision, not just follow a recipe. This attention to scale is what separates a handmade item from a factory one. It’s the same eye required when selecting full-grain leather for its natural character versus corrected grain leather for uniform appearance.
Common Creasing Mistakes (And How to Avoid Them)
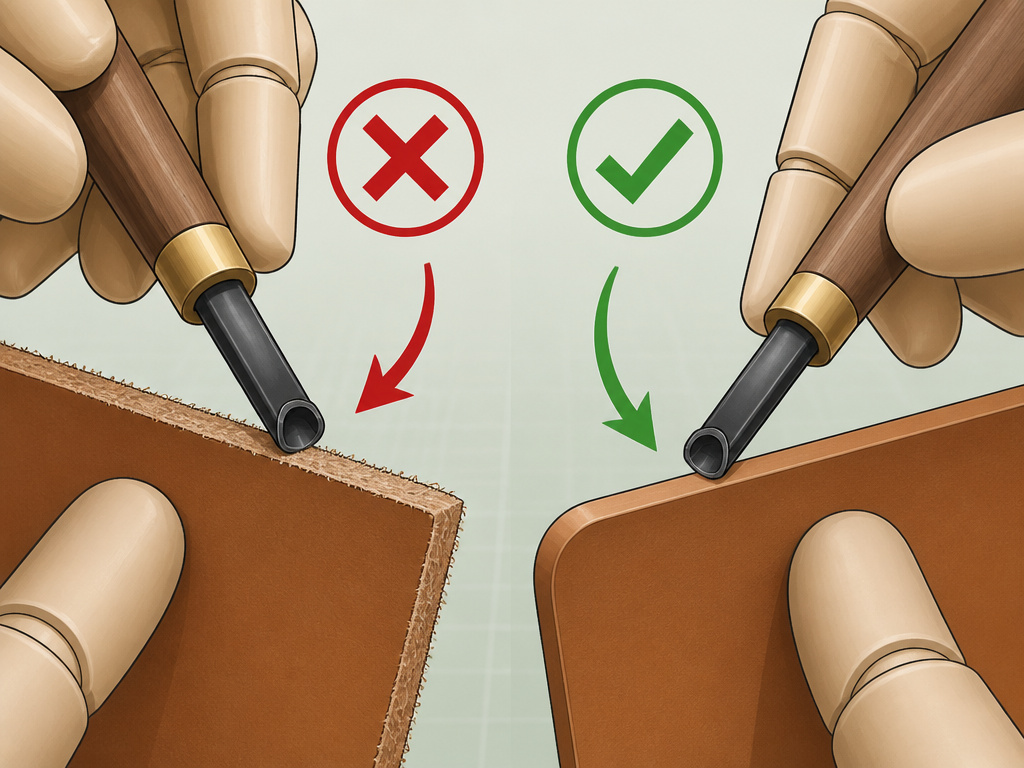
A few errors account for most beginner frustrations. Steer clear of these.
- Creasing Before Edge Finishing. This is the most common error. Always sand, bevel, and burnish your edge completely before you run the creaser. The line should land on a perfectly prepared surface.
- Inconsistent Heat. With a manual tool, test on scrap every time. The heat needed for firm veg-tan is different than for supple chrome-tan. Inconsistent heat leads to lines that vary in color and depth.
- Rushing the Pass. A fast, jerky pull creates a wavy line. Steady, moderate pressure wins. Your arm speed should match the tool’s ability to compress the fibers.
- Ignoring Grain Direction. Just like with how leather is made, the material has a direction. Creasing with the grain (from butt to shoulder) is often smoother than creasing against it, especially on tighter-grained hides.
Easy to miss: The type of leather dictates your approach. Firm vegetable-tanned leather, a product of the traditional tanning process, takes a crisp, deep crease well. Softer chrome-tanned or garment leathers require less heat and pressure to avoid over-compressing and distorting the edge.
Frequently Asked Questions
Can you use a leather creaser without heat?
Yes. A cold creaser will still compress the fibers and create a line, especially on dampened vegetable-tanned leather. However, the line will be subtler, less dark, and may relax over time. Heat sets the crease permanently by slightly melting the collagen fibers.
What’s the difference between a creaser and an edge groover?
Groover cuts a channel to sink thread below the leather surface, protecting the stitch. It removes material. A creaser only compresses the material, creating a decorative or structural line without cutting. You would groove before stitching and crease after all edge work is complete.
What is the best leather for creasing?
Vegetable-tanned leather is the gold standard. It’s firm, responds predictably to heat and moisture, and burnishes beautifully. You can crease chrome-tanned leather, but use lower heat and test extensively, as it can melt or distort more easily.
How do I choose the right size creaser tip?
For fixed tips, a 1.5mm or 2.0mm is the most versatile starting point for small to medium goods. However, an adjustable creaser eliminates this choice entirely, allowing you to match the spacing to each project, which is why it’s often the smarter buy for assessing leather quality across diverse projects.
Can a creaser be used on fake leather?
Technically, yes, but it’s not recommended. Synthetic or bonded leathers have a plastic coating that can melt, bubble, or peel under heat. The crease won’t compress fibers because there are no natural fibers to compress, it will just be a dent in plastic.
The Bottom Line
A leather creaser isn’t a mandatory tool, but it is the signature of a finished piece. It’s the quiet detail that tells the eye you cared about the edge. If you’re building a toolkit, bypass the set of fixed manual creasers and go straight for a quality adjustable screw creaser. It solves the spacing problem and teaches you control without the high cost of an electric system.
Remember, the goal isn’t just to make a line. It’s to frame your work. That means matching the crease to the piece’s proportions, not a chart. Start on scrap, master the relationship between heat, pressure, and your particular leather, whether it’s real leather or a more uniform embossed leather. Your first clean, consistent line is a milestone. It’s the moment the craft starts to speak through your hands.
