
How to Dye Leather | The 70–85°F Rule That Decides Success
This post contains affiliate links. As an Amazon Associate, we earn from qualifying purchases.
To dye leather, you need the right dye type, a meticulously clean and sanded surface, and thin, even coats applied in a controlled environment between 70–85°F. Alcohol-based dyes like Fiebing’s Pro Dye penetrate the fibers for durability, while acrylic paints like Angelus sit on top. The final, required step is sealing the dyed leather to prevent rub-off.
Let me share what I’ve learned. That temperature range isn’t a suggestion. At 55°F, your dye takes hours to set properly. Above 90°F, it dries on contact before it can soak in, leaving a blotchy, weak finish. The difference between a rich, even color and a patchy mess often comes down to a thermometer reading.
What follows is a straightforward guide. We’ll walk through choosing your dye, the non-negotiable prep work, the four-step application process, and the one sealing step every beginner misses. By the end, you’ll understand leather better to make confident choices, whether you’re refreshing a wallet or tackling a car seat.
Key Takeaways
- Dye Type Dictates Durability: Alcohol-based dyes (Fiebing’s Pro Dye) penetrate leather fibers, making the color part of the material. Acrylic paints (Angelus) coat the surface and can crack.
- Preparation is 80% of the Job: Any oil, wax, or old finish left on the leather will cause uneven dye absorption. Deglazing and light sanding with 400-600 grit paper are mandatory.
- Apply Thin Coats, Not Thick Ones: A significant color change shouldn’t be visible until the third thin coat. A single thick coat stays tacky, obscures the grain, and feels plasticky.
- Seal the Deal: Alcohol-based dye must be sealed with a topcoat like Leatherique Clear Coat #6. If you skip this, the dye will bleed onto clothes and hands.
- Environment Controls Outcome: Dye between 70–85°F (21–30°C) with low humidity. Outside this range, drying times and chemical reactions become unpredictable.
Gathering Your Tools and Materials
You wouldn’t start cooking without your ingredients and pans. Dyeing leather demands the same forethought. Using the wrong applicator or skipping a prep chemical guarantees a result you’ll want to strip off and redo.
Here are the non-negotiable items. I’ll break down the details for you.
The Dye Itself: This is your primary colorant. Your choice here frames the entire project. * Alcohol-Based Dye (Fiebing’s Pro Dye): The professional standard for most projects. It penetrates deep into the leather fibers, coloring them from within. The result is durable and allows the natural grain to show through. It can dry out leather, so conditioning after sealing is key. * Water-Based Dye (Eco-Flo): Less toxic and easier to clean up, but it doesn’t penetrate as deeply. Colors are often less vibrant, and it can raise the grain of the leather, leaving a slightly rougher feel. * Acrylic Leather Paint (Angelus): This isn’t a dye; it’s a surface coating. It sits on top of the leather, which is great for opaque colors and designs but can crack or peel with flexing if not properly prepared and sealed.
Preparation & Application Tools: These are what change the dye from a bottle into a finish. * Deglazer or Rubbing Alcohol: This strips the leather’s topcoat and any oils. It’s the essential first step for ensuring the dye can penetrate evenly. * 400-600 Grit Sandpaper: For wet sanding. This smooths minor nicks and, more importantly, roughens the surface just enough for the dye to grip. You’re not trying to create suede. * Wool Daubers or Sponges: My preferred tools for applying dye to larger areas. They hold a good amount of liquid and release it evenly, minimizing streaking. A cheap brush will shed bristles and ruin your work. * High-Quality Acrylic Brushes: Necessary for getting dye into seams, piping, and tight corners. Clean them with soap and hot water immediately after use. * Lint-Free Cloths: For wiping away excess deglazer, dye, and topcoat. Paper towels can leave fibers behind. * Sealant (Topcoat): A clear protector like Leatherique Clear Coat #6 or Angelus Acrylic Finisher. This locks in the dye and provides a barrier against scuffs and moisture.
Alcohol-Based vs. Water-Based vs. Acrylic Paint
This isn’t about good versus bad. It’s about matching the material to the job. Each option behaves differently because of its chemistry, and using one for the other’s purpose leads to frustration.
Where this goes sideways: Using acrylic paint on a belt that will flex daily. Without a perfect flexible base, the paint film cracks at the first bend, revealing the original leather color underneath in fine, ugly lines.
Let’s be clear about one thing: penetration is the key differentiator. An alcohol-based dye soaks in. Acrylic paint builds up. That simple difference changes everything about the finished piece’s feel, durability, and maintenance.
| Type | How It Works | Best For | Biggest Risk |
|---|---|---|---|
| Alcohol-Based Dye | Penetrates leather fibers, staining them. | Belts, bags, shoes, furniture – any item that will see wear and flex. | Can over-dry leather if not conditioned; requires sealing to prevent rub-off. |
| Water-Based Dye | Partially penetrates, sits more in the surface. | Projects where low odor and easy cleanup are priorities, like indoor crafts. | Can raise the grain, creating a rough, fuzzy surface texture. |
| Acrylic Leather Paint | Forms a flexible film on the leather’s surface. | Custom sneakers, artistic designs, achieving opaque colors on dark leather. | Can peel if the leather wasn’t deglazed or if the piece is subjected to extreme flexing. |
The practical takeaway? For recoloring a worn leather furniture armrest or making a leather shoes look new, an alcohol-based dye is almost always the right call. It becomes part of the material. For a full tutorial on that specific dark shade, our guide on how to dye leather black walks through the nuances.
The Critical Prep Work Nobody Wants to Do
This is the stage everyone tries to rush. I get it. You have the dye in hand and you want to see color. But the leather will tell you what it needs, and if you don’t listen, it will show you with every splotch and streak.
Your goal is to create a perfectly clean, slightly toothy, and uniformly absorbent surface. Any deviation from that, a spot of hand oil, a patch of old wax, a glossy finish you missed, is a landmine.
Step 1: Deep Clean
Start with a dedicated leather cleaner or a dilute solution of saddle soap. This isn’t about a quick wipe. You’re removing decades of dirt, body oils, and conditioners that have soaked deep into the pores. For a car interior, a product like Leatherique Rejuvenator is designed to pull these contaminants to the surface over 24 hours. Rinse thoroughly and let it dry completely. A damp leather will dilute your dye and cause uneven spots.
Step 2: Deglaze the Surface
This is the magic step. Apply a deglazer or 99% isopropyl alcohol with a lint-free cloth. You’re chemically stripping any factory topcoat, silicone, or wax finish. Rub until the cloth doesn’t pick up any more color or residue. The leather should look uniformly dull and feel completely dry to the touch. If it still feels slick in spots, hit it again.
Step 3: Lightly Sand
With the leather clean and deglazed, take 400-600 grit sandpaper and lightly wet-sand the entire surface. You’re not removing material. You’re creating microscopic scratches for the dye to grip onto and smoothing any lifted grain from cleaning. The sound should be a soft, consistent whisper, not a aggressive scraping. Wipe away all dust with a tack cloth.
I once rushed conditioning a vintage bag without a spot test. The conditioner reacted with an old finish I hadn’t fully removed, causing a blotchy discoloration I couldn’t reverse. That bag is a permanent reminder on my shelf: never, ever skip the prep basics.
The 4-Step Dyeing Process (And Where It Goes Wrong)
 Now for the main event. If your prep was meticulous, this part feels almost effortless. If you cut corners, this is where the project unravels. Follow this sequence in order, it’s based on years of practical experience to avoid the most common pitfalls.
1. Control Your Environment
Work in a space between 70 and 85°F (21 to 30°C) with low humidity. This is the sweet spot where the dye flows and penetrates without drying too fast or too slow. In a cold garage (55°F), the dye will sit wet for hours and can run. In a hot shed (90°F), it dries on contact, leading to lap marks and a weak bond. Good ventilation is non-negotiable.
2. Apply Thin, Even Coats
Shake your bottle of leather dye thoroughly and pour a small amount into a dish. Stir it, pigments settle. Using a wool dauber or sponge, apply the first coat in circular motions, working it into the leather. Don’t flood the surface. You should see only a subtle tint. Let this dry completely (about 15-20 minutes). The second coat will build more color. A full, rich hue often takes three or even four of these thin layers.
Common mistake: Applying one thick coat to save time. The dye pools, dries tacky, and completely obscures the leather’s natural grain pattern. You’re left with a plastic-looking finish that feels sticky for days.
3. Mind the Details
Use a small acrylic brush to carefully dye edges, seams, and stitching. These areas absorb more dye, so go lightly to avoid dark, saturated lines. If you’re using an airbrush for a project like dye car seats, thin the dye no more than 20% with the appropriate solvent and maintain a consistent, overlapping spray pattern.
4. Seal the Color
This is the step that separates a hobbyist job from a professional one. After the final coat of dye has dried for at least two hours, apply a dedicated leather sealant or topcoat. For alcohol-based dyes, a product like Leatherique Clear Coat #6 is ideal. Apply one or two thin coats with a clean brush or cloth. This creates a protective barrier that prevents the dye from rubbing off onto your clothes, a problem known as dye transfer leather.
Why Does Dye Go Blotchy? (Troubleshooting Guide)
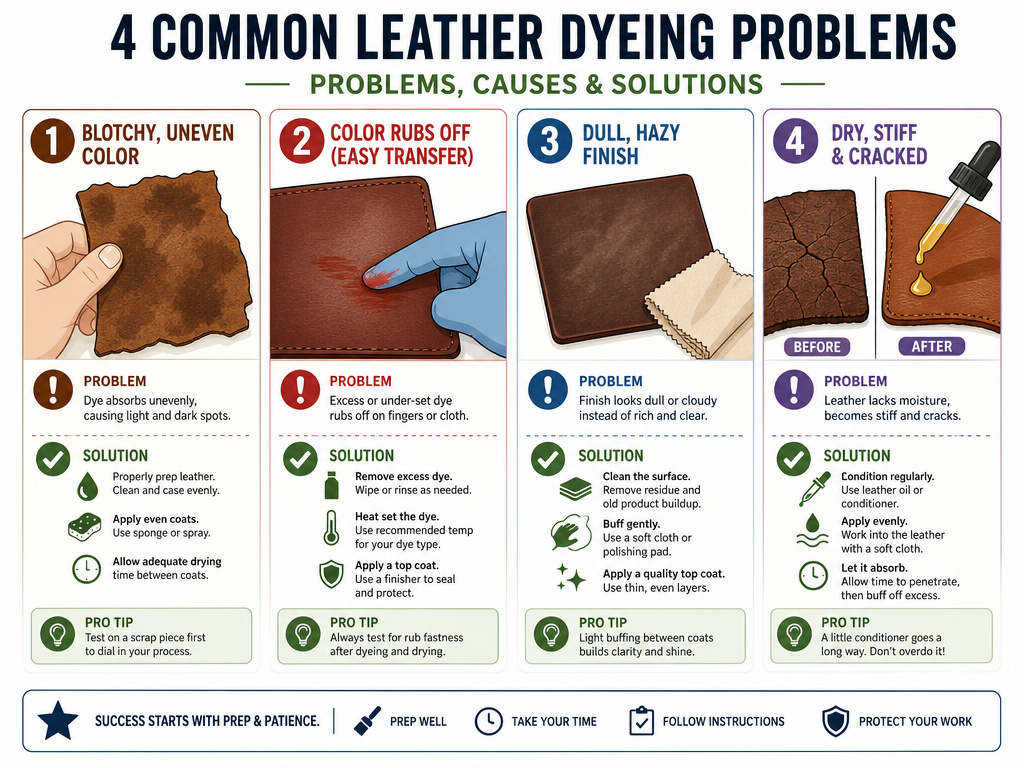 Even with perfect prep, sometimes things go wrong. The color is uneven, or it feels wrong. Here’s how to diagnose the issue before you decide to strip it all and start over. Ignore the marketing copy on quick-fix products; the solution is almost always in the process.
| Symptom | Likely Cause | The Fix |
|---|---|---|
| Blotchy, uneven color | Insufficient or uneven deglazing; residual oils. | Strip the dye with more deglazer, sand lightly, and restart with thinner coats. |
| Dye rubs off on hands | Failed to apply a sealant/topcoat. | Let the dye cure for 48 hours, then apply 1-2 thin coats of a clear acrylic finisher. |
| Color looks dull, hazy | Dye dried too quickly in a hot/dry environment. | Lightly buff with a soft, dry cloth after full cure. If haze remains, a thin coat of leather conditioner may restore shine. |
| Stiff, crackly feel | Alcohol-based dye over-dried the leather; no conditioning after sealing. | Once fully sealed and cured, apply a light coat of a pure oil conditioner (like neatsfoot) to restore suppleness. |
The ISO 11664-4:2019 standard gives us a scientific benchmark for color change: a ΔE value greater than 5 indicates a change is visible to the human eye. If your finished color is wildly different from the dye bottle’s cap, you might be looking at a ΔE well over 5, likely from applying over an incompatible base color without a proper intermediate coat.
Frequently Asked Questions
Can I dye leather a lighter color?
You cannot dye leather a lighter color. Dye adds pigment; it cannot remove the existing color from the leather fibers. The only path to a lighter shade is to strip the existing dye completely, a difficult and often damaging process, or to use an opaque acrylic paint to cover it, which changes the material’s feel and flexibility.
How long does leather dye take to dry?
Thin coats of alcohol-based dye are touch-dry in 15-20 minutes at 70-85°F. They are dry enough for a subsequent coat. However, the dye is not fully cured or set for 48 hours. During this time, the piece is fragile and the color can still be affected. Avoid using or handling the item until after this cure time and after a sealant has been applied.
Do I need to seal leather after dyeing it?
Yes, you must seal leather after using an alcohol-based or water-based dye. These dyes stain the fibers but are not fixed. Without a sealant (like an acrylic topcoat), the dye will gradually rub off onto clothing, a problem called crocking. Sealing also protects the color from UV fading and moisture.
What’s the difference between leather dye and leather paint?
Leather dye vs leather paint is a fundamental distinction. Dye penetrates and colors the leather fibers from within, preserving the natural grain and flexibility. Paint, like Angelus acrylics, sits on the surface as a flexible film, used for opaque colors and artwork. Paint can crack if the leather flexes too much; dye cannot.
Can I use shoe polish to dye leather?
Shoe polish can temporarily tint leather, but it is not a dye. It contains waxes and pigments that sit on the surface and will wear off quickly with handling or friction. For a permanent color change that is part of the leather, a proper penetrating dye is the only reliable method.
Before You Go
One rule most guides skip: if your workspace isn’t between 70 and 85°F, don’t start. Wait for a better day or relocate your project. That temperature threshold is the single biggest environmental factor you control, and working outside of it introduces more variables than any technique can correct for.
Your first step this week shouldn’t be buying dye. It should be assessing the piece you want to color. Is it clean? Is it free of deep cracks that need filling? Does it have an old, unknown finish? Answer those questions first, then gather your deglazer, sandpaper, and a bottle of Fiebing’s Pro Dye in your chosen color.
The obsession with one-coat, miracle solutions ruins more projects than anything else. Building color with thin layers is slower, but it’s the only method that yields a professional, durable finish that respects the leather itself. That’s the part nobody mentions.
