
Leather Dog Leash Care: Steps to Keep It Strong and Supple
This post contains affiliate links. As an Amazon Associate, we earn from qualifying purchases.
This post contains affiliate links. As an Amazon Associate, we earn from qualifying purchases.
Care for a leather dog leash by keeping it clean, dry, and conditioned. Wipe off dirt after walks with a damp cloth, let it air-dry away from heat, and apply a leather balm containing beeswax and lanolin every 6 to 12 months. Inspect the hardware and stitching monthly for wear. The goal is to preserve the leather’s natural oils, not strip them.
The 6-12 month conditioning window is the manufacturer-recommended interval that prevents the leather from drying out and cracking under tension. Most leashes fail from neglect, not use, specifically, from letting the leather get brittle before you notice it’s thirsty.
What follows is the straightforward maintenance routine that extends a leash’s life by years, plus the specific warnings for water, hardware, and common mistakes that turn a lead with a tested breaking strength into a safety risk. This process is about keeping a working tool reliable.
Key Takeaways
- Condition with a beeswax-based balm like Renapur or Leather Genie every 6-12 months, or whenever the leather looks dry and loses its lustre.
- Never let your dog swim with a leather leash attached; the risk of underwater snagging and entanglement is a documented drowning hazard.
- Remove the leash before applying liquid spot-on flea treatments to the dog, as the chemicals can permanently stain and damage the leather.
- Store the leash loosely coiled in a dry, ventilated area, never in a sealed plastic bag, which traps moisture and causes mildew.
- Monthly, check the D-ring, snap hook, and stitching for rust, wear, or deformation; these metal parts fail before the leather does.
The Daily Wipe-Down and Weekly Check
Head design changes the entire process. Look at the business end of your trimmer.
Look at where the leash meets the world: the handle loop, the area near the snap hook, and the length that drags through grass. Dirt, salt, and sand are abrasives. They grind into the leather’s surface with every coil and uncoil, acting like fine sandpaper.
After a muddy or dusty walk, grab a soft, damp cloth. Wipe the leash down, following the grain of the leather. Don’t soak it, you’re removing surface grime, not giving it a bath. Let it dry at room temperature, hung up or laid flat. Direct heat from a radiator or hairdryer cooks the moisture out too fast, causing the fibers to contract and crack.
Once a week, run the leash through your fingers. You’re feeling for two things: changes in texture and the hardware. The leather should feel supple, not stiff or board-like. The metal snap hook should open and close with a positive click, and the swivel should rotate freely without grinding. This two-minute check catches problems long before they become failures.
Where this goes sideways: Storing a wet, dirty leash coiled in a bag or bucket. Trapped moisture has nowhere to go, creating a perfect environment for mildew to set in within days. The leather will develop a musty smell and dark, splotchy stains.
The 6-12 Month Conditioning Rhythm
Conditioning replenishes the oils that keep the leather fibers bonded and flexible. A dry leash under tension is a cracked leash waiting to happen.
The consensus interval from makers like Tetherleads is every 6 to 12 months. Don’t mark your calendar. Judge by the leather itself. When it starts to look dull, feel stiff, or show light greyish streaks in the grain, it’s time. That’s the leather crying out for nourishment.
Forget fancy, scented potions with a dozen unpronounceable ingredients. Reach for a simple, beeswax-based leather balm. Brands like Renapur or Leather Genie are popular with equestrian and dog gear makers for a reason, they nourish without clogging. Beeswax provides a degree of water resistance, while oils like jojoba (found in Leather Genie) penetrate to condition.
| Conditioning Step | Purpose | Risk If Skipped |
|---|---|---|
| Spot Test | Ensure product won’t stain or damage. | Permanent discoloration on the front of the leash, ruining its appearance. |
| Apply Thin Coat | Allow for even absorption, no clogged pores. | A sticky, greasy residue that attracts more dirt and can weaken stitching over time. |
| Buff Gently After Absorption | Remove excess, restore natural sheen. | The leather feels tacky and picks up every piece of lint and dust on the next walk. |
Apply a small amount, a little goes a long way, with a soft cloth, working it into the leather in a circular motion. Pay extra attention to high-wear areas: the handle and the last six inches near the clip. Let it absorb for an hour, then buff lightly with a clean cloth. The leash shouldn’t feel greasy, just subtly richer and softer.
When to Clean (Not Just Condition)
Cleaning and conditioning are different jobs. You condition to nourish; you clean to remove embedded soil that a damp cloth can’t lift. If your leash is visibly grimy or has been through a serious mud bath, cleaning comes first.
Saddle soap is the traditional choice, but it’s a strong cleaner designed for sweaty, filthy saddles. For a dog leash, it can be overkill and drying if used too often. Reserve it for heavy, set-in dirt. For general cleaning, a dedicated, pH-balanced leather cleaner is gentler.
- Test the cleaner on an inconspicuous spot, like the very end near the stitch line.
- Apply to a cloth, not directly onto the leather, to control the amount.
- Wipe gently with the grain to lift dirt. Don’t scrub.
- Let it dry completely before you even think about conditioning. Conditioning over damp leather or cleaner residue seals moisture in, which can rot the fibers.
This is a timeless material. A patina, the darkening and softening from oils and use, is a sign of character. You’re not cleaning to make it look new again. You’re cleaning to remove the harmful elements so the good character can develop.
Hardware and Stitching: The Weak Points
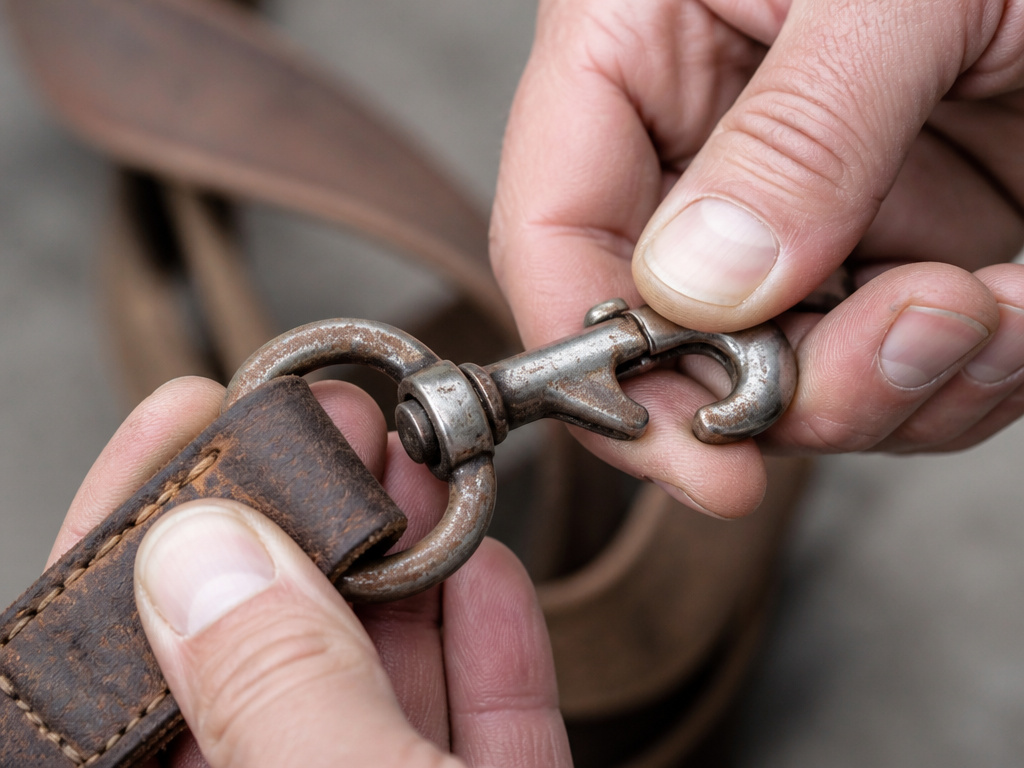 The leather often outlasts the metal. Your monthly inspection must include the functional parts.
- D-Ring & Snap Hook: Look for rust, cracks, or deformation. A bent D-ring has been overloaded. A snap hook that doesn’t close firmly is a failure point. Wipe metal fittings dry after wet walks to prevent corrosion, especially with salt water.
- Stitching: Check for fraying, broken threads, or areas where the thread has pulled loose from the leather. This is critical at stress points: where the leash meets the clip and where the handle loop is sewn.
- Rivets & Hardware: Ensure any rivets are snug and not spinning freely.
The best leather leashes use solid brass or nickel-plated solid brass hardware for corrosion resistance. If your leash’s fittings are showing excessive wear, it’s a sign to replace the entire lead. You can’t re-stitch or re-rivet it at home with any guarantee of safety.
What Not to Do: The Short List
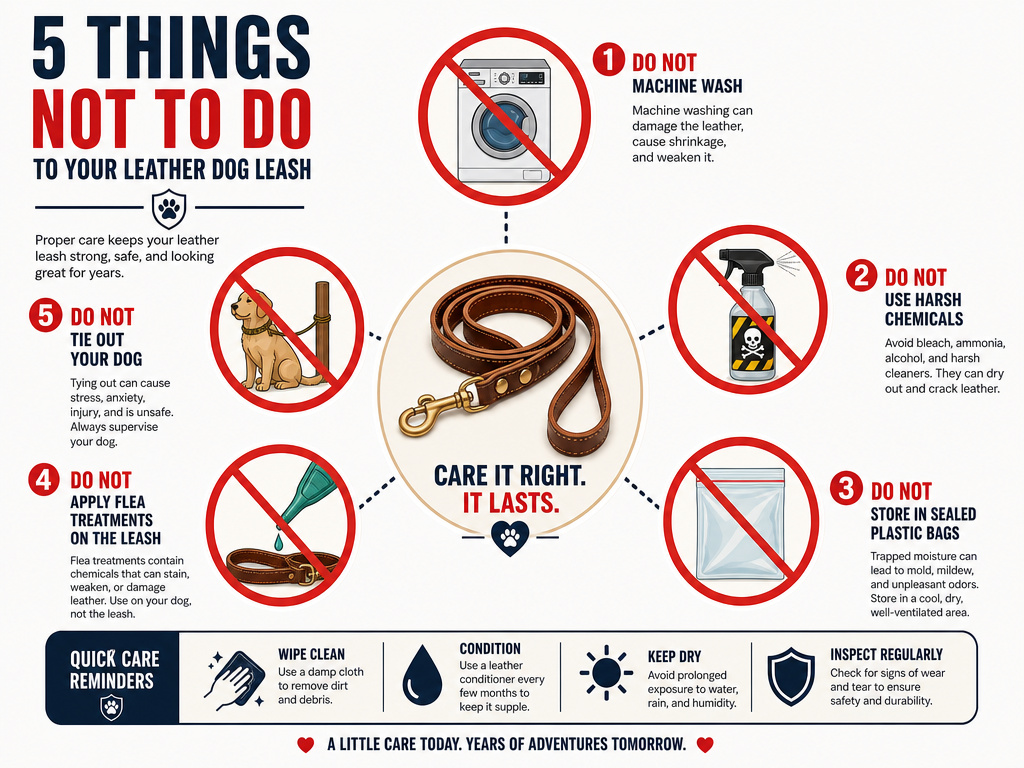 More leashes are ruined by well-intentioned mistakes than by neglect. Here’s the blunt list.
Never allow your dog to swim while wearing a collar and leash attached. This is the cardinal safety rule from manufacturers like FIREDOG. The risk isn’t just wet leather, it’s the leash snagging on underwater obstacles, leading to entanglement and drowning. If your dog is a swimmer, take the leash off.
Avoid these common errors:
- Machine Washing/Tumble Drying: The agitation, heat, and detergents will destroy the leather’s structure, shrink it, and crack it irreparably.
- Harsh Household Cleaners: Bleach, ammonia, or all-purpose sprays will strip the leather’s natural oils and cause permanent discoloration.
- Plastic Bag Storage: Leather needs to breathe. Storing it in a sealed plastic bag traps ambient moisture and leads to mildew. I learned this the hard way with a jacket; a summer in a bag left it with splotchy mildew stains.
- Ignoring Flea Treatment Residue: Liquid “spot-on” flea treatments are notorious for staining and degrading leather. Remove the leash before application, and only put it back on once the dog’s coat is completely dry.
- Using as a Tie-Out: A leash is for walking and control, not for tethering a dog unsupervised. The constant, uneven tension can overstress stitching and hardware.
For a deeper dive on the products themselves, our guide on the difference between leather cleaner and conditioner breaks down when to use each.
Choosing and Storing for Longevity
Your choices when the leash isn’t in use determine its lifespan. This is where the 6-12 month conditioning rhythm meets daily habit.
Storage is essential.** Hang the leash on a hook by its handle or lay it flat in a drawer. Keep it in a cool, dry place away from direct sunlight, which can fade and dry it out. Never store it tightly coiled for long periods under heavy objects, as this can set a permanent kink in the leather.
If you need to soften leather that has become stiff from neglect, conditioning is the first step. Apply a balm, let it absorb overnight, and gently work the leather back and forth. For severe stiffness, multiple light applications over a week are better than one heavy one.
The principles here mirror those for a leather dog collar. The leather and hardware require the same vigilance, though a collar faces additional challenges from direct contact with the dog’s skin and fur.
Frequently Asked Questions
Can a leather dog leash get wet?
It can tolerate occasional dampness from rain or grass, but it should not be soaked. If it gets wet, wipe off excess water with a soft cloth and let it air-dry naturally at room temperature. Repeated soaking or submersion will degrade the leather over time.
What is the best conditioner for a leather dog leash?
Beeswax-based leather balm, such as Renapur or Leather Genie, is ideal. These products nourish the leather with natural oils and provide light water resistance without creating a sticky, pore-clogging film. Always do a spot test first.
How often should I oil my leather dog leash?
“Oiling” is less common than conditioning with a balm. Follow the conditioning rhythm of every 6-12 months, or as needed when the leather looks dry. Over-oiling can oversaturate the leather, making it greasy and attracting dirt.
How do you restore a dry, stiff leather leash?
Restoration starts with a thorough cleaning to remove embedded dirt, followed by multiple light applications of a quality leather balm. Apply the balm, let it absorb fully (overnight is good), and gently flex the leather. Repeat until suppleness returns. The process for a leash is similar to conditioning a leather collar.
Are leather dog leashes strong?
Well-made leather dog leash from quality, full-grain or vegetable-tanned leather is extremely strong and durable. Its strength comes from the dense fiber structure of the hide. However, its longevity is entirely dependent on proper care to prevent drying and cracking.
The Bottom Line
A leather leash is a partnership between you, your dog, and a material that improves with correct care. The entire routine boils down to a simple cycle: wipe it down, let it dry, check the hardware, and feed it balm when it looks thirsty.
The one threshold that changes everything is water exposure. The moment you see your dog heading for a lake or the ocean, unclip the leash. No exceptions. That single action prevents the most severe safety risk and the fastest route to leather damage.
Everything here applies to general leather maintenance. The specifics of frequency and hardware checks are what turn general knowledge into a practical, working protocol for a tool that gets used daily. Do that, and the leash will outlast your dog’s puppyhood, adolescence, and well into their calm adult years.
