
Leather Baseball Glove Conditioning: A Step-by-Step Guide
This post contains affiliate links. As an Amazon Associate, we earn from qualifying purchases.
To condition a leather baseball glove, apply a manufacturer-approved leather conditioner in tiny, measured amounts, think a pea or dime per section, working it into clean, dry leather with a cloth. Let it absorb fully, then wipe off any excess. Never use heat, household oils, or soak the leather, as this damages the fibers and shortens the glove’s life.
The difference between a pea-sized dab and a dime-sized blob is the line between a glove that lasts a decade and one that turns soft and fails in two seasons. Manufacturers print those specs because leather can only absorb so much before the excess sits on top, attracting dirt and speeding up rot.
What follows is a breakdown of the why behind each rule, drawn directly from OEM manuals, and the step-by-step process that keeps the structure of a Rawlings Heart of the Hide or a Vinci Pro intact while keeping the leather supple.
Key Takeaways
- Use only conditioners made for baseball gloves, like Rawlings Glovolium or Nokona NLT. Household oils and most general leather products can over-soften or damage the specific leathers used.
- Apply conditioner in pea-sized or dime-sized amounts per section, as specified by brands like Vinci and Nokona. Over-application is the fastest way to shorten your glove’s lifespan.
- Never use heat, steam, ovens, or hot cars, to soften or dry a glove. Every major manufacturer, including Rawlings and Nokona, explicitly warns this dries out leather and breaks down the laces.
- Condition the entire glove, pocket, laces, and rear, unless it’s a specific model like the Vinci Fortus, where only the palm needs treatment.
- Let the glove sit for at least 24 hours after conditioning for full absorption before wiping off excess and using it.
The Core Rules of Glove Conditioning
Conditioning replenishes the natural oils that keep the leather fibers flexible and strong. Get the amount wrong, and you’re not maintaining it, you’re degrading it.
Vinci’s instructions are relentlessly specific: “never apply more than a pea sized amount at a time. Usually 3 – 5 pea sized applications will sufficiently treat each side of a new glove.” Nokona says “dime-sized amounts.These are the maximum the leather can absorb without leaving a residue that weakens the material. A glove slathered in oil feels flexible for a week, then the leather becomes overly soft, loses its shape, and the laces stretch prematurely.
The goal is to replenish the leather’s natural oils, not to saturate it. Over-conditioning creates a sticky surface that attracts dirt and grime, which then grinds into the leather like sandpaper every time you close the glove.
Here’s what happens when you ignore the core rules.
| Common Mistake | What It Does to the Leather | Timeline to Visible Damage |
|---|---|---|
| Using too much conditioner | Oil sits on surface, attracts dirt, weakens fiber bonds | Glove feels soggy within a month; laces stretch and break faster |
| Using household oils (olive, etc.) | Can go rancid, attracts mold, over-softens beyond repair | Odor and discoloration in 2-3 months |
| Applying heat (steam/oven) | Rapidly dries out natural oils, causes leather to shrink and crack | Laces become brittle and snap on first hard catch |
| Conditioning dirty leather | Grinds dirt into pores, creates permanent scratches | Immediate; dull, scratched finish after first use |
The feel of a properly conditioned glove is firm but pliable, with a slight, healthy tackiness. An over-conditioned one feels limp and vaguely greasy hours after you’ve wiped it down.
What You’ll Need: Choosing the Right Conditioner
Not all leather conditioners are equal. A product for a sofa or a dress shoe often contains silicones or waxes meant to seal and shine. A baseball glove conditioner is designed to penetrate and nourish without compromising the leather’s grip or structure.
You need a cleaner, a conditioner, and some simple tools. * A soft-bristled brush or dry microfiber cloth for dust. * A leather-safe cleaner for deeper grime (optional, but vital for used gloves). * A baseball glove-specific conditioner (Rawlings Glovolium, Nokona NLT, Vinci Conditioner, Pecard Glove Conditioner). * Latex or nitrile gloves to keep your hands clean. * A few clean, lint-free cloths (old t-shirts work perfectly).
Skip the all-in-one “cleaner/conditioner” combos. Cleaning and conditioning are separate processes with different goals. You also don’t need a special “glove mallet” for conditioning, that’s for breaking in the pocket’s shape, which is a different task.
For most gloves, a brand-matched conditioner is the safest bet. The chemistry is formulated for their specific tannage. If your glove’s brand is unknown, Pecard Glove Conditioner or Lexol Leather Conditioner are neutral, high-quality options trusted by professionals for decades. I keep a jar of Pecard on my shelf for general projects because its mix of natural oils and waxes nourishes without over-softening.
Step-by-Step: Conditioning Your Glove
This isn’t a race. Rushing leads to gloopy, uneven application. Set aside 30 minutes for the application and plan to let the glove rest overnight.
1. Clean the Glove Thoroughly
Start with a completely dry glove. Brush out all loose dirt, dust, and dried mud from the pocket, laces, and webbing with a dry brush. For ingrained grime, dampen a corner of a cloth with a leather-safe cleaner and gently spot-clean. Never dunk the glove in water. Let it dry fully if you use any moisture. A proper cleaning process for gloves is the essential first step before any conditioning.
2. Apply Conditioner in Tiny Amounts
Put on your latex gloves. Dip a fingertip into your conditioner. Vinci’s pea or Nokona’s dime. Apply that small amount to one section of the glove: the palm, a finger, or the web. Using a clean cloth, rub the conditioner in with firm, circular motions. You’re working it into the leather’s pores, not just painting the surface. Cover every leather surface: front, back, fingers, and critically, the laces. Dry laces snap.
The part nobody mentions: Laces are leather, too. They dry out faster than the glove body because they flex more. Skipping them is why people are re-lacing a glove every season.
3. Let It Absorb, Then Buff
Once the entire glove is treated, set it aside in a cool, dry place, not in direct sun or a hot car. Let it sit for a full 24 hours. This wait is essential; it lets the oils wick deep into the leather fibers. After 24 hours, take a fresh, dry cloth and buff the entire glove. You’re removing any conditioner that didn’t absorb, which prevents that sticky residue. The glove should not feel oily or slick.
4. Shape and Store
After buffing, shape the pocket by placing a ball inside and wrapping it with a couple of rubber bands or a glove wrap. Store it flat or on its side in a temperate place. This helps it hold its form while the conditioner fully cures.
Model-Specific Notes and Exceptions
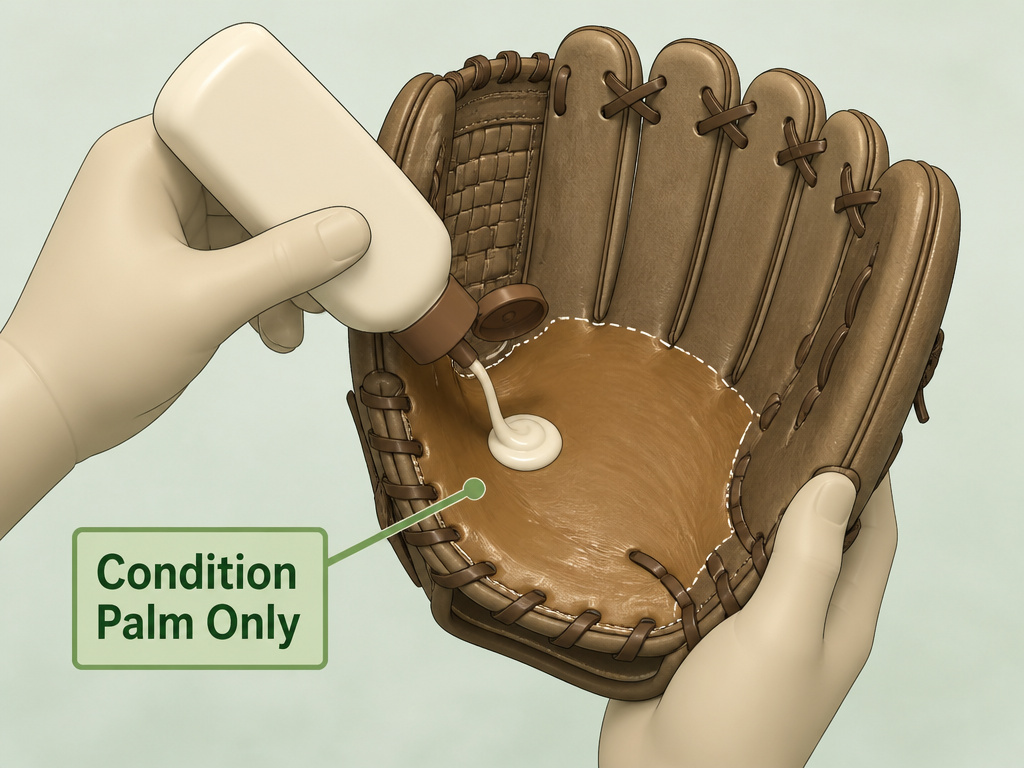
Most rules have an exception that proves them. With gloves, it’s the Vinci Fortus and CP Junior Youth models. Vinci explicitly states: “On Fortus and CP Junior Youth gloves only condition the palm.” The rest of the glove uses a different leather or treatment that doesn’t require it. Conditioning the whole thing could oversoften the structured parts.
High-end models like the Rawlings Heart of the Hide and Pro Preferred use a fuller, tighter grain leather. They naturally take longer to break in and may feel stiffer initially. Don’t mistake this for dryness and over-apply conditioner. Follow the same light, measured approach, the payoff is a glove that holds its shape and performance for years longer than a softer leather.
Understanding your leather glove types helps here. A stiff, full-grain steerhide glove needs conditioning for flexibility. A soft, already-supple deerskin glove needs it much less frequently, only to prevent drying.
What Not to Do: The Fast Ways to Ruin a Glove
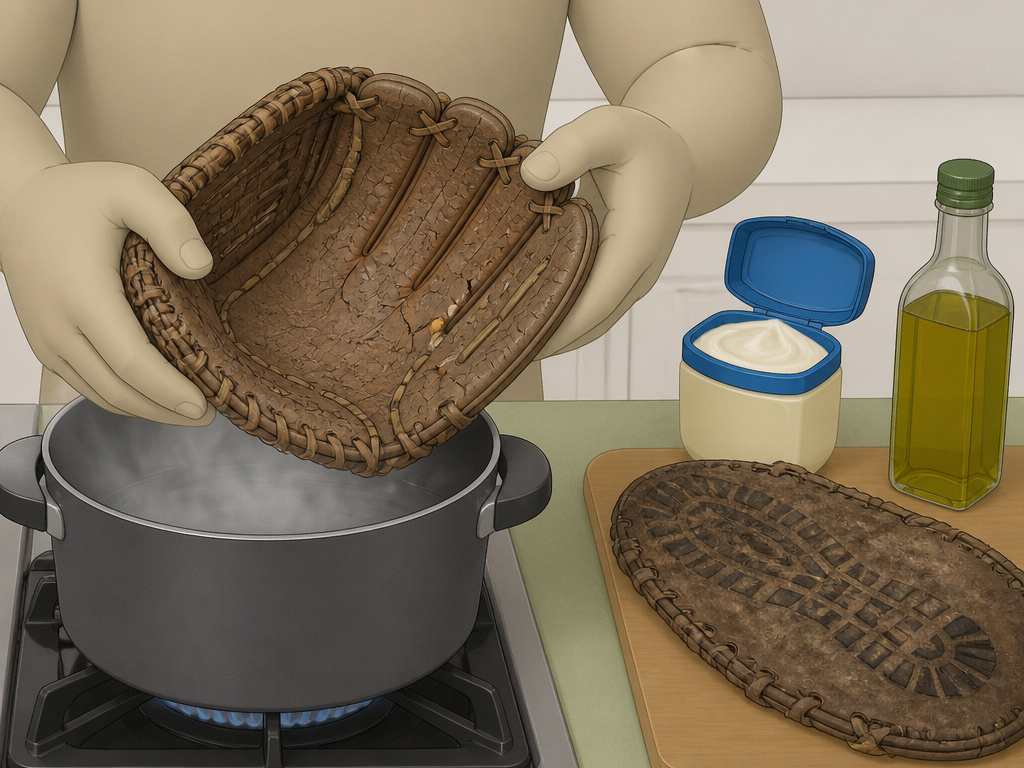
The internet is full of terrible shortcuts. Let’s be clear about this: the manufacturers who build these gloves unanimously say to avoid these methods.
Never Use Heat. Rawlings, Nokona, and Vinci all ban steaming, baking, or leaving a glove in a hot car. Heat doesn’t “open up the pores”; it rapidly vaporizes the leather’s natural moisture and oils. The leather shrinks, hardens, and becomes brittle. The laces dry out and will snap on the first hard impact. It’s irreversible damage disguised as a quick fix.
Never Use Petroleum Jelly, Olive Oil, or Mink Oil. These are not formulated for tanned baseball leather. They can go rancid, attract mold, and over-soften the leather to a mushy state. They also darken leather significantly and unevenly. Stick to products designed for the task, just as you would use a specific leather balm for boots or a dedicated neatsfoot oil for certain heritage leathers.
**Never Drive Over It.This action crushes and stresses the leather fibers unpredictably. You might get a pocket fold, but you’ve also likely compressed and weakened critical stress points.It’s a great way to get a dirty, misshapen glove.
How Often Should You Condition a Glove?
The answer is found in the leather itself. A glove used three times a week in dry, sunny climates will need conditioning more often than one used monthly in humid conditions.
Inspect your glove. Look for these signs: * The leather looks dull, chalky, or ashy. * It feels stiff and crisp, not supple. * The laces are dry and ragged. * The color seems faded or parched.
For most players, a solid conditioning at the start and end of the season is sufficient. During the season, a quick, light touch-up if the glove gets soaked or caked in mud is wise. A glove stored properly in the off-season may only need it once a year. The key is establishing a conditioning schedule based on use, not guesswork.
Over-conditioning is a bigger risk than under-conditioning. If your glove feels sticky or too soft, you’ve done it too often or used too much. Wipe it down, let it air out for a few days, and don’t condition it again for at least six months.
Troubleshooting: Over-Conditioned, Under-Conditioned, and Stained
You can fix most conditioning mistakes if you catch them early.
Sticky, Over-Conditioned Glove: The leather feels limp and tacky. Take a clean, dry cloth and buff the glove vigorously to remove surface residue. Then, let it air out in a well-ventilated room (not in the sun) for 2-3 days. The excess oils will slowly evaporate. Do not apply any more product.
Stiff, Under-Conditioned Glove: The leather is dry and cracking. Apply a single, very light coat of conditioner following the pea-sized rule. Focus on the stiffest areas. Let it absorb for 48 hours instead of 24, then buff. You may need a second light treatment in a week if it’s severely dry.
Stains on the Glove: Conditioner can sometimes darken leather unevenly, especially if there was a pre-existing stain or dirt. The best fix is prevention, always clean first. For existing stains, you may need a dedicated leather stain removal process before your next conditioning. Never try to “condition out” a stain; you’ll just set it deeper.
Frequently Asked Questions
Can I use coconut oil on my baseball glove?
No. Avoid coconut oil and other food-based or household oils. They are not designed for tanned leather, can spoil, and will over-soften the glove, destroying its structure. Use a conditioner made for baseball gloves.
How long does it take for glove conditioner to dry?
It doesn’t “dry” like water; it absorbs. You should let the glove sit for 24 hours after application to allow the oils to fully penetrate the leather. After that, buff off any excess that remains on the surface.
Will conditioner make my glove heavier?
Properly applied, absorbed conditioner will not add noticeable weight. If your glove feels heavier, you used too much, and the excess is sitting on the surface. Buff it off thoroughly.
Can I condition a wet glove?
Never. Always condition a completely dry glove. Applying conditioner to wet leather traps moisture inside, which can lead to mildew and rot. Dry the glove fully at room temperature first.
Does conditioning a glove help break it in?
Yes, but indirectly. Conditioning softens the leather fibers, making them more pliable and easier to form to your hand. It should be part of your overall process to break in a baseball glove, along with playing catch and shaping the pocket.
Before You Go
Conditioning a glove is a act of preservation, not transformation. The goal is to maintain what’s already there, the strength, the shape, the memory of a thousand catches. The one rule that overrides all others: less is more. A pea-sized amount, applied with patience, beats a soaked rag every time.
If you take away one thing, let it be this: your glove’s leather type dictates everything. A top-tier full-grain leather glove is built to last but demands respect. A cheap, coated leather might not absorb conditioner at all. Know what you have, use the product meant for it, and let time do the work. A well-cared-for glove isn’t just gear; it’s a record of every game you’ve played.
