
A Complete Guide on How to Fix Cracked Leather Car Seats
This post contains affiliate links. As an Amazon Associate, we earn from qualifying purchases.
You fix cracked leather car seats by cleaning the area thoroughly, applying a leather filler compound into the cracks, letting it cure for 6-12 hours, and then sealing and color-matching the repair. The process hinges on matching the filler to the seat’s material, real leather, vinyl, or bonded leather, because each bonds differently and fails on its own timeline.
That bond is the whole game. A filler slapped over a crack in bonded leather will peel within a month, while the same filler on full-grain leather can last for years. The repair isn’t just about hiding damage; it’s about rejoining the microscopic fibers that have dried out and separated.
What follows: how to identify your seat’s actual material, the short list of tools that replace a professional’s invoice, and the step-by-step walkthrough that accounts for drying times most guides gloss over.
Key Takeaways
- Identify your seat material first, real leather, vinyl, or bonded leather, as this dictates which repair kit and adhesive will work.
- Allocate at least 6-12 hours for the filler to fully cure before sitting on the seat; rushing this step causes the repair to fail.
- Use a leather-specific adhesive, never standard super glue, which creates a brittle spot that prevents future repairs.
- Color matching is a two-step process: apply the filler, then use a separate leather dye or paint to blend the repair. Regular conditioning with a leather conditioner meeting the Bickmore Bick 4 standard is the only proven way to slow future cracking.
The Three Materials You’re Actually Gluing Back Together
Most guides talk about “leather” repair as one thing. It isn’t. Your car’s seats are likely one of three materials, and gluing them back together works differently for each.
Full-grain or top-grain leather is a single, thick piece of animal hide. When it cracks, the fibers themselves are splitting. A leather filler can wick into these gaps and bond, effectively creating a bridge. Vinyl is a plastic sheet. Cracks here are often just in the clear coat or color layer; repair requires a flexible vinyl filler and an adhesive that bonds to plastic. Bonded leather is the tricky one. It’s a pulp of leather scraps bonded with latex or polyurethane to a fabric backing. A crack here is a delamination, not a split. The surface layer is separating from the backing.
The part nobody mentions: A repair on bonded leather is temporary at best. The material itself is failing, so any filler is just buying a few months before the next crack appears nearby. A patch is the only semi-permanent fix.
The first step is diagnosis. Run your fingernail lightly across the crack.Does it catch on a rough, fibrous edge? That’s likely real leather. Is the crack smooth, with a slightly raised lip, and does the area feel plasticky? That’s vinyl or a synthetic. Does the surface feel like leather but the backing feels like cloth, and is the crack wide and shallow? That’s bonded leather.
Your repair strategy follows from this. – For real leather: a flexible leather filler and a penetrating adhesive. – For vinyl: a vinyl repair compound and a plastic-bonding adhesive. – For bonded leather: a flexible filler and a strong, fabric-compatible adhesive like Tear Mender, but plan for a future patch.
Assess the Damage: Cracks, Scuffs, and the Point of No Return
Not every blemish needs the same intervention. A network of fine, shallow cracks in the seating area can often be filled. A single deep gash that goes through the material usually needs a patch. A scuff that’s just removed the color layer only needs dye.
Here’s a simple rule: if you can see the foam or fabric backing through the crack, it’s a candidate for patching, not just filling. Filler alone in a deep tear will flex and crack with every sit. It might hold for a season, but it will fail.
Look at the crack’s edges. Are they curled upward? That means the material has shrunk and lost its flexibility. You’ll need to gently sand those edges flat before applying any filler, otherwise you’ll have a noticeable lump. This is where a lot of DIY jobs go wrong, they fill over the curl, sand it smooth, and then the filler pops out because it wasn’t bonded to a flush surface.
Before you start: Wear nitrile gloves. The solvents in leather prep solutions and the pigments in dyes will stain your skin. Work in a well-ventilated area, a garage with the door open is ideal. The fumes from some adhesives and prep liquids are strong.
The Short List of Tools That Actually Work
You don’t need a professional’s shop. You need a few specific items that match the job. This list assumes a crack-filling repair on real leather.
| Tool | Purpose | Skip It & You’ll Get… |
|---|---|---|
| Leather cleaner & prep solution (e.g., Colourlock Mild Cleaner, Lexol Leather Cleaner) | Removes dirt, oils, and silicones that prevent filler adhesion. | Filler that peels off within a week because it bonded to grime, not leather. |
| Microfiber cloths (several) | Wiping, buffing, and applying gentle pressure. No lint. | Lint fibers embedded in your repair, creating a fuzzy, amateur look. |
| 240-400 grit sandpaper | Lightly roughens the crack edges for mechanical grip. | A smooth, glossy surface that the filler can’t grip, leading to early failure. |
| Leather filler/repair compound (e.g., Fiebing’s Leather Repair Kit, Colourlock Liquid Leather) | Fills the crack and bonds the fibers. | A visible gap that continues to widen with use. |
| Plastic palette knife or spatula | Spreads filler smoothly and presses it into the crack. | A lumpy, uneven application that looks obvious and cracks along thick-thin lines. |
| Leather dye or paint (e.g., Colourlock Fresh Paint, Fiebing’s Leather Dye) | Blends the repair color with the surrounding seat. | A repaired spot that’s a different shade, drawing the eye to the damage. |
| Leather finisher/sealer (often included in kits) | Protects the repair and evens out the sheen. | A matte repair on a glossy seat, or vice versa. |
A heat gun or hair dryer is optional but useful for speeding up curing between coats of dye. If you use one, keep it moving and on a low setting. Leather begins to degrade around 212°F (100°C), as noted in a Mazda technical bulletin for its CX-90 seats.
Step-by-Step Repair Guide: Patience Over Speed
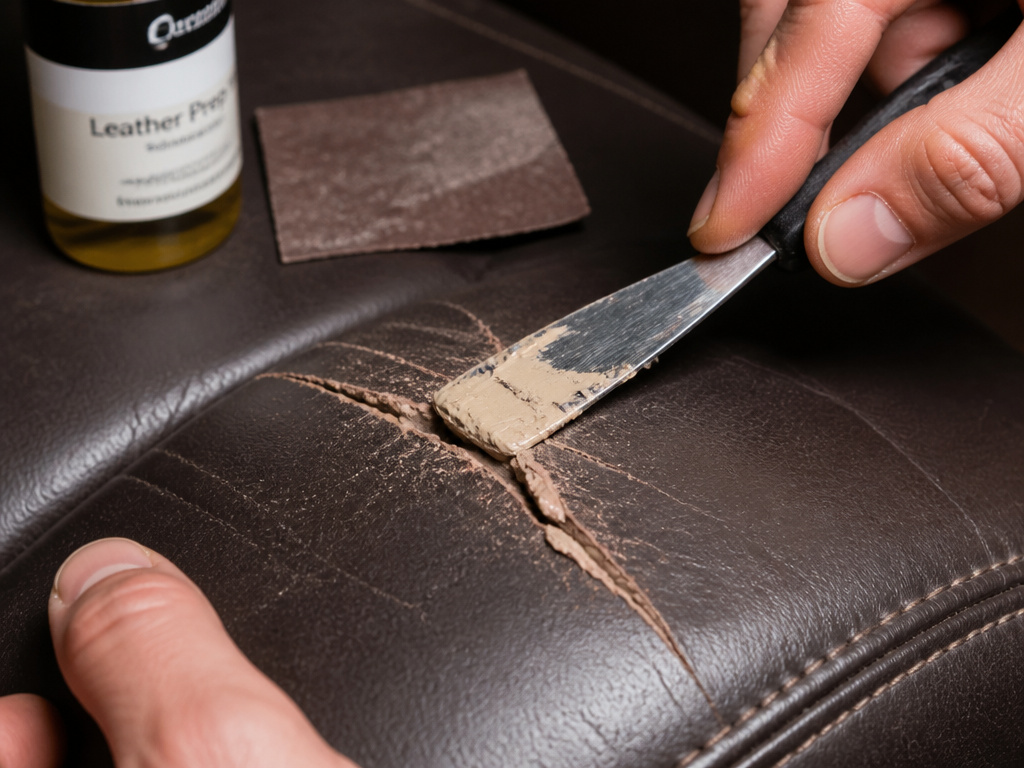 This is the core of any leather seat repair. The difference between a repair that lasts a year and one that lasts five is the timeline you follow.
1. Clean the area. This isn’t a wipe. Apply leather cleaner with a microfiber cloth, agitate gently, and wipe away the dirt. Follow with a dedicated leather prep solution or isopropyl alcohol on a clean cloth. This step strips any lingering conditioners or protectants. Let it dry completely. Proceeding with damp leather is the most common beginner mistake.
2. Prep the crack. Using 400-grit sandpaper, gently sand the immediate area of the crack. You’re not trying to remove material, just to create a microscopically rough surface for the filler to grip. Wipe away all dust with a clean, damp cloth. Let it dry again.
3. Mix and apply the filler. Most leather repair kits come with a two-part compound. Mix it thoroughly according to the instructions, usually equal parts from each tube. Use the palette knife to press the filler firmly into the crack, overfilling it slightly. Smooth the surface as best you can. The goal is to get the compound into the depths of the crack, not just to cover the top.
4. Let it cure. This is the step every rushed guide gets wrong. The surface may feel dry in an hour. The filler deep in the crack is not. The iFixit guide for a Honda CRV seat repair notes a required drying time of 6 to 12 hours. Heed it. Don’t sit on the seat, don’t put weight on it, don’t move to the next step. Full curing is essential.
5. Sand it smooth. Once fully cured, use 400-grit sandpaper to sand the repaired area flush with the surrounding leather. Use a light, circular motion. Wipe away all dust.
6. Color match. This is where artistry meets science. Apply your leather dye or colorant in thin, even coats, using a sponge applicator or airbrush if the kit includes one. Let each coat dry completely, a hair dryer on low can help between coats. It often takes 3-5 thin coats to build up perfect color coverage and hide the repair. One thick coat will look painted on and will chip.
7. Seal and protect. Apply the included sealer or a dedicated leather finisher. This protects the color and blends the sheen. Once dry, the repair is complete.
Why Most “Quick Fixes” Fail Within a Year
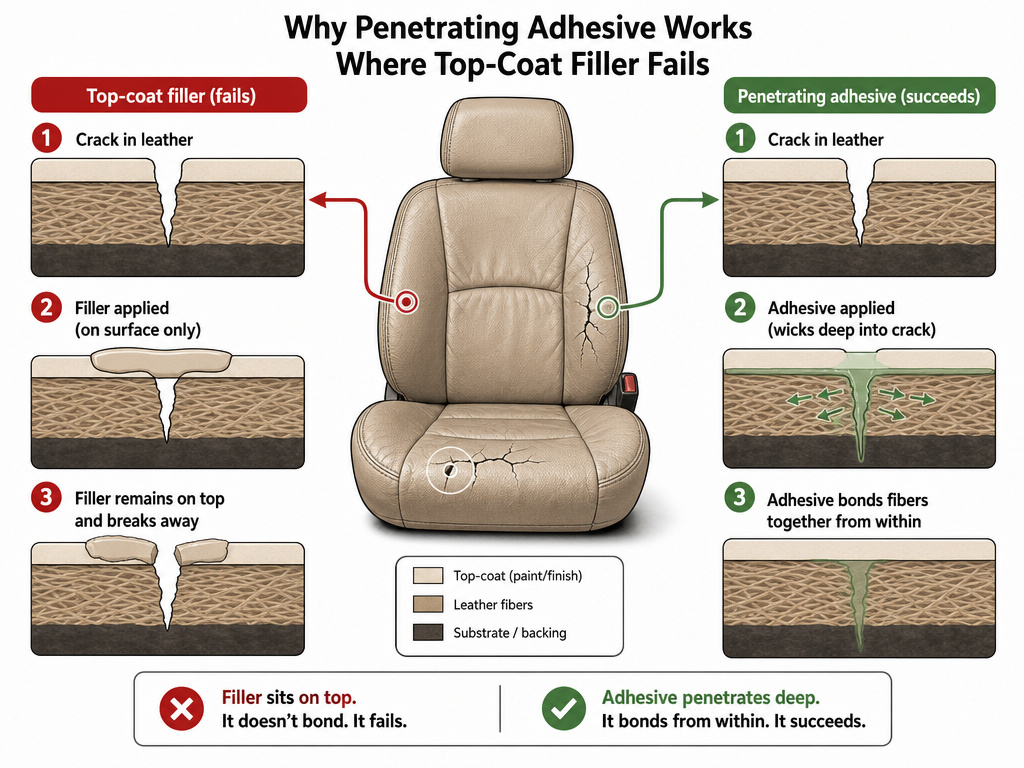 The chemistry is simple. Leather is a porous, fibrous material. A crack is a physical separation of those fibers. A filler that sits on top of the crack is just a bandage. It will flex with the seat and eventually detach. A filler that wicks into the crack and bonds the fibers together becomes part of the structure.
That’s why sanding the edges and applying firm pressure with the palette knife matters. You’re mechanically forcing the adhesive into the gap. Skipping the prep solution is another guaranteed failure. Modern seats are coated with silicones from off-the-shelf cleaners and conditioners. These create a barrier nothing bonds to. Isopropyl alcohol or a dedicated prep solution strips that barrier away.
The standard advice is to use a leather conditioner every six months. For a client’s bag stored in a humid climate, this schedule caused over-conditioning and a greasy feel. We adjusted to a yearly schedule. The same principle applies here: more product isn’t always better. After a repair, wait at least a month before applying a conditioner for car seats. Let the filler and dye fully settle and off-gas.
Color Matching: The Make-or-Break Final Step
A structurally perfect repair that’s the wrong color is a failure. Color matching is a two-stage process: first the filler, then the topcoat.
Many repair kits include a range of color pigments you can mix into the filler. This gets you close. The final color accuracy, however, comes from the dedicated leather dye or paint you apply on top. Brands like Colourlock offer system-specific leather dye for nearly every car manufacturer’s interior color code.
Test your color match in an inconspicuous spot first, like the backside of the seat bolster or under the front edge. Leather dyes can look different wet versus dry, and your seat’s color may have faded. Apply a small dot, let it dry, and evaluate. Adjust if needed.
I won’t recommend trying to dye a scuffed black seat to a lighter color. The existing pigment is too deep, and you’d need to strip the seat professionally. It’s often cheaper to buy a new seat cover or live with the patina.
When to Call a Professional (And When to Patch Instead)
DIY has its limits. Call a professional if: – The damage is larger than your hand. – The seat has multiple, deep tears. – The material is a rare or unusual color you cannot match. – The seat has active airbags or complex electronics within the bolster.
For larger tears, patching is a stronger solution than filling. This involves cutting a piece of matching leather or vinyl, applying a strong, flexible adhesive for leather like Tear Mender to the underside, and carefully setting it over the tear. The edges are then feathered with filler and the whole area is color-matched. It’s more work, but it addresses the structural weakness directly.
Frequently Asked Questions
Can you fix deep cracks in leather car seats?
Yes, but deep cracks often require a patch, not just filler. If the crack goes all the way through the leather, a filler alone will flex and fail. A leather patch glued underneath, followed by filler and dye on top, creates a much more durable repair.
How long does a leather seat repair last?
Proper repair on good-quality leather can last several years, often the remaining life of the vehicle. A repair on low-quality or bonded leather might only last 6-12 months before cracking elsewhere. The longevity depends more on the underlying material than the repair technique.
What’s the best product to fix cracked leather seats?
For most DIYers, a kit like the Fiebing’s Leather Repair Kit or a Colourlock system-specific kit is the best starting point. These include filler, colorant, and tools. The “best” product is the one designed for your seat’s specific material (leather vs. Vinyl) and color.
Can I use super glue to repair a leather car seat?
No. Never use standard cyanoacrylate (super glue) on leather. It dries hard and brittle, creating a stress point that will cause the leather to crack around it. It also seals the leather, preventing any future proper repair. Use a flexible, leather-specific adhesive.
Before You Go
The goal is to restore the seat’s function and extend its life. A well-executed repair will be visible on close inspection, and that’s fine.It’s evidence of care.
If your car lives outside in full sun, a repair is a stopgap without addressing the cause. Cracked leather is dry leather. Once your repair has cured for a month, start a regimen with a dedicated leather cleaner and conditioner every six months. It’s the only thing that slows the clock.
And if the seats are bonded leather, know that any fix is temporary. Save the effort for the driver’s seat, where comfort matters most, and consider seat covers for the long term. Sometimes, the right repair is knowing when to manage expectations instead.
