
How to Remove Grease from Leather – The Right First Step
This post contains affiliate links. As an Amazon Associate, we earn from qualifying purchases.
This post contains affiliate links. As an Amazon Associate, we earn from qualifying purchases.
To remove grease from leather, first blot up any excess oil, then cover the stain with a dry absorbent powder like cornstarch for at least ten minutes. Only after the powder has pulled up the oil should you gently clean the area with a damp cloth and a mild soap solution. Rushing straight to soap pushes the grease deeper; letting the absorbent do its work first is the step most people skip.
That gap between blotting and cleaning is where the real work happens. Soap and water don’t dissolve grease; they lift it from the surface. If the grease is still pooled on top, your damp cloth just smears it into a wider, deeper stain. Let’s be clear about one thing. The absorbent powder buys you time and lifts the bulk of the contaminant before your cleaning solution ever touches the leather.
The practical takeaway is a three-part sequence: blot, absorb, then clean. I’ll break down what to use for each step, why the order matters, and how to adjust your approach for different types of leather like smooth finished hides versus delicate Nubuck.
Key Takeaways
- Blot, don’t rub. Rubbing a fresh grease stain presses it deeper into the leather’s pores, making removal harder.
- Use cornstarch or baking soda as a dry absorbent for at least ten minutes before any liquid touches the stain. This step pulls the bulk of the oil to the surface.
- Dilute your soap properly, a few drops of mild liquid soap (like Ivory) in a quart of water. A solution that’s too strong leaves a sticky residue that attracts more dirt.
- Avoid all solvents (acetone, nail polish remover, harsh detergents). They strip the leather’s dyes and natural oils, causing permanent fading and stiffness.
- Test every cleaner on a hidden seam or underside first. A reaction on a visible area is damage; a reaction in a hidden spot is a warning.
The Immediate First Aid: Absorb the Oil
A fresh grease stain is a race against absorption. Your first move is not to clean, but to contain.
Grab a clean, white, dry cloth, a paper towel can work in a pinch, but a lint-free cotton cloth is better. Press it firmly onto the stain to soak up any excess oil. Don’t swipe. Swiping spreads the grease and grinds any particulate grit into the leather’s surface. Just press, lift, and check. Repeat with a fresh section of cloth until no more oil transfers.
Now comes the part most guides treat as an afterthought. If the stain is still damp, you need a dry absorbent. Cornstarch or plain baking soda are the go-tos here. A 2013 NHTSA technical service bulletin for vehicle interiors explicitly lists cornstarch as the first response for a grease stain before any liquid cleaning.
Common mistake: Reaching for a spray cleaner first. Soap needs a surface to work on; if that surface is covered in a layer of oil, the soap just slides over it. The grease gets pushed deeper, and you end up cleaning the soap off the grease, not the grease off the leather.
Sprinkle a thin, even layer of cornstarch over the entire stained area. You’re not making a paste; you’re creating a dry blanket. Let it sit for at least ten minutes. For a thick, heavy grease stain, leave it for an hour. You’ll see the powder start to darken and clump as it pulls the oil up. That’s your signal it’s working.
After the time is up, vacuum up the powder gently with a brush attachment. Don’t scrub with the vacuum head, just hover over it to suck up the spent absorbent. If a greasy shadow remains, repeat the cornstarch application. One round is rarely enough for a serious spill. This dry absorption step often lifts so much oil that the remaining stain removal is straightforward.
The Right Way to Clean with Soap and Water
Once the bulk of the grease is gone, you can address the residual stain with a gentle clean. This isn’t about blasting the leather; it’s about lifting the last traces without disturbing the finish.
Your cleaning solution is brutally simple: a few drops of a mild, non-detergent soap like Ivory or Murphy’s Oil Soap in a quart of warm water. Detergent soaps and dish soaps are designed to cut grease aggressively and often leave a film that attracts dirt. You want a soap that rinses clean. The official vehicle interior cleaning guidance from the same NHTSA bulletin specifies this diluted soap-and-water method for greasy stains on leather upholstery.
Dampen a soft, white cloth or a non-abrasive sponge (like a 3M Scotch–Brite® Type T sponge, part number 07439) in the solution. Wring it out until it’s just damp, not dripping wet. The leather should never feel soaked.
Start at the outer edge of the stain and dab inward, then work your way back outward to the edge. This circular, dabbing motion prevents a visible “clean spot” ring. Use moderate hand pressure, you’re not scouring a pan. After a few passes, rinse your cloth in clean water, wring it out, and go over the area again to pick up any soap residue. Follow immediately with a dry, absorbent towel to blot the area dry.
Let the leather air dry completely, away from direct heat. A fan on a low setting can help. Never use a hair dryer or place it in sunlight. Heat can bake any remaining oils into the leather and cause the hide to shrink or crack.
What Not to Use: The Damage Brigade
The urge to use a powerful solvent on a stubborn grease stain is strong. Resist it.
Household cleaners containing ammonia, bleach, or solvents like acetone will not just remove the grease. They’ll strip the aniline dyes right out of the leather, leaving a permanent, faded ghost of the stain. They also dissolve the natural oils that keep the leather supple, leading to a stiff, cracked patch. This is based on years of practical experience seeing the results.
Saddle soap is another common misstep. It’s formulated for the heavy oils and dirt found on equestrian gear, not for your jacket or car seat. On finished leathers, it can leave a waxy, sticky residue that clouds the finish and attracts lint.
Where this goes sideways: Using a magic eraser or stiff brush. These are abrasives. They don’t remove the stain; they sand off the leather’s top-grain finish along with it, creating a dull, rough patch that will never polish back to a sheen.
Stick to the mild soap and water protocol. If a stain persists after two careful treatments, it may be time to call in a professional. Continuing to attack it with stronger home remedies usually does more harm than good.
Smooth Leather vs. Nubuck: A Critical Distinction
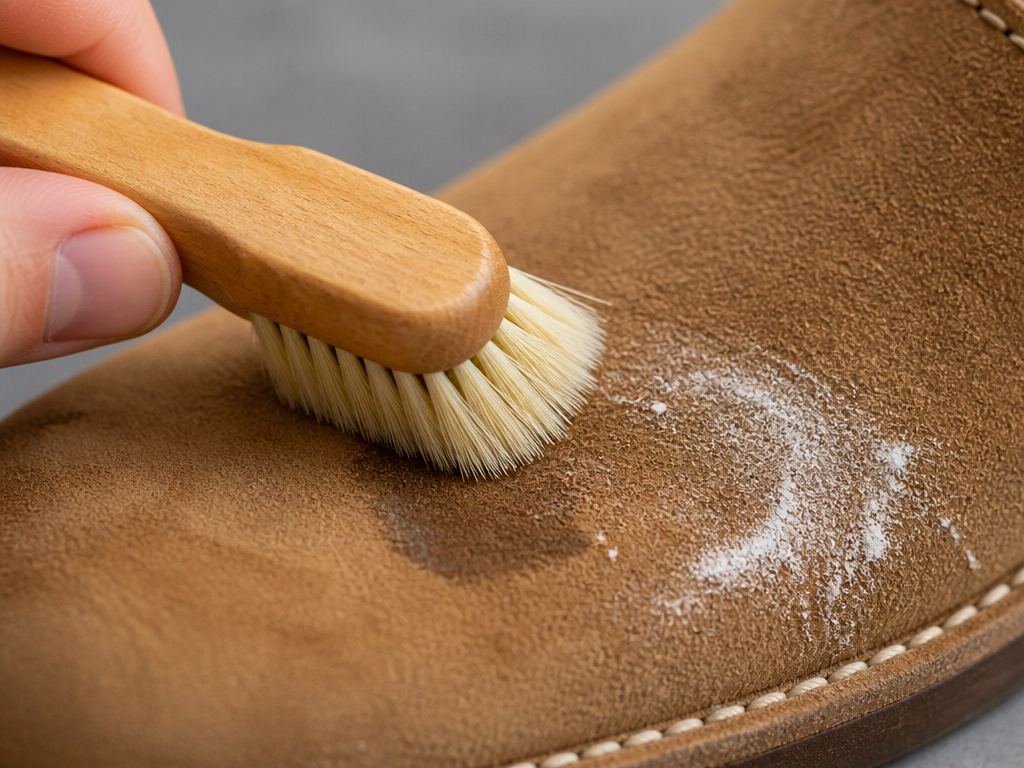 Not all leathers are cleaned the same. A standard smooth, finished leather (like what’s on most car seats, jackets, and bags) can handle the damp-cloth method. But Nubuck, that velvety, brushed leather, requires a drier approach.
Nubuck is top-grain leather that’s been sanded to raise a short nap. Getting it wet can mat that nap down, creating a permanent dark spot. The procedure changes.
| Leather Type | First Step for Grease | Cleaning Step | Special Note |
|---|---|---|---|
| Smooth Finished | Blot, then cornstarch. | Damp cloth with diluted soap, dab dry. | A horsehair brush (#BR-01 style) after drying restores shine. |
| Nubuck / Suede | Blot, then cornstarch. | Use a dry, clean horsehair brush to gently brush the area after vacuuming. | Avoid all moisture. If stain remains, use a dry specialist suede cleaner. |
| Aniline (Unfinished) | Blot, then cornstarch. Extra caution. | Minimal damp dabbing, dry immediately. | Highly absorbent; grease can penetrate deeply. Consider professional help early. |
For Nubuck, after you’ve vacuumed up the cornstarch, take a clean horsehair brush dedicated to leather care and gently brush the nap back up. The goal is to restore the texture. If a shadow remains, a dry powder suede cleaner might help, but introducing any liquid risks a much bigger problem. This is why knowing your leather types is step zero for any care routine.
Step-by-Step Walkthrough
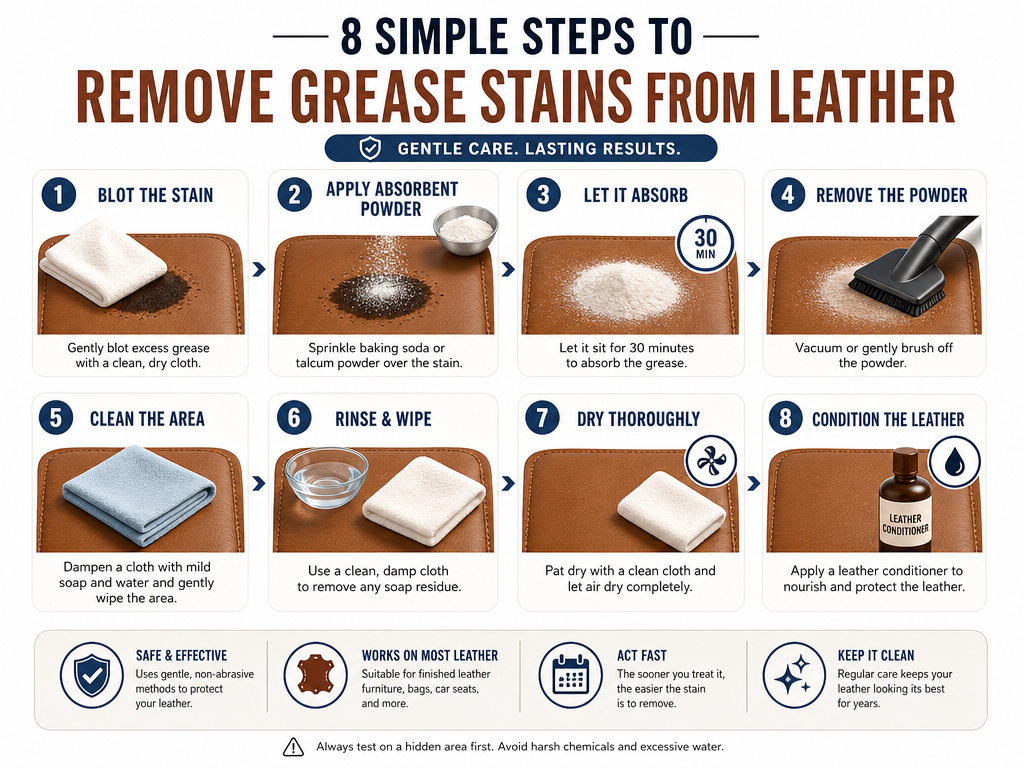 Here’s the full sequence, start to finish, for a typical grease stain on smooth leather.
- Blot. With a dry white cloth, press firmly on the stain to soak up excess oil. Use a fresh section of cloth each time.
- Apply Absorbent. Sprinkle a thin layer of cornstarch or baking soda over the stain. Let it sit for at least 10 minutes (30-60 for heavy grease).
- Vacuum. Gently vacuum up the powder with a soft brush attachment.
- Inspect. If a stain shadow remains, repeat steps 2 and 3.
- Mix Solution. In a bowl, mix a quart of warm water with 3-4 drops of mild liquid soap (Ivory).
- Damp-Clean. Dampen a white cloth, wring it out thoroughly, and dab the stain from the outside in. Rinse the cloth in clean water and dab again to remove soap.
- Dry. Blot the area with a dry towel, then let it air dry completely.
- Condition (Optional). Once fully dry, if the leather feels stiff, apply a tiny amount of a quality leather conditioner to restore suppleness. Buff lightly with a dry cloth.
The leather will tell you what it needs. If the spot looks lifted and the surrounding area isn’t discolored, you’ve won. If a faint ring persists, sometimes a second, very light conditioning of the entire panel (not just the spot) can even out the appearance.
Why Conditioner Matters After Cleaning, especially with even mild soap, can strip away a tiny amount of the leather’s natural lubricating oils. That’s why a follow-up conditioner isn’t just cosmetic; it’s maintenance.
But not right away. You must let the leather dry completely, usually 24 hours, before applying any conditioner. Applying conditioner to damp leather traps moisture underneath and can lead to mildew or a blotchy finish.
I learned this the hard way with a favorite briefcase. I cleaned a grease spot, buffed it dry, and immediately applied conditioner, eager to restore the look. The spot dried with a faint, waxy residue that attracted dust and looked duller than the rest of the bag. Now I wait a full day. The conditioner soaks in evenly, and the spot blends perfectly.
Choose a conditioner meant for your type of leather. For smooth finished leathers, a light cream like Leather Honey or Bick 4 works well. For jacket care or boots, you might use a product with a bit more wax for water resistance. The key is a thin, even application and a thorough buff after it soaks in.
Preventing Future Stains and Damage
An ounce of prevention is worth a pound of cornstarch. Keeping your leather healthy makes it more resistant to stains in the first place.
- Regular Dusting. Use a soft, dry cloth or a horsehair brush to remove surface dust weekly. Dust particles can grind into the leather under friction, acting like fine sandpaper over time.
- Condition Seasonally. Apply a light conditioner every 3-6 months, depending on use and climate. Dry, stiff leather is more porous and will absorb grease and stains faster than nourished, supple leather.
- Mind the Environment. Don’t store leather in hot cars, plastic bags, or damp basements. Ideal storage is around 70°F (21°C) with 50% humidity. Extreme heat dries it out; dampness promotes mold.
- Treat High-Touch Areas. Armrests, headrests, and bag handles get constant contact with skin oils. Give these areas a light preventative clean with a damp microfiber cloth every month or so before oils build up into a visible stain.
Think of it like boot care. You don’t wait for the salt stains to etch in; you wipe them down after each wear. The same principle applies to your leather goods.
Frequently Asked Questions
Can I use baking powder instead of cornstarch?
No. Baking powder contains acids and leavening agents. Stick to pure cornstarch or baking soda (sodium bicarbonate), which are simple, dry absorbents with no reactive additives.
What if the grease stain is old and dried?
The process is similar but requires more patience. You can’t blot a dried stain, so go straight to the cornstarch. Let it sit for several hours, even overnight, to slowly pull the hardened oils to the surface. You may need to repeat the absorption step three or four times before moving to cleaning.
Will this method work on leather car seats?
Yes, this is the exact method outlined in automotive service bulletins for cleaning car seats. The key is to avoid saturating the stitching or the underlying foam. Use a barely-damp cloth and dry thoroughly to prevent musty odors.
Can I use this to remove oil from a leather bag?
Absolutely. The process is identical for bags, jackets, or furniture. For bag stains, pay extra attention to seams and edges where grease can hide. Use a cotton swab dipped in your soap solution for precise cleaning along stitching.
What about other types of stains like ink or water?
Grease is a specific beast because it’s oil-based. For ink stains, you need a different solvent (often alcohol-based, used with extreme caution). For water stains, the best approach is often to let them dry completely and then brush the nap. Each stain type has its own protocol.
The Bottom Line
Removing grease from leather isn’t about finding a miracle chemical. It’s about respecting the material’s porosity and working with simple physics: blot, absorb, then gently clean. The cornstarch step is your best ally, turning a liquid problem into a powder you can simply vacuum away.
If you remember one thing, let it be this: never let a sense of urgency make you skip the dry absorbent. Rushing to apply soap to a fresh grease spill is the single most common error, and it’s how a small spot becomes a permanent shadow. Slow down, let the powder work, and you’ll save the leather every time.
