
How to Lock Stitch Leather for Maximum Strength and Finish
This post contains affiliate links. As an Amazon Associate, we earn from qualifying purchases.
To lock stitch leather by hand, you use two needles and a single length of waxed thread to create a self-locking stitch within each hole. This traditional saddle stitch is stronger and more repairable than a machine lockstitch because if the thread breaks anywhere, the rest of the seam stays intact. For leather over 3 oz, it’s the gold standard.
That strength comes from a specific locking action. The two threads cross inside the hole, creating a knot that rests in the middle of the material, not on the surface where wear happens. A machine lockstitch uses a bobbin thread and a needle thread to form a knot on the underside, which can be a single point of failure.
What follows is a breakdown of the exact tools, a step-by-step walkthrough of the saddle stitch, and a look at why this method outlasts machines on thicker hides. You’ll also get the numbers on why stitch density matters more than you think, and what happens when you get it wrong.
Key Takeaways
- Hand-sewn saddle stitching creates a true lockstitch that is stronger and more easily repaired than a machine-made lockstitch on leather.
- Use a pricking iron, not a revolving punch, to create clean, consistent holes that align perfectly for a professional finish.
- Beeswax your thread thoroughly; it reduces friction, helps the thread lay flat, and seals the stitch holes against moisture.
- Pull each stitch to a firm, consistent tension, over-tightening puckers the leather and cuts the thread against the hole edge.
- A stitch density of 5 stitches per centimeter (spc) is the sweet spot for strength on garment leathers; going denser actually weakens the seam.
Tools You Actually Need
Forget the speedy stitchers and sewing awls for primary seams. They’re great for field repairs but produce an inconsistent, weak stitch compared to a hand saddle stitch using a #4 or #5 harness needle and waxed thread. The right tools don’t just make the job easier, they make the result durable.
You need three core items: a way to make holes, something to pull thread through them, and the thread itself. A rotary punch makes round holes, which are fine for belts or straps. For any sewn panel, a set of pricking irons is essential. They create slanted diamond-shaped holes that close up around the thread, which is why they’re the standard for fine leatherwork.
The thread choice defines the seam’s character. I reach for Ritza Tiger Thread or Meisi Superfine for almost everything. They’re braided polyester cords with a waxed finish, and they lay beautifully. For needles, John James harness needles are my default. Their slight taper helps them follow the pre-punched holes without tearing.
Common mistake: Using a standard round awl to poke holes freehand for a long seam. The holes will drift, the stitch length will vary, and the finished piece will look amateurish. Invest in a set of pricking irons matched to your thread size.
What about machines? A heavy-duty machine like a Pfaff 1245 can run a lockstitch at 2800 rpm. It’s fast. But it also consumes about 2.08 meters of thread per meter of seam, and the knot it ties is vulnerable. For a bag or a pair of chaps that sees real use, the hand-sewn method is the one I trust. The saddle stitch method is slower, but it builds in redundancy.
Needle Points and Leather Strength
Not all needles are the same, and the point shape decides how much you damage the leather as you sew. This isn’t a minor detail, it’s the difference between a seam that lasts and one that tears out prematurely.
Leather has a grain direction, like wood. Sewing across it requires a needle that parts the fibers cleanly rather than tearing them. For machine sewing, Groz-Beckert’s technical guides specify a P-point needle for the highest seam tensile strength. The P-point cuts perpendicular to the seam direction, which sounds destructive but actually creates a clean hole that closes tightly around the thread under load.
| Needle Point Type | Best For | Effect on Seam Strength |
|---|---|---|
| P-point (Cutting) | Tough leathers, heel seams | Highest leather tensile strength; hole closes under load. |
| SD/R-point (Light Cutting) | Soft leathers, apparel, car seats | Good strength with minimal visible cutting. |
| S-point (Cutting) | Multi-directional sewing, bags | Lower strength; cuts in direction of seam. |
| Cloth Point | Woven fabrics only | Damages leather fibers; inconsistent appearance. |
For hand sewing, you’re not using a cutting point needle. You’re using a sharp, tapered needle to follow a pre-made hole. The hole creation is the critical step you control with your pricking irons. The geometry of that hole, a clean slice versus a ragged puncture, is what your seam strength hangs on.
This ties directly to assessing leather quality. A dense, tight grain like that found in full-grain leather can withstand a tighter stitch pattern without the fibers being cut. A softer leather needs more space between stitches to avoid becoming perforated.
Stitch Density: The 5 SPI Sweet Spot
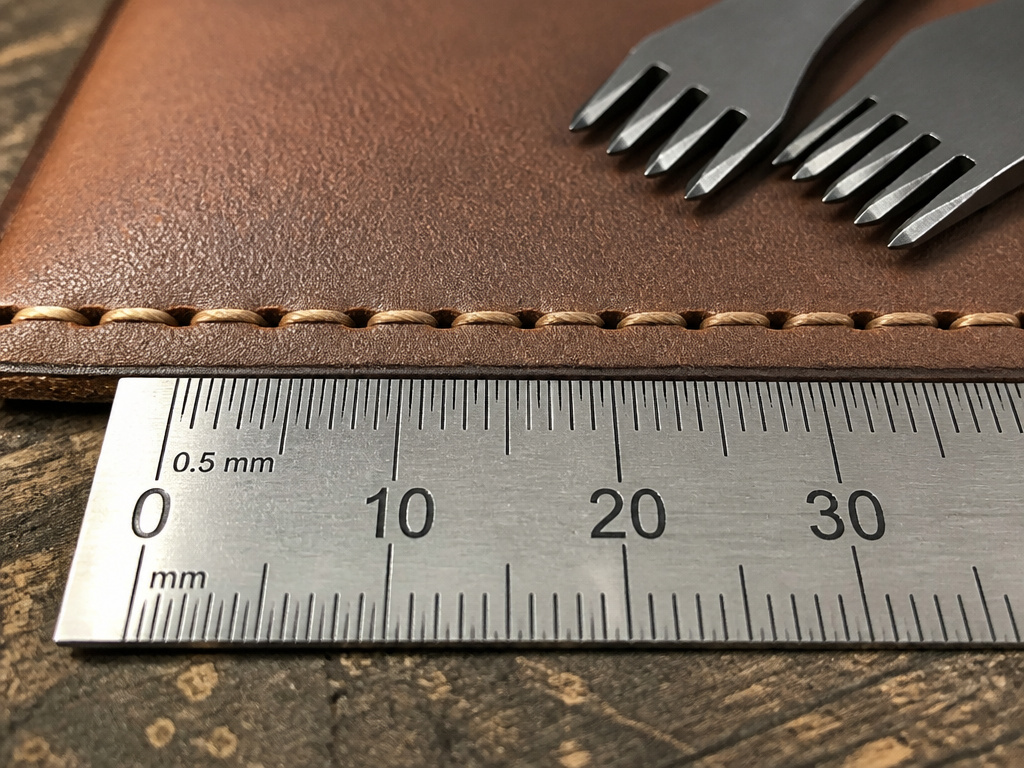 How close should your stitches be? The answer is a specific number, not a guess. Academic studies on garment leathers, using test method ISO 17697, found that a lockstitch reaches peak seam strength at 5 stitches per centimeter. That’s about 12.5 stitches per inch.
Here’s the non-obvious part: going denser than that makes the seam weaker. Increasing to 6 stitches per centimeter (about 15 SPI) caused a measurable drop in strength. The reason is mechanical: too many needle holes too close together act like perforation on a tear-off coupon. They cut the leather’s continuous fibers, turning a solid panel into a dotted line.
A 2023 study on sheep nappa leather recorded a seam strength of 114.0 ± 1.4 N at the optimal 5 spc density. Pushing to 6 spc started cutting those fibers, and the strength number fell.
This density rule is a great example of a sourced-number citation magnet. It’s a verifiable figure that contradicts the “more stitches = stronger” intuition. It also informs your pricking iron spacing. If your irons are stamped 3mm apart, that’s roughly 8.5 stitches per inch, you’re in the safe zone. If they’re 4mm apart (about 6 SPI), you might want a finer set for delicate work.
This precision is part of identifying genuine leather workmanship. Mass-produced items often use a faster, denser machine stitch because it looks “tight.On a piece from a brand like Hermès or Tanner Goods, the stitch spacing will look deliberate, not frantic.
The Core Hand-Sewn Lockstitch Technique
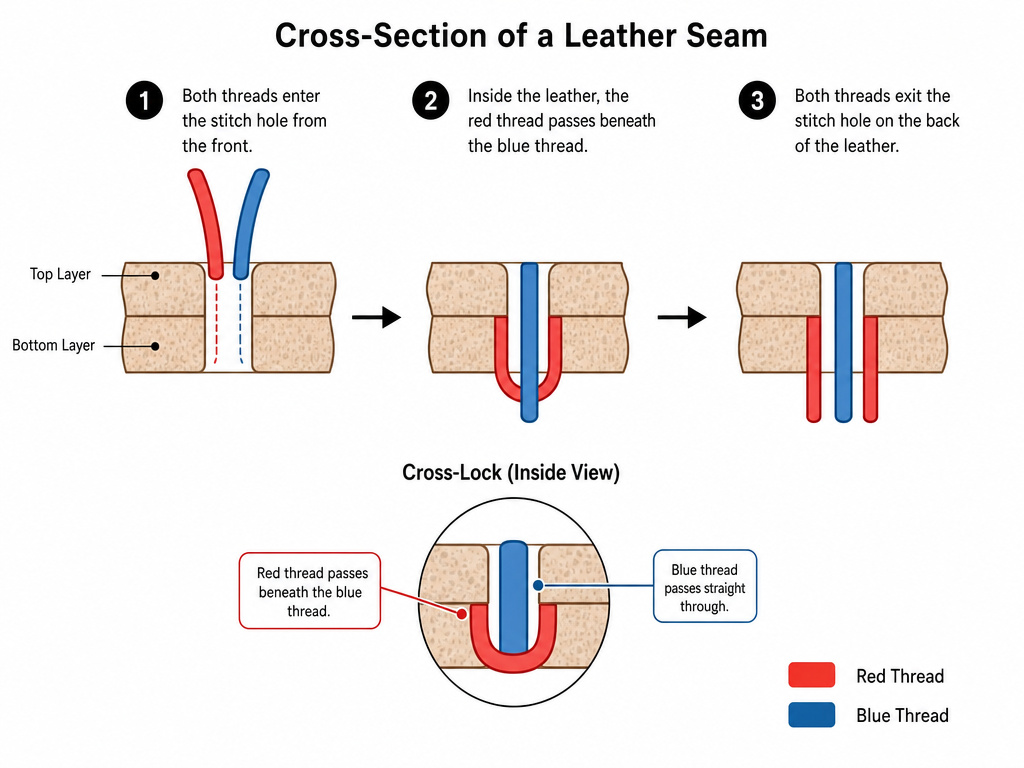 Let’s walk through the saddle stitch. This is the physical process of creating a true lockstitch by hand. The goal is that familiar crossed-thread lock inside every hole, with a rhythm that becomes automatic.
First, prepare your thread. I cut a length about four times the intended seam length. Run the entire length through beeswax, pulling it firmly to embed the wax into the braid. This isn’t just tradition, the wax reduces friction dramatically, so the thread pulls through the hole with a soft hiss instead of a gritty drag. It also helps the thread lay flat and fills the stitch hole slightly, slowing moisture ingress.
Now, thread both ends of the single strand onto two needles. You now have a needle on each end of one piece of thread. This is the setup for the saddle stitch.
- Enter the first hole. Push the right-hand needle through the first hole from front to back. Pull the thread through until you have equal lengths on each side.
- Cross the threads. Take the left-hand needle and pass it through the same hole, also front to back, but below the first thread. You should feel the needles click past each other inside the leather.
- Pull and set. Pull both threads evenly and firmly until the stitch snugs up. The crossed threads are now locked inside that hole.
- Move to the next hole. Repeat the process: right needle through the next hole, left needle through the same hole below the right thread, pull evenly.
The locking action happens because each new stitch pulls the previous lock tight from the opposite direction. If you skip the cross-step and just run two parallel threads, you have a running stitch that can unravel completely if one end breaks.
Where this goes sideways: Pulling one side tighter than the other. This twists the lock to one side of the hole and puts all the stress on one thread. Pull with equal pressure from both hands every single time. Your seam will lie flat and the threads will wear evenly.
The rhythm is slow at first. After a few inches, your hands find the pace. You’ll hear the soft pop of the thread pulling through the waxed hole and feel the slight resistance as the lock forms. That’s the sensory signal you’re doing it right.
This method is the foundation of all hand-sewing leather. It’s the reason a well-made leather bag can be re-stitched decades later, while a machine-stitched bag often needs the entire seam cut out and replaced.
Machine Lockstitch vs. Hand Saddle Stitch
This is the comparison that defines a lot of my tool choices. A machine is faster. A Pfaff 1245 can sew a lockstitch seam in minutes. But is it better for the leather?
A machine lockstitch is formed by the needle thread interlocking with a bobbin thread underneath the material. The knot sits on the backside. This is efficient, and for thin leathers or linings, it’s perfectly adequate. The weakness is singular: if that one knot or a short section of thread fails, the entire seam can unravel. There’s no built-in redundancy.
The hand saddle stitch is two needles on a single thread, crossing in every hole. Each hole contains its own independent lock. If the thread gets cut in the middle of a seam, the locks on either side of the cut hold fast. The seam might gap slightly, but it won’t unravel. This is why saddles and horse tack have been sewn this way for centuries, the stakes are too high for a single point of failure.
Consider thread consumption. That same Pfaff study found a lockstitch consumes 2.08 meters of thread per meter of seam. A chain stitch used 4.80 meters. The hand method uses roughly double the seam length in thread, but every millimeter of it is doing locking work. You’re trading material efficiency for structural redundancy.
The repair difference is stark. Fixing a broken machine stitch often means unpicking a long section or patching over it. Repairing a saddle stitch means re-threading a needle and sewing back through a few holes, the existing locks keep everything in place. For someone who believes in joining leather for the long term, the choice is clear.
Troubleshooting Common Problems
Even with the right technique, things can go wrong. Here are the physical signs and their fixes, grounded in what the leather and thread are actually doing.
Puckering along the seam line. The leather gathers up like a curtain. This is almost always caused by over-tightening each stitch. You’re pulling so hard that the thread cinches the leather panels together, distorting them. The fix is to pull just until you feel the thread seat, then stop. The seam should lie flat against your finger. A puckered seam is weaker because the leather fibers are under constant tension.
Thread fraying or breaking mid-seam. You’ll see little fluffy bits appearing on the thread. First, check your beeswax, did you skip it? Unwaxed thread heats up from friction and weakens. Second, check the holes. If you used a dull pricking iron or a round awl, the edges of the holes might be rough and act like little knives. A few passes with a fine burnisher on the hole edges can smooth them out.
Inconsistent stitch appearance. Some stitches look tight and sunken, others look loose. This is a rhythm issue, usually from not pulling both threads with equal tension every time. It can also happen if your holes aren’t aligned perfectly between the two pieces of leather. The hand vs machine stitch debate often highlights this: a machine’s consistency is visual, but a practiced hand can match it.
The leather “smiles” or gaps between stitches. The seam opens up slightly, showing tiny crescents of light. This means your stitches are too far apart for the thickness of the leather. The tension is pulling the holes open. Switch to a pricking iron with closer teeth, or use a thicker thread for leather stitching that fills the hole better.
Frequently Asked Questions
What’s the difference between a lockstitch and a saddle stitch?
Lockstitch is a category of stitch where two threads interlock. A saddle stitch is a specific type of hand-sewn lockstitch made with two needles on one thread, creating a lock inside each hole. All saddle stitches are lockstitches, but not all lockstitches (like those from a sewing machine) are saddle stitches.
Can I do a lockstitch by hand without two needles?
Technically, yes, by using a single needle and looping the thread back on itself, but it’s fussy and doesn’t create the same secure, efficient lock as the two-needle saddle stitch. For any serious leatherwork, the two-needle method is standard because the locking action is automatic and reliable with every stitch.
Is a machine lockstitch stronger than a hand-sewn one?
On paper, a machine lockstitch can achieve high tensile strength. In practice, for leather, the hand-sewn saddle stitch is more durable because its failure mode is different. A machine stitch can unravel from a single break; a saddle stitch will only loosen locally. For real-world toughness and repairability, the hand-sewn version wins on leather over 3 oz.
How do I know what size pricking iron to use?
Match the iron’s tooth spacing to your desired stitch density and thread size. A 3mm spacing (about 8.5 stitches per inch) is a versatile medium. For finer work, look at 2.5mm or 2.7mm irons. The iron should also match your thread thickness, the hole it makes should be just large enough for two threads to pass through comfortably.
Why does my thread keep twisting as I sew?
This is almost always a tension issue. You’re pulling one thread harder than the other, or you’re not allowing the threads to naturally untwist between stitches. Before you pull a stitch tight, let the needles dangle and spin freely for a second. This lets the natural twist of the braided thread even out.
Before You Go
The real threshold here is leather thickness. Below 3 oz, a machine lockstitch with a thread weight of Tex 70 or higher is perfectly serviceable. Above that, the hand-sewn saddle stitch isn’t just a craft tradition, it’s mechanical advantage. The crossed-thread lock inside the hole is a simple, brilliant piece of engineering that outsmarts wear and tear.
Your first step this week shouldn’t be a complex project. Cut two small scraps of leather, mark a straight line, and practice the saddle stitch for six inches. Focus on the feel of the cross inside the hole and the sound of the waxed thread pulling through. That muscle memory is worth more than any tool.
Most guides won’t tell you this, but I’d rather see a slightly uneven hand-stitched seam on a belt than a perfect machine stitch. The hand-sewn one can be fixed, improved, and lived with. The machine stitch is a closed system. And leather, like the things we care about, should always be repairable.
