
What Is a Leather Punch? A Guide to This Key Crafting Tool
This post contains affiliate links. As an Amazon Associate, we earn from qualifying purchases.
A leather punch is a hand tool designed to cut a clean, circular hole through leather by removing a plug of material, essential for tasks like adding belt holes, setting rivets, or creating stitch lines. Unlike a drill or knife that tears fibers, a punch’s hollow, sharp-edged tube shears a precise disc, leaving a finished edge that won’t fray.
That cutting-versus-tearing distinction is the whole point of the tool. Use a drive punch with a beveled edge and a sharp, polished face. The tool has to overcome the material’s resistance with a clean shear, not a ragged rip.
What follows is a breakdown of how different punches achieve that cut, the jobs each type is built for, and the one mistake I see beginners make with rotary tools on thick hides.
Key Takeaways
- A leather punch cuts a hole by removing a plug; a knife or drill tears a hole, which weakens the leather edge and invites fraying.
- Rotary punches (plier-style with a spinning head) are for convenience on thinner leathers, while drive punches (tubes struck with a mallet) deliver cleaner cuts on thicker material.
- The common six-hole rotary design was patented in 1865 by Peter Bauer as a “Spring Punch” for leather and paper. Always punch onto a soft surface like an end-grain wood block or a punch pad; striking on metal or stone will blunt the tool’s sharpness immediately.
- Match the punch size to your hardware: a hole for a 3mm rivet needs a 3mm punch; going larger creates a sloppy, weak fit.
The Core Mechanism: How a Punch Cuts vs. Tears
You don’t force a hole. You cut one out. That’s the first mental shift.
A drive punch is a hollow steel cylinder with a sharp, circular knife-like edge. You place it on your marked leather, which is resting on a resilient surface like an end-grain wood block. A strike from a mallet drives the tube down. The sharp edge shears through the leather fibers, and the cut-out disc is pushed up into the hollow tube, often to be ejected later with a punch. What’s left is a hole with a crisp, compressed edge.
This removal of material is what separates a punch from a drill or an awl. Drilling generates heat and friction, which can burn and weaken collagen fibers. An awl parts fibers without removing them, which can leave a hole that wants to close up. A punch’s clean shear creates a stable, finished aperture ready for a rivet or stitch.
I learned the value of that clean edge the hard way on an early belt project. I used a drill bit for the buckle holes. The leather didn’t just look fuzzy; those torn fibers acted like a zipper, and the first real stress on the belt started a tear right from the hole’s edge. A punch would have removed that failure point entirely.
Types of Leather Punches and Their Jobs
Not all punches do the same work. Grabbing the wrong one is how projects get messy. Your choice comes down to the hole you need and the leather you’re cutting.
Rotary Punch (Turret or Spring Punch)
This is the plier-like tool with a revolving head holding six different-sized punch tubes. You squeeze the handles to drive the selected size through the leather. It’s fast, convenient, and great for on-the-fly adjustments.
Where it shines: Punching belt holes, setting small rivets or snaps on garment-weight leather (under 3 oz), or any job where you need to switch sizes quickly without reaching for a mallet.
Where it falters: Thick leather. The force from the handles often isn’t enough to cleanly shear through heavy belt or strap leather. You end up crushing and tearing, not cutting. The repeated squeezing motion can also fatigue the pivot, leading to sloppy alignment.
Drive Punch & Hollow Punch Sets
A drive punch is a single, hollow steel tube meant to be struck with a mallet. A hollow punch set is simply a collection of these in graduated sizes, usually from 1mm up to 12mm or more, stored in a roll.
Why they’re the workshop workhorse: The direct, vertical force from a mallet strike, combined with a sharper, heavier-duty tube, delivers the cleanest possible cut. It’s the definitive tool for punching holes in leather where finish matters.
Best for: Any thick leather project (bags, belts, saddlery), larger holes for hardware, and when you need a perfectly round, crisp edge. You’ll use these for the final hand stitching leather holes after marking with a pricking iron.
Pricking Irons & Stitching Chisels
These create a line of holes, not a single one. Pricking irons make small, angled slits that form the classic diamond-shaped stitch pattern. Stitching chisels punch straight through, creating a more modern, round-hole look.
The key difference: Pricking irons mark the leather to be opened later by an awl during stitching, allowing for adjustment. Stitching chisels punch the full hole in one strike. Both are fundamental for precise, spaced stitching lines on projects like wallets and bags.
| Punch Type | Best For | Action | Limitation |
|---|---|---|---|
| Rotary Punch | Belt holes, thin leather (<3oz), quick size changes | Squeeze handles | Crushes thick leather; tubes dull faster |
| Drive Punch | Crisp holes in thick leather, large hardware | Strike with mallet | Requires a mallet and block; one size per tool |
| Pricking Iron | Marking stitch lines for traditional saddle stitch | Strike with mallet | Creates a slit, not a finished hole |
| Stitching Chisel | Creating a line of round holes for stitching | Strike with mallet | Less adjustable once punched |
A Brief History: From 1865 to Your Workbench
That six-tube rotary punch on your bench has a direct lineage to the 19th century. The design was first patented in 1865 by Peter Bauer of Newark, New York. He called it a “Spring Punch” for making holes “in leather, paper, or any other substance or material of a similar nature.”
The military formalized the tool’s specs a century later. The MIL-P-2001D specification from August 12, 1964, details the exact requirements for a “PUNCH, CUTTING, REVOLVING HEAD” for Army, Navy, and Air Force use. It mandated steel handles, a tensioned index spring to hold the head firmly in place, and a proof load test for durability. This wasn’t a suggestion, it was a procurement standard.
Modern versions, like the CURIO-TOOL-PUNCH-M-151 for digital cutting machines, show how the principle adapts. That OEM manual states a clear edge case: “Depending on the thickness and hardness of the leather, it may not be possible to cut through it.” Some truths about material limits don’t change, even with new technology.
The Essential Companion Tools
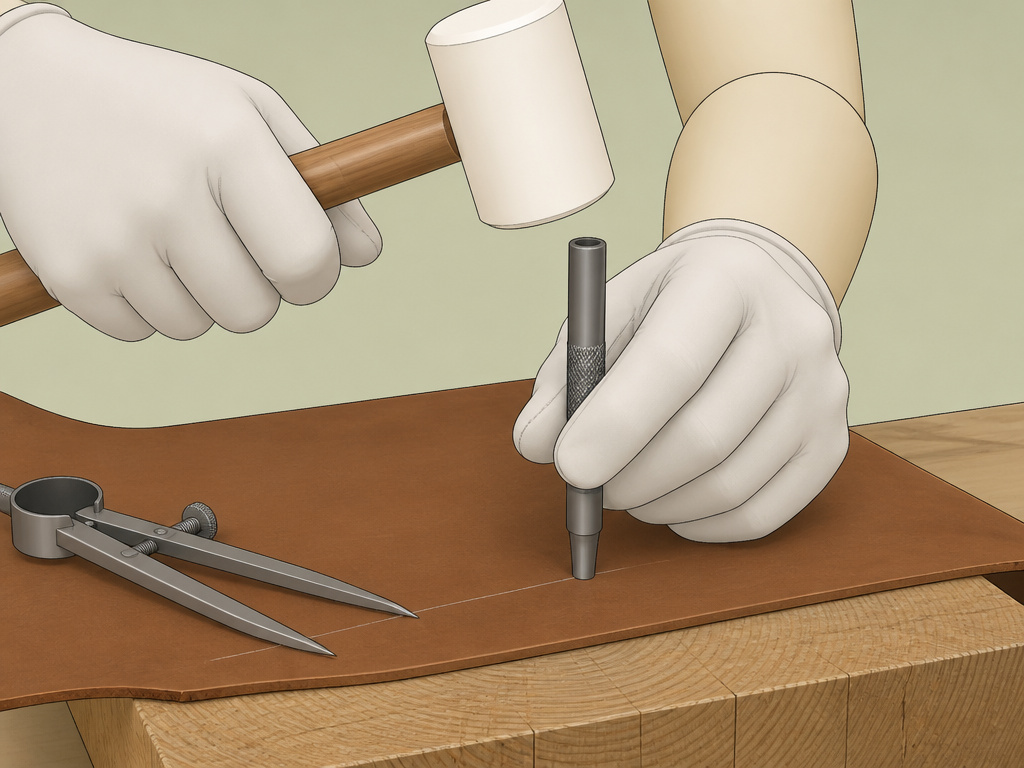
A punch doesn’t work alone. It’s part of a system, and skipping a piece breaks the process.
- Use a solid steel bench block or a poly cutting board dedicated to leatherwork. Use an end-grain wood block, a leather punch pad, or a thick poly cutting board. These surfaces give just enough to let the punch cut through, then rebound. Striking on metal, stone, or glass will roll or chip the sharp edge on first contact. The difference in tool life is measured in years versus minutes.
- A Dead-Blow or Poly Mallet: For drive punches, you need a non-marring hammer. A dead-blow mallet (filled with shot) delivers firm force without bouncing back, perfect for setting hardware. A poly/rubber mallet is gentler on tools. Never use a steel hammer on a steel punch, it’s a great way to mushroom the top and send metal shards flying.
- A Wing Divider or Stitching Groover: Accuracy first. These tools scratch a consistent guideline onto the leather, ensuring your holes are straight and evenly spaced from the edge. Guessing leads to a wobbly stitch line every time.
Common mistake: Using a rotary punch on a hard tabletop. The anvil on the tool is small and hard. Without a protective surface underneath, the punch will dent and mar your workbench and the shock will travel back into the tool’s pivot, loosening it over time.
How to Choose the Right Punch for Your Project
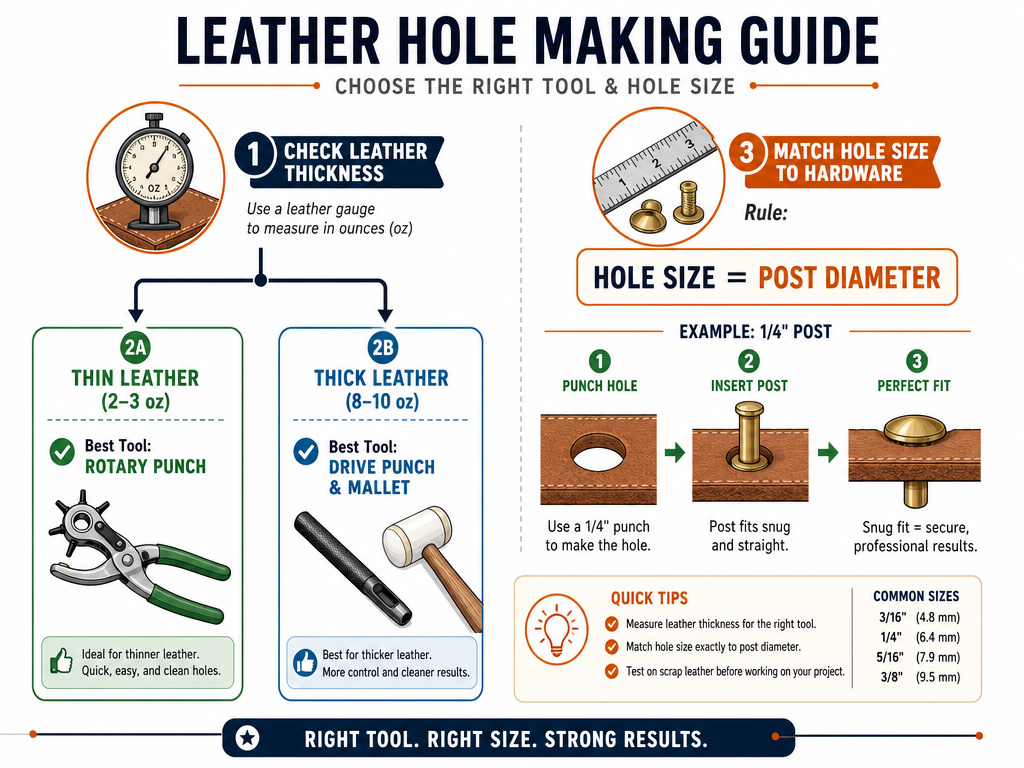
Your project’s leather and hardware dictate the tool. Here’s the decision tree I use at the bench.
First, identify your leather type and weight. Is it a soft, thin chrome-tanned leather for a card holder, or a stiff, thick vegetable tanned leather for a belt? Weight (measured in ounces) is the best proxy for thickness.
| Project | Typical Leather | Recommended Punch | Why |
|---|---|---|---|
| Wallet / Card Holder | 2–3 oz chrome-tanned | Rotary Punch or Stitching Chisel | Thin leather; needs small, precise holes for stitching. |
| Belt | 8–10 oz vegetable-tanned | Drive Punch Set (4-5mm) | Thick leather requires mallet force for a clean cut; a rotary punch will struggle. |
| Bag Strap | 5–6 oz oil tanned leather | Drive Punch | Oiled leather is dense; a drive punch ensures a clean hole that won’t gum up. |
| Setting Snaps/Rivets | 3–4 oz any type | Rotary Punch (correct tube size) | Convenient for multiple small holes; ensures exact match for post diameter. |
Second, match the hole size to your hardware. This seems obvious, but it’s the most frequent sizing error. A rivet with a 3mm post needs a 3mm hole. A 4mm punch will give you a sloppy, weak connection. If you’re unsure, test on a scrap first, this is a fundamental step in learning how to test leather quality for workability.
For decorative work or leather embossing setups that require holes, the same rules apply: use a drive punch for crisp edges that will hold their shape.
Maintenance and Sharpening
A dull punch is worse than no punch. It tears, it requires excessive force, and it yields ugly results. Sharpening isn’t complicated, but it is specific.
Drive punches are sharpened from the inside. The cutting edge is the interior bevel. Take a small dowel, wrap it in fine-grit sandpaper (600 grit or higher), and spin it inside the tube to hone that inner edge. Do not try to sharpen the outside, you’ll change the diameter and ruin the punch.
Rotary punch tubes can be sharpened with a fine, tapered diamond needle file. Carefully dress the inner cutting edge, maintaining the original angle. The goal is to restore a burr-free, sharp edge, not to reshape the tool.
A simple rule: if you have to lean into the mallet strike or squeeze the rotary handles until your knuckles are white, the punch is probably dull. A sharp tool does the work for you.
Frequently Asked Questions
What’s the difference between a leather punch and a hole punch for paper?
Leather punch is built to shear through dense, fibrous collagen. It’s made of hardened tool steel, has a much sharper and more robust cutting edge, and is designed to withstand being struck with a mallet. A paper punch is made from thinner, softer steel and would deform instantly on leather.
Can I use a drill instead of a punch?
You can, but you shouldn’t for most applications. A drill bit rotates and tears fibers, leaving a rough, frayed edge that weakens the leather. It also generates heat. A punch cuts cleanly, removing material and leaving a strong, finished edge. The only time a drill is acceptable is for very large holes (over 1/2 inch) where no punch exists, and even then, you must sand the edge smooth.
What do the sizes on a rotary punch mean?
The sizes refer to the diameter of the hole the tube will cut, typically measured in millimeters. Common sizes range from 1.5mm (for tiny rivets) to 4.5mm (for larger belt holes). It’s crucial to match this size exactly to the post of the rivet, snap, or buckle pin you’re using.
How do I punch a hole in the middle of a large piece of leather?
For a hole far from any edge, a drive punch is your only option. Mark the center point precisely with an awl. Place the punch tip directly on the mark, hold it perfectly vertical, and strike firmly with a mallet onto your punching block. The plug will be ejected from the top of the punch.
My punch is stuck in the leather. What do I do?
This usually means the punch is dull or the leather is very thick and damp. Do not twist or rock it. Place the entire piece (leather with embedded punch) on your block and tap the top of the punch gently with a mallet to drive it all the way through. Next time, ensure your punch is sharp and use a thicker mallet for more decisive force.
Before You Go
Understand the mechanism, and the tool choices become obvious. A punch cuts a disc out; everything else is a compromise. For thin, quick jobs, the rotary tool from 1865 still works. For thick leather where the edge matters, reach for the drive punch and mallet.
The one rule I enforce in my own shop: always test on a scrap from the same hide. Leather varies, even within the same side. That five-second test tells you if your punch is sharp enough and if the leather’s temper will allow a clean cut. It’s the single step that separates a planned project from an accidental lesson.
