Learn How to Stitch Leather by Hand with the Saddle Stitch
This post contains affiliate links. As an Amazon Associate, we earn from qualifying purchases.
Hand stitching leather requires matching a few specific things: the right needle and thread combination for your leather’s thickness, a consistent method for marking and punching holes, and the two-needle saddle stitch technique that locks each stitch internally for maximum durability.
Most guides treat stitching as a single skill. It’s actually two separate challenges, solved by the same tools. The first is making clean, evenly spaced holes that line up on both sides of your work. The second is pulling a continuous thread through those holes in a way that doesn’t cut itself or distort the leather. Get both right, and your seam will outlive anything a machine can produce on material thicker than a credit card.
What follows: the exact tool specs for different leather weights, the mechanics of the saddle stitch that make it unbreakable, and the one tension mistake that puckers leather within the first three inches.
Key Takeaways
- Match thread and awl size to leather thickness. Use the manufacturer’s sizing chart: for 7-10 oz. Leather, a .085″ awl width pairs with size 207 (.65 mm) thread.
- Mark holes with a pricking iron, don’t freehand with an awl. The iron guarantees consistent spacing and angle, which is 90% of a professional-looking stitch line.
- Pull each stitch firm, not tight. Overtightening is the most common beginner error; it stresses the thread against the hole edge and pulls the leather out of alignment.
- Use a stitching pony. This $30 tool holds your work at the perfect angle, freeing both hands to manage the needles and tension.
- Burnish thread ends, don’t knot them. For synthetic threads like Ritza Tiger, trim and melt the end. For linen, a dot of glue tapped in with a needle seals the stitch.
Essential Tools for Hand Stitching
You can’t improvise a durable leather seam. The materials matter because leather is a dense, fibrous material that dulls cheap needles and snaps thin thread. Start with a small, correct kit.
Needles: Blunt-tipped harness needles, like John James brand in sizes 003 to 1/0, slide between leather fibers instead of piercing them. The eye is large enough for thick thread without shredding it.
Thread: Waxed polyester or linen. Ritza 0.8mm Tiger Thread is the default for medium to heavy work; its flat, braided profile lays flush. Lin Cable linen is traditional for fine work like watch straps. The wax coating reduces friction as you pull it through the hole.
Hole Creation: This is the first half of the skill. A diamond-shaped awl blade, held in a handle, slices a clean channel. A pricking iron, a multi-toothed chisel, marks the exact spacing for those holes before you pierce them. Trying to eyeball hole placement with just the awl gives you a wobbly, amateur stitch line every time.
Holding & Marking: A stitch groover cuts a shallow trench for the thread to sit in, protecting it from abrasion. A wing divider scribes a straight guideline if you choose not to groove. And a stitching pony, a simple clamp on a stand, is essential for any project longer than a few inches. It holds the work steady, leaving both your hands free to manage the two needles.
For 7-10 oz. Leather (the weight of a sturdy belt or bag strap), use a .085″ wide diamond awl blade, size 207 (.65 mm) polyester thread, and size 003 (.040″) harness needles. This combination, from the Sage Creek Saddles guide, ensures the hole is wide enough for the thread to pass through without binding, yet tight enough for the threads to lock inside the stitch.
Matching Thread & Needle to Leather Thickness
A thick thread in a small hole will fray and break. A thin thread in a large hole looks sloppy and won’t fill the space to create a tight lock. Leather weight, measured in ounces per square foot, dictates your entire toolkit.
| Leather Weight (oz.) | Stitches Per Inch | Awl Width | Thread Size (TEX/mm) | Needle Size |
|---|---|---|---|---|
| 3 to 6 | 11 to 9 | .075″ | 137 / 138 (.43 mm) | 004 (.033″) |
| 7 to 10 | 10 to 8 | .085″ | 167 / 207 (.55/.65 mm) | 003 (.040″) |
| 11 to 14 | 7 to 6 | .1″ | 277 (.65 mm) | 1/0 (.042″) |
| 15+ | 6 to 5 | .15″ | 346 (.75/.8 mm) | 1/0 to 2/0 (.050″) |
This chart, adapted from professional saddlery guides, is your starting point. Stitches per inch (SPI) is both an aesthetic choice and a structural one. More stitches mean more holes close together, which can weaken thin leather. Fewer stitches with thicker thread is stronger for heavy work.
Why the sizing matters: The awl width must be slightly larger than the thread’s thickness. When you pull two strands of thread through the same hole in opposite directions during a saddle stitch, they need room to cross in the middle without jamming. If the hole is too small, the friction will heat and weaken the thread. If it’s too large, the threads won’t press against each other enough to create the locking friction that defines the stitch.
Preparing the Leather & Punching Holes
Gluing, marking, and punching come before the needle ever touches the thread. Rushing this stage guarantees a crooked seam.
- Glue the pieces. Use a thin layer of rubber cement or contact adhesive on the flesh sides. Let it become tacky-dry, then press the pieces together. This creates a temporary bond that holds everything in perfect alignment for stitching and can be peeled apart later if you make a mistake.
- Mark your stitch line. Decide if you need a grooved channel. For a bag strap that will rub against clothing, groove it. For a decorative panel, just scribe a line with a wing divider set about 1/8″ from the edge.
- Mark the hole spacing. Place the teeth of your pricking iron exactly on your guideline. A light tap with a mallet implants the diamond-shaped marks. This is not punching through, just marking. Align one tooth with the previous mark to keep spacing perfectly even. An overstitch wheel can do this too; a size “6” wheel means six stitches per inch.
- Punch the holes. Now use your diamond awl. Follow the angle of the pricking iron mark, pushing the awl straight through at a 90-degree angle to the leather’s surface. Rock it gently to release it. For thick leather, you might punch from both sides, meeting in the middle.
Common mistake: Punching holes freehand with just the awl. Your spacing will drift within the first inch, and the backside of your work will look chaotic. The pricking iron is the commitment device that forces consistency.
Pre-punching all your holes before you start sewing leather is the professional method. It lets you focus entirely on the rhythm of the stitch itself.
The Saddle Stitch Process
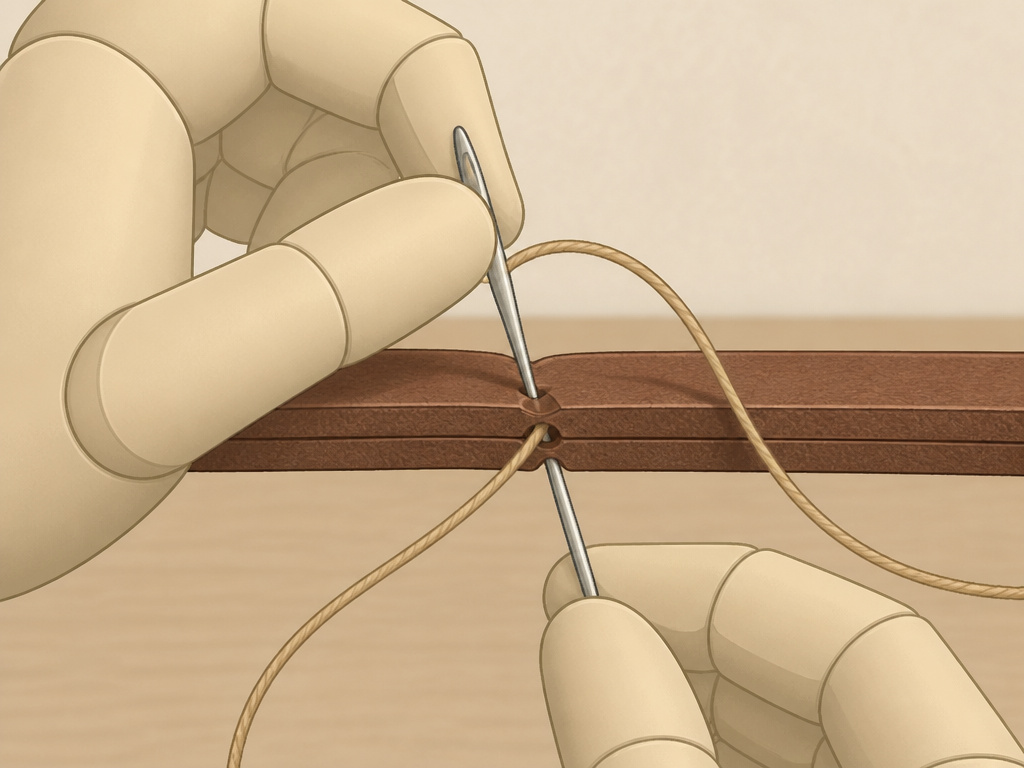 This is the technique. It uses one continuous thread with a needle on each end, passing through the same hole in opposite directions to form a lock in the middle of the leather. No machine can replicate this.
Step 1: Measure and thread. Cut a length of thread. Here’s the first debate: Martha Stewart’s guide says three times the length of your seam, while Tandy Leather says five times. For your first project, go with five times. It’s better to have leftover thread than to run out three inches from the end. Thread a needle onto each end and lock them on by piercing the thread tail with the needle point, then pulling the loop tight.
Step 2: Set up in the stitching pony. Clamp your work with the stitch line facing you and angled slightly away. The hole farthest from you is your starting point.
Step 3: The first stitch. Push the left needle down through the first hole from the front. Pull it through until the thread is centered, with equal length on each side. Both needles should now be at the back.
Step 4: The locking sequence. This is the core of the two-needle method. For the second hole: – From the front, push the left needle down into hole #2. – Before pulling it all the way through, take the right needle (which is at the back) and push it up into the SAME hole #2 from the back. – You now have both needles in hole #2, pointing toward each other. Pull them through completely. The left needle emerges at the back, the right needle emerges at the front. – Gently pull both threads tight. The pull should be firm enough to seat the thread, but you should still see a slight gap between the leather pieces. If the leather starts to buckle, you’re pulling too hard.
Step 5: Repeat to the end. Continue this pattern: left needle goes down into the next new hole, right needle comes up into that same hole. The threads cross inside each hole, creating an internal lock stitch that cannot unravel. Your hands settle into a rhythm, punch, pass, pull.
Step 6: The backstitch. When you reach the end, don’t just tie a knot. Reverse direction and stitch back over the last two or three holes. This buries the thread ends within the existing stitch line, making the finish nearly invisible and incredibly secure.
Managing Thread Tension and Avoiding Puckering
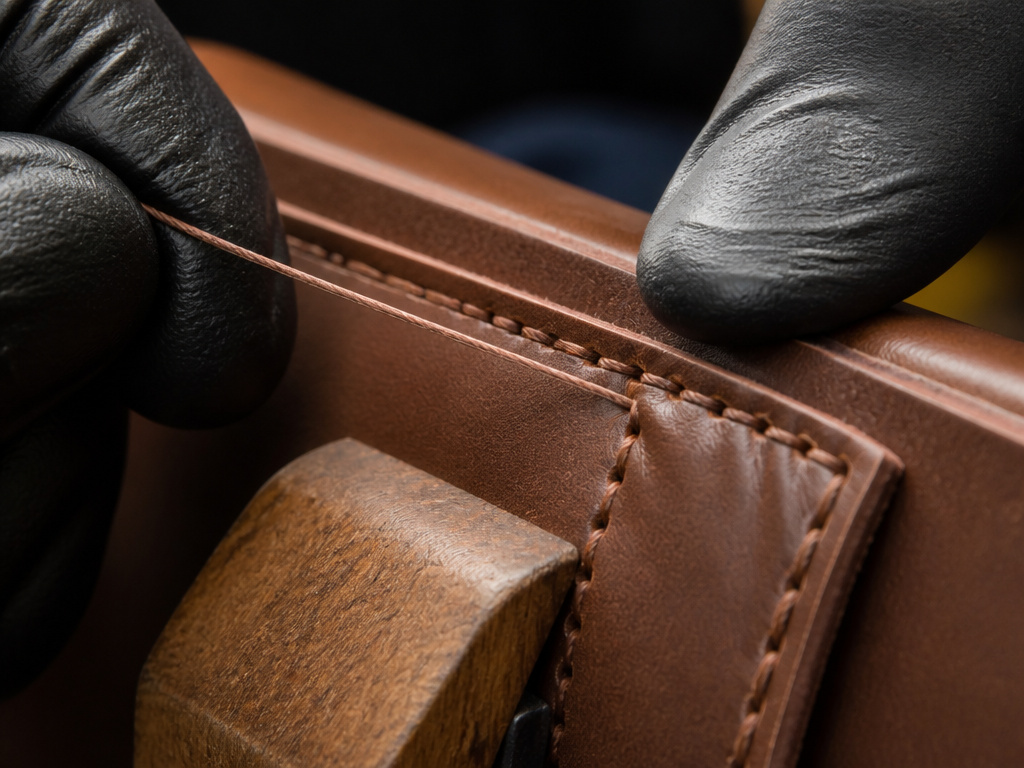 Puckering is the telltale sign of a beginner. The leather gathers and wrinkles along the stitch line. It happens when you pull each stitch too tight, yanking the upper and lower pieces of leather toward each other with more force than the thread can handle.
The fix is in the feel. After you pull a stitch tight, run your thumb along the seam. There should be a tiny, consistent gap between the two pieces of leather, the thickness of a sheet of paper. If the pieces are pressed completely flat against each other, you’ve over-tightened. The thread is now under constant, cutting tension against the edge of the hole.
I learned this the hard way on an early holster project. The first side looked perfect, but when I flipped it over, the leather was pulled into tiny ripples along the entire seam. The thread was so tight it had begun to stretch and thin. I had to cut it out and start over. Now, I pull just until I feel the thread seat, then stop. The leather will tell you what it needs.
Check the seam by gently flexing it open after stitching a few inches. The threads should move slightly within their holes, not be locked solid. This slight play is what allows the leather to flex in use without stressing the thread to breaking.
Finishing the Stitch Line
How you end the thread is as important as how you stitch it. A knotted tail can come undone or create an uncomfortable lump.
For waxed polyester thread (like Ritza Tiger): 1. After your final backstitch, pull the threads to the back side. 2. Trim them to about 1/8″ (3mm) long. 3. Carefully use a lighter to melt the ends into a small, hard blob. Press this melted end flat against the leather with the back of the lighter. It fuses the thread so it can’t pull back through.
For linen thread: 1. Trim the ends short. 2. Place a tiny drop of flexible leather glue (like Fiebing’s Leathercraft Cement) on the tip of a needle. 3. Tap the glue-tipped needle into the trimmed thread end, wicking the glue down into the stitch hole. This seals it without a bulky knot.
Finally, lay your finished work on a hard surface and gently tap the entire stitch line with a smooth-faced hammer or maul. This “sets” the stitches, compressing them evenly into their grooves and giving the line a polished, professional appearance. It’s the last step in joining leather pieces by hand.
Frequently Asked Questions
What’s the strongest hand stitch for leather?
The saddle stitch is the strongest. It uses two needles on one thread, crossing inside each hole to create a lock. Even if the thread is cut on one side, the opposite thread remains locked in the adjacent holes, so the seam holds. A machine lockstitch will completely unravel if the thread breaks.
Can I use a regular sewing needle?
No. Regular sharps will pierce and cut the leather fibers, weakening the material around the hole. Use blunt-tipped harness needles (like John James) that push between the fibers. The right thread for leather is also thicker and waxed, requiring a larger eye.
How do I fix a mistake in my stitching?
If you catch it within a few stitches, slowly back the needles out. For a longer run, you’ll need to cut the thread, remove it, and re-punch the affected holes if they’ve been distorted. This is why checking tension every few inches is critical, it prevents major rework.
Is a stitching pony really necessary?
For anything longer than a few inches, yes. It acts as a third hand, holding the leather at the perfect angle and tension. This frees you to focus on needle control and consistent pull. You can stitch without one, but the process is slower and the results less even.
Why are my stitches slanted or uneven on the back?
This almost always comes from the awl not entering the leather at a perfect 90-degree angle. If you tilt the awl, the hole is angled, so the thread exits at a different point on the back side. Use a stitching pony to hold the work steady and make a conscious effort to keep the awl straight up and down.
Before You Go
Hand stitching isn’t about speed. It’s about building a seam that becomes part of the leather’s structure, not just a fastener on its surface. If your first attempt looks a little rough, that’s normal. The second side will be straighter. The third project will feel rhythmic.
The single most useful thing you can do before starting is to make a practice piece. Glue two scraps of your project leather together, punch a line of holes, and stitch a six-inch seam. You’ll learn the hand feel for correct tension, see how your chosen tools for punching holes perform, and waste only scraps, not your good material.
Once that seam is solid, you’ve moved from following steps to understanding the craft. The tools, the awl, the pony, the two needles, stop being unfamiliar objects and start being extensions of your hands. That’s when you can start thinking about edge finishing and other details, because the foundation is permanent.
