
How to Lighten Leather | The Real Limits and Steps
This post contains affiliate links. As an Amazon Associate, we earn from qualifying purchases.
This post contains affiliate links. As an Amazon Associate, we earn from qualifying purchases.
To lighten leather, you must first remove its protective finish with a deglazer or acetone, then apply a lightening dye or paint in thin, even layers. This works best on top-grain or full-grain leathers and typically achieves a change of two to four shades. Attempting to turn black leather white will damage the material.
The “two to four shades” limit is a physical constraint of the material. Leather can only absorb so much pigment-removing or light-coloring agent before the fibers break down.This guide walks through the exact steps, but more importantly, it explains why each step exists and what physically happens if you skip it.
What follows: the eight essential steps, the one prep move that 90% of failed attempts miss, the products that won’t reverse your progress, and how to care for leather after you’ve changed its color.
Key Takeaways
- Lightening works only on top-grain or full-grain leather; bonded or heavily finished leathers will not accept new color evenly.
- You must completely remove the existing protective finish with a leather deglazer before any lightening agent can penetrate.
- Set realistic expectations: leather can typically be lightened only 2-4 shades. Transforming black to tan is possible; black to white is not.
- Never lighten damp leather, moisture blocks the dye and causes blotchy, permanent unevenness.
- After lightening, you must seal the leather with a compatible finish to lock in the color and protect it.
What “Lightening Leather” Actually Means
It’s not magic. It’s chemistry and mechanics. When you lighten leather, you’re doing one of two things: stripping away the existing colorant and finish to reveal a lighter base, or applying a new, lighter colorant on top of the old one. The first method uses solvents like acetone. The second uses specialized light-colored dyes or paints.
The leather’s structure dictates everything. Quality aniline leather and full-grain hides are porous, allowing these agents to soak in. A pigmented leather with a thick, plastic-like coating will simply resist the product, leading to peeling and flaking. This is why testing on a hidden spot is your first, non-negotiable step.
Common mistake: Skipping the deglazing step on a finished leather. That protective coat is there to repel stains, it will repel your lightening dye, too. The result is a sticky, uneven mess that rubs off on your hands.
The Realistic Limits: How Light Can You Go?
This is where most guides get vague. Let’s be clear.
You can expect to lighten leather by two to four shades. A dark brown jacket might become a medium brown. A burgundy purse could shift to a rosewood. A black boot may reach a charcoal or dark coffee color. The starting point is everything.
Attempting to transform black leather into white or very light tan is unrealistic and could damage the material.
The limitation is in the leather dyeing process itself. Original dyes penetrate deep into the fibers. You’re not erasing them; you’re either dissolving the top layers or overwhelming them with a new pigment. There’s only so much “overwhelming” the leather’s structure can take before it becomes brittle and cracks. I recommend no more than three to four applications of any lightening solution.
| Starting Color | Realistic Goal | Unrealistic Expectation |
|---|---|---|
| Black | Charcoal, Dark Brown | White, Cream, Tan |
| Dark Brown | Medium Brown, Camel | Beige, Honey |
| Burgundy | Rosewood, Dusty Rose | Pink, Peach |
| Navy | Slate Blue, Weathered Denim | Sky Blue, Pastel |
The 8-Step Process to Lighten Leather
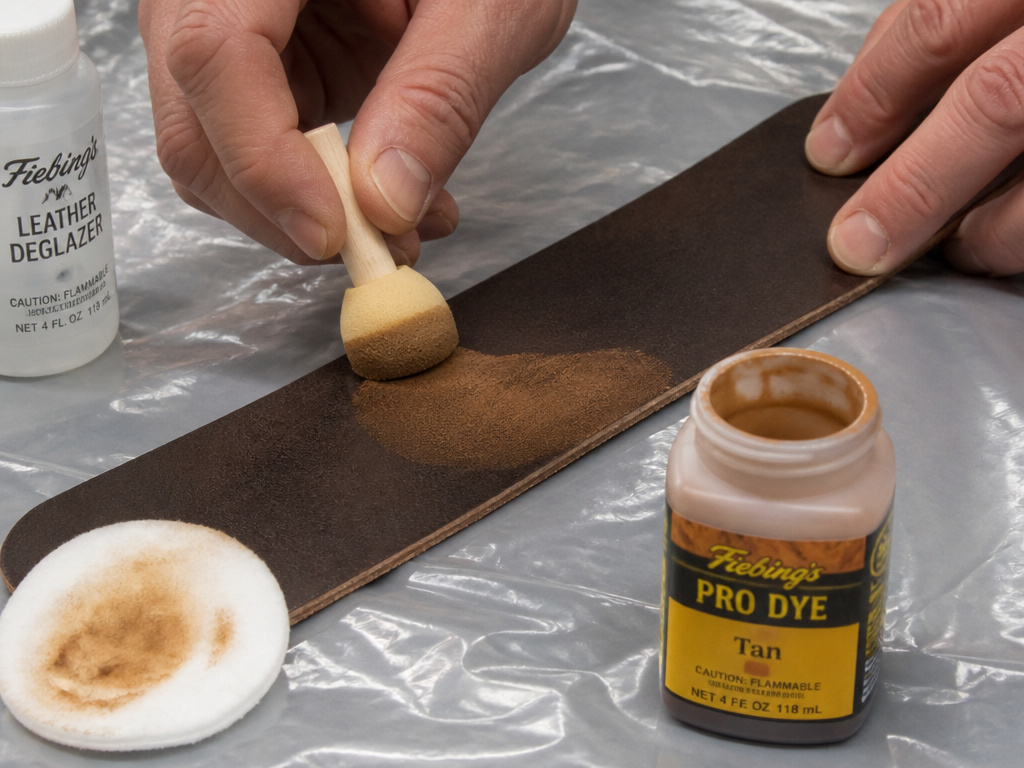 This project demands ventilation, patience, and attention to detail. Rushing any step guarantees a result you’ll dislike.
Step 1: Set Up Your Workspace
You need a well-ventilated area, a garage with the door open or a patio. The chemicals involved, especially deglazers, emit strong fumes. Lay down a plastic drop cloth or newspapers. Good lighting is non-negotiable; you must see the leather’s surface clearly to spot missed patches during prep.
Step 2: Deep Clean the Leather
Any dirt, oil, or old conditioner will block your lightening agent. Use a dedicated leather cleaner or a damp cloth with a drop of mild dish soap. Scrub every crease and seam. This isn’t a light wipe; it’s a thorough wash.
Then, let it dry completely. Not mostly dry. Completely. Attempting to lighten damp leather traps moisture under the new color, which leads to milky blotches and inconsistent absorption. Wait overnight if you have to.
Step 3: Test and Deglaze the Finish
Here’s the pivotal step most people skip, and it’s why their project fails. Most leather goods have a protective topcoat. You must remove it.
- Test: In a hidden area (inside a belt loop, under a collar), apply a small amount of leather deglazer or pure acetone on a cotton ball. Rub gently. If the surface gets tacky and color comes off on the cotton, you have a removable finish. If nothing happens, you have a sealed pigmented leather finish that may not lighten well.
- Deglaze: If the test passes, apply deglazer to a clean cotton pad. Work in small sections, using circular motions with moderate pressure to dissolve the finish. The leather will look dull and dry, this is correct. You’ve stripped it back to a raw state. Miss a spot, and your lightening will be uneven there.
Step 4: Apply Your Lightening Agent
Your choice here depends on your goal and the leather type.
- For Subtle Lightening (Stripping Tone): Use a leather preparer or lightener like Fiebing’s White. Apply with a wool dauber, it gives more control than a rag. Use thin, even coats.
- For a New Color (Dyeing): Use a light-colored alcohol-based dye like Fiebing’s Pro Dye in Tan or Buckskin. Apply with a dauber in overlapping strokes. Alcohol-based dyes penetrate; acrylic paints sit on top.
Apply the first coat and walk away. Let it dry for at least two hours. The leather will look dark while wet, don’t panic. The true color appears as it dries.
Step 5: Assess and Repeat (Cautiously)
After the first coat is bone-dry, assess the color. Is it light enough? If you need more, apply a second coat. Remember the limit: 3-4 coats max. The leather will only absorb so much before it becomes stiff and over-saturated.
Step 6: Let It Cure Fully
This is the hardest part. After your final coat, the leather needs to cure for at least 24-48 hours. Don’t handle it. Don’t test the color. Place it in a dry, room-temperature area away from sun and heat. Premature handling leaves permanent fingerprints in the soft, dyed surface.
Step 7: Seal and Protect
If you used an alcohol-based dye, you must seal it. An unsealed dye will bleed and rub off. Apply a thin coat of a leather finisher or resolene with a sponge brush. This creates a new protective layer. Let it dry completely.
Step 8: Condition and Nourish
The deglazing and dyeing process strips the leather of its natural oils. Now you must put them back. This is critical. Use a conditioner that will not darken leather, like Bick 4 or Leather Honey. Apply a nickel-sized amount to a cloth and rub it in until it disappears. Wait 15 minutes, then buff with a clean cloth.
Choosing Your Tools: What Actually Works
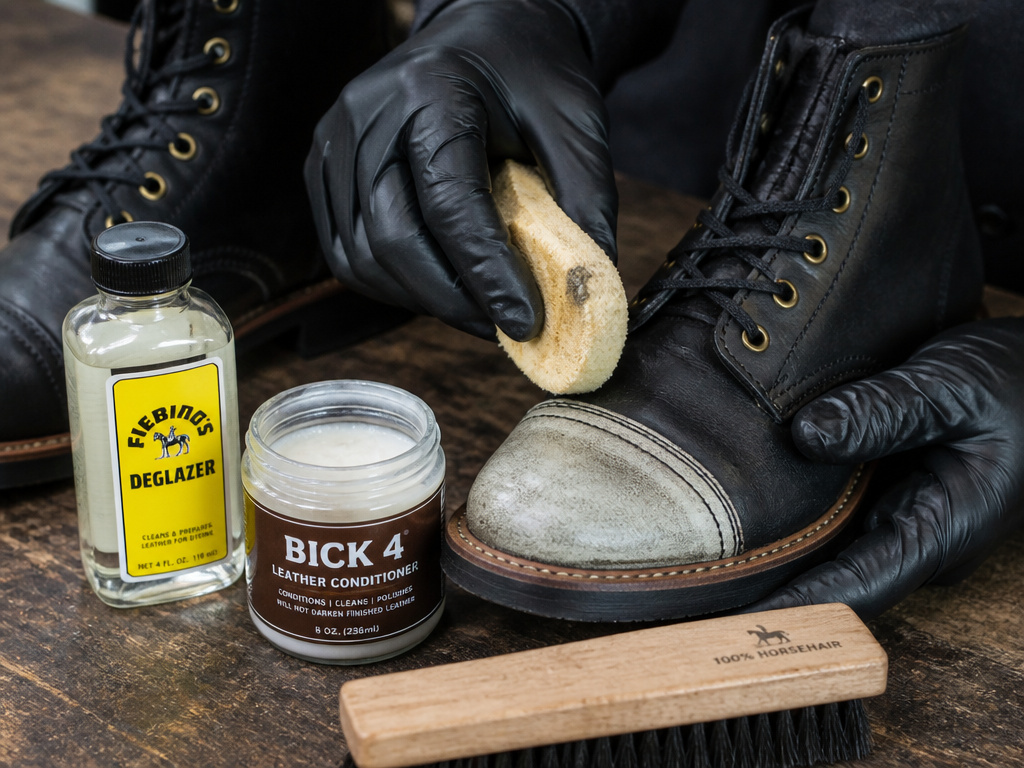 Don’t just grab what’s under the sink. The wrong tool makes the job harder and can ruin the leather.
- Deglazer: Fiebing’s Deglazer or pure acetone (100% pure, not scented nail polish remover). Acetone is more aggressive.
- Application Tools: Wool daubers for dye, natural sponges for conditioner, lint-free cotton cloths for buffing. Old t-shirts leave fibers behind.
- Dye/Paint: Fiebing’s Pro Dye (alcohol-based) for penetration, Angelus Leather Paint (acrylic-based) for opaque coverage on difficult leathers. Bick 4 conditioner (non-darkening) and a leather finisher like Saphir.
A horsehair brush is your best friend for working conditioner into broguing and seams after dyeing. Just dab it up and down, the bristles pull the product out of the holes.
Aftercare for Lightened Leather
Your job isn’t over once the color is set. Lightened leather is more vulnerable.
For the first month, keep it away from denim (dye transfer), water, and excessive sunlight. Clean only with a damp cloth. When it’s time for routine care, re-apply your non-darkening conditioner every 4-6 months. This replaces the oils that keep the fibers supple and prevents the new color from cracking.
This maintenance is what allows a natural patina development to occur gracefully on your newly lightened piece, rather than it just looking worn out.
Frequently Asked Questions
Can you lighten any type of leather?
No. The process works best on porous, quality leathers like top-grain and full-grain. Bonded leather, vinyl, or leathers with a thick plastic coating (pigmented leather) will not absorb lightening agents properly and will likely be damaged by the deglazing step.
Will acetone ruin my leather?
Used correctly, it won’t ruin it, but it will aggressively strip it. Acetone is a powerful solvent that removes all finishes, oils, and some of the original dye. It leaves the leather bare, dry, and ready for a new color. The “ruin” happens if you don’t follow up with proper dyeing, sealing, and conditioning.
How long does the whole process take?
Set aside a full weekend. Deep cleaning and drying: 4-8 hours. Deglazing: 1 hour. Applying 2-3 coats of dye with drying time between: 6-8 hours. Curing: 24-48 hours. Sealing and conditioning: 2 hours. Rushing causes failure.
Can I lighten just a stained spot?
You can try, but blending is extremely difficult. Lightening a spot often creates a lighter “halo” around it. It’s usually better to clean the entire panel or section to ensure an even color change. Spot-treating works for cleaning, not for major color alteration.
What’s the difference between dye and paint for lightening?
Dye penetrates the leather fibers, changing their color from within. It’s more durable and flexible but requires a sealant. Paint sits on top of the leather like a film. It’s better for covering impossible colors (like going over black) but can crack if applied too thickly on a flexible item like a jacket.
Before You Go
Lightening leather is a commitment, not a hack. The most important spec is the 24-hour cure time between coats that most people ignore. If your leather is worth the effort, it’s worth the patience.
If you’re unsure about your leather’s type, do the testing leather steps first. Knowing you’re working with a quality aniline and pigmented leather hybrid changes the product you should use. And if you end up deciding a full color change is too much, remember that a deep clean and conditioning to restore the leather’s suppleness can often revive a piece beautifully without ever touching a dye pot.
