
How is Leather Dyed? Exploring the Chemistry of Colorfast Hides
This post contains affiliate links. As an Amazon Associate, we earn from qualifying purchases.
Leather is dyed by immersing prepared hides in a water-based solution containing specialized dyes. The color fixes through chemical bonds, ionic attraction for most dyes, covalent bonds for reactive types, dictated by precise control of pH, temperature, and time. The leather type (chrome-tanned, vegetable-tanned) determines which dye class will bond successfully, and the process aims for deep penetration and high fastness to light, water, and rubbing.
That chemical bond is the whole game. Get it wrong, and the color sits on the surface like cheap paint, ready to rub off on your clothes or fade in a week of sunlight. Get it right, and the dye becomes part of the leather’s fiber network, developing a patina that lasts decades.
What follows is a breakdown of the chemistry, the three main industrial methods (aniline, pigment, semi-aniline), and the precise drum-dyeing process tanneries use. By the end, you’ll be able to look at any leather good and understand not just its color, but how permanently that color is locked in.
Key Takeaways
- Dyeing isn’t painting; successful color requires matching the dye’s ionic charge (anionic or cationic) to the electrical charge of the tanned leather.
- Chrome-tanned leather, with a positive charge, loves negatively charged acid dyes and metal complex dyes for deep penetration.
- Vegetable-tanned leather, with a negative charge, bonds with positively charged basic dyes, but these often sit on the surface with weaker fastness.
- The industrial drum process is a timed dance of pH shifts and temperature climbs, designed to pull dye molecules into the hide before locking them down.
- “Fastness” tests (ISO 105 series) measure how well the dye resists sunlight, water, and friction, the real metrics of a quality dye job.
The Basic Chemistry of Leather Dyeing
Forget everything you know about painting a wall. Leather dyeing is a molecular negotiation between a dyestuff and a protein fiber called collagen. The goal is not to coat, but to infiltrate and bond.
The main lever in this negotiation is electrical charge. When a hide is tanned, whether with chromium salts (chrome tanning) or plant tannins (vegetable tanning), the process alters the electrical charge on the collagen fibers. Chrome tanning leaves the fibers with a net positive charge. Vegetable tanning leaves them with a net negative charge.
Dyes are classified by their own charge. Acid dyes and metal complex dyes are anionic (negatively charged). They are magnetically attracted to the positively charged sites on chrome-tanned leather. Basic dyes are cationic (positively charged) and seek out the negative sites on vegetable-tanned leather.
Common mistake: Assuming any dye works on any leather. Using a basic dye on chrome leather gives only a faint tint; using an acid dye on vegetable leather often yields a pale, uneven wash. The charge must match.
This ionic attraction is powerful, but it can be too fast. If you simply dump an anionic dye into an acidic bath with chrome leather, the dye fixes instantly to the surface. The result is a dark, saturated crust with a pale, undyed core, a problem called “bronzing” or “surface plating.”
The solution is process control. Tanneries start the dye bath at a neutral or slightly alkaline pH, where the ionic attraction is weaker. The dye molecules diffuse deep into the hide over 30 to 45 minutes. Then, they gradually lower the pH (add acid), strengthening the ionic pull and locking the dye molecules in place throughout the leather’s thickness. A study in the Journal of ALCA leather coloring article details how this pH-mediated diffusion is critical for achieving level, penetrating shades on dense bovine hides.
Dye Types: Matching the Molecule to the Job
Not all dyes are created equal. Their chemical structure dictates not only color but also lightfastness, solubility, and how they interact with different tannages. Choosing the wrong one is a sure path to premature fading or bleeding.
| Dye Type | Chemical Charge | Best For | Key Strength | Key Weakness |
|---|---|---|---|---|
| Acid Dyes | Anionic (Negative) | Chrome-Tanned Leather | Bright colors, good penetration | Can require high heat (60–80°C) for good fixation |
| Metal Complex Dyes | Anionic (Negative) | Chrome-Tanned, High-End Goods | Excellent wash/light fastness, soft hand | Often more expensive; some use chromium ions |
| Basic Dyes | Cationic (Positive) | Vegetable-Tanned Leather | Strong, vibrant surface shades | Poor light/rubbing fastness; minimal penetration |
| Reactive Dyes | Forms Covalent Bonds | Aldehyde-Tanned/Some Specialty | Unbeatable wash fastness | Incompatible with acidic chrome tannage |
Acid dyes are the workhorses for chrome leather. They’re relatively inexpensive and offer a vast color range. They do their job well, but they’re not superheroes. Their bond is ionic, which is strong but can be compromised by prolonged soaking or harsh chemicals.
Metal complex dyes are a step up. They’re essentially acid dyes that have been pre-complexed with a metal ion (often chromium, but sometimes cobalt or nickel). This metal-ion “handle” gives the dye molecule more sites to bond with the leather, resulting in dramatically improved fastness properties. They’re the go-to for automotive upholstery or leather goods that will see frequent cleaning.
Then there are basic dyes. They produce incredibly vivid colors on vegetable-tanned leather, but the bond is superficial and notoriously fugitive. That vibrant purple notebook? It might turn gray at the edges after a year on a sunny shelf. They’re a lesson in trade-offs.
Finally, reactive dyes operate differently. Instead of ionic attraction, they form permanent, covalent chemical bonds with the collagen fibers. Think of it as welding instead of gluing. The fastness is phenomenal, but the chemistry is finicky. They require specific alkaline conditions and are generally incompatible with standard chrome-tanned leather, which falls apart at high pH. They find use in specialized “wet white” (aldehyde-tanned) leathers for automotive and apparel.
The Three Main Industrial Dyeing Methods
The chemistry dictates the possible, but the method dictates the final look and feel. There are three primary ways color is applied at scale, each leading to a distinct category of leather you can buy.
Aniline Dyeing: Letting the Leather Speak
In aniline dyeing, transparent dyes are applied to the hide, coloring the leather without hiding its natural surface. You’ll see the grain, the pores, and any natural markings. It’s the highest grade, often called “full aniline.”
The process is straightforward but demanding. The dyed hide receives little to no surface pigment coating. This means any imperfections in the raw hide are visible, so only the best hides are selected. The result is a leather that feels incredibly soft and natural, but it’s also more susceptible to stains and fading. Light, especially sunlight, will cause it to develop a rich patina over time, a feature, not a bug, for enthusiasts. You can see this process detailed in our guide to aniline leather.
Pigment Dyeing (or “Pigment Top Coating”)
This is the opposite approach. Pigmented leather is coated with an opaque, paint-like layer containing colored pigments and binders (usually acrylic or polyurethane). It completely masks the natural leather surface underneath.
Think of it as a durable finish, not a penetrating dye. The advantages are huge: incredible uniformity of color, superior resistance to stains, scuffs, and fading. The disadvantage is that it can feel plastic-like and mask the leather’s natural breathability and hand. It’s the standard for furniture, car interiors, and lower-cost goods where durability and consistency trump natural character. The specifics of this protective layer are covered in our article on pigmented leather.
Semi-Aniline Dyeing: The Strategic Compromise
Semi-aniline leather is the best-of-both-worlds solution. It undergoes a true aniline dyeing process first, imparting a base color that penetrates the hide. Then, a very light, translucent layer of pigment is applied on top.
This light coating protects the surface and evens out minor hide imperfections without completely obscuring the natural grain. It offers better stain and fade resistance than full aniline, while retaining a more natural look and feel than a heavy pigment coat. It’s a sophisticated process that balances aesthetics and practicality, which we explore further in our comparison of aniline vs semi-aniline leather.
A Practical Look at the Drum Dyeing Process
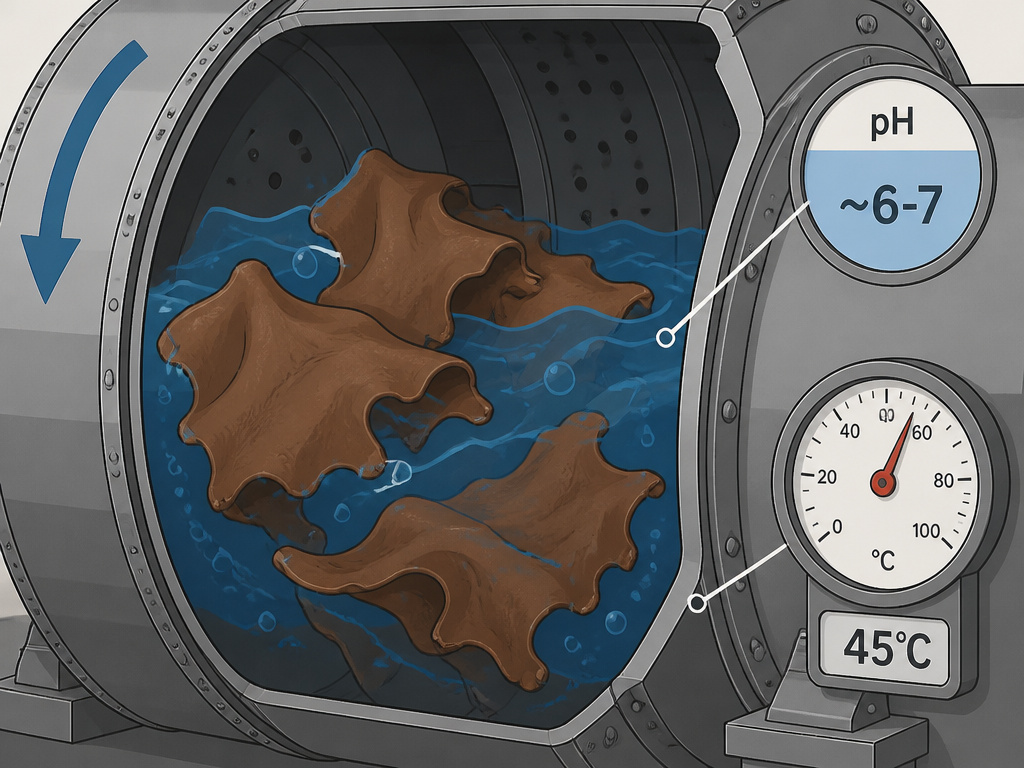 So how does this actually happen in a tannery? The heart of the operation is the dye drum, a large, rotating cylinder that looks like a concrete mixer. Here’s the step-by-step sequence for dyeing chrome-tanned leather with acid dyes, which is the most common industrial scenario.
| Process Step | Typical Conditions | What’s Happening Chemically | Consequence If Skipped/Rushed |
|---|---|---|---|
| 1. Neutralization | pH ~5-6, 30°C, 20 min | Removes excess acid from tanning, evens out charge on collagen. | Uneven dye uptake; patchy color. |
| 2. Dye Addition | pH ~6-7, 40-50°C, 30-45 min | Dyes diffuse into the hide. Penetration phase. | Surface-only dyeing; color rubs off easily. |
| 3. Acidification (Fixing) | pH lowered to ~3.5-4, 50-55°C, 20 min | Ionic bonds form, locking dyes into the leather. | Poor wash fastness; dye bleeds in water. |
| 4. Fatliquoring | Same bath, 50-55°C, 30-60 min | Oils are emulsified and absorbed, lubricating fibers for softness. | Leather becomes stiff, boardy, and prone to cracking. |
| 5. Final Washing & Draining | Warm water rinse | Removes unfixed dye, excess chemicals, and prepares for drying. | Residual chemicals can cause color migration or skin irritation. |
The timing and temperatures aren’t arbitrary. A BASF patent for a sulfo-containing azo dye specifies a dyeing range of 25° to 60°C, preferably 30° to 55°C, with the process lasting 30 to 90 minutes. Straying outside these windows risks incomplete fixation or damage to the leather.
Where this goes sideways: Adding the dye while the bath is still too acidic. The dye fixes instantly to the surface, starving the core of color. The leather will look done, but a cross-section cut will reveal a pale center, and the surface color will wear away rapidly with friction.
After dyeing and fatliquoring, the leather is sammed (partially dried), then goes through the leather finishing process where protective topcoats, embossing, or buffing is applied.
Why Fastness Tests Matter (Beyond the Sales Pitch)
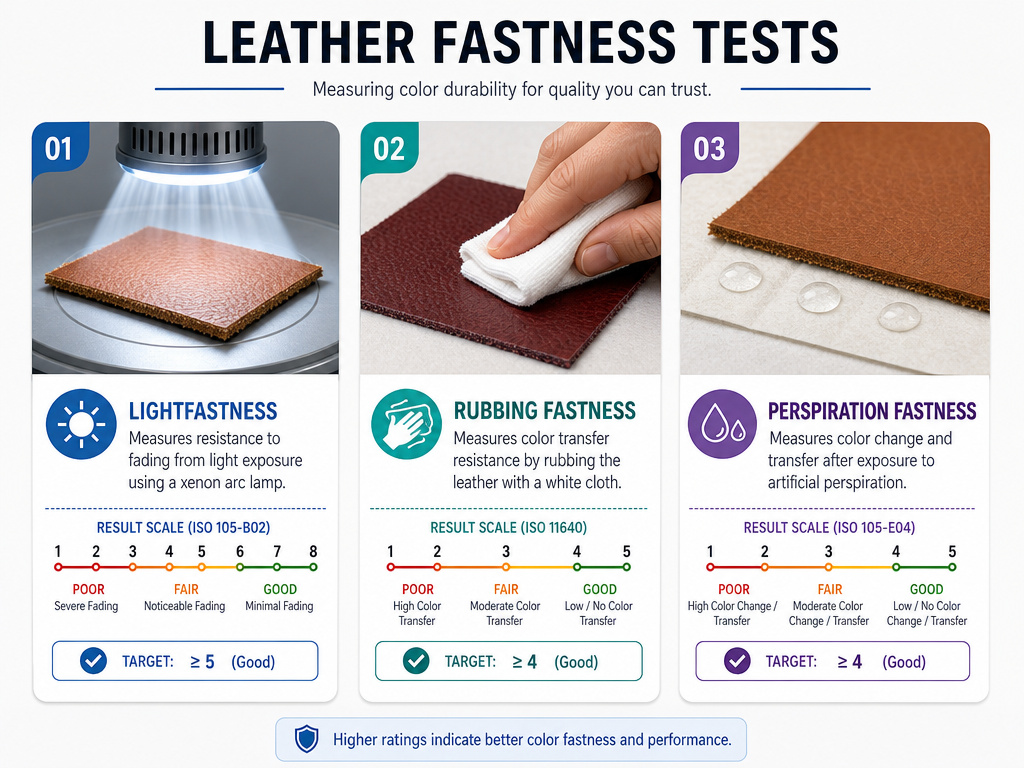 “Colorfast” is a marketing term until it’s verified. In leather, fastness refers to a dye’s resistance to external forces that try to remove or change it. It’s measured by standardized tests, many outlined in ISO standards like the ISO 7906 color fastness standard for general principles.
The most common tests are: * Lightfastness (ISO 105-B02): A xenon arc lamp simulates sunlight. The leather is exposed for a set number of hours, and the color change is measured against a grey scale. Aniline dyes, while beautiful, typically score lower here than pigments. * Rubbing/Crocking Fastness (ISO 105-X12): A dry or wet white cloth is rubbed against the leather under pressure. Does color transfer? This test directly relates to that annoying color bleed on your clothes from a new bag or jacket. * Perspiration Fastness (ISO 105-E04): The leather is subjected to artificial acidic and alkaline perspiration. This is critical for shoe linings, watch straps, and any leather worn against the skin.
A more niche but telling test is migration fastness. Some dyes, particularly those with low molecular weight or residual manufacturing side-products, can slowly migrate out of the leather and into a polyurethane topcoat or adjacent material over time. The IULTCS leather dyes properties PDF describes a test where a light grey finish is applied, then exposed to 90% relative humidity at 70°C for 16 hours. A visible color shift in the finish indicates a migration problem, a deal-breaker for high-end automotive or aviation interiors.
The Variables That Decide Your Color Outcome
Even with the right dye and perfect drum procedure, several other factors sway the final result. Controlling these is what separates consistent, high-quality production from a lottery.
- Liquor Ratio: This is the weight ratio of water to leather in the drum (e.g., 1.5:1). A lower ratio (less water) means a higher dye concentration, often leading to darker, more intense shades faster. But it can also make levelness harder to achieve. A higher ratio gives more uniform circulation but dilutes the dye, requiring more dye stuff or longer time.
- Water Quality: Hard water (high in calcium/magnesium) can react with dyes and chemicals, causing cloudiness, precipitation, or shade changes. Tanneries often use softened or demineralized water.
- Hide Variation: As noted in a ScienceDirect review on collagen dyeing additives, the collagen structure varies with the animal’s breed, age, and even the part of the hide (butt vs. Belly). The belly is looser and will absorb dye faster and darker than the tight butt. A good dyeing process minimizes this difference, but it can never be eliminated entirely. This inherent variation is part of what gives genuine leather its character.
I learned this the hard way early on, judging leather quality solely by surface appearance. I once dismissed a beautifully dyed top-grain leather as inferior, assuming the consistent color meant it was hiding flaws. Closer inspection of hundreds of samples showed that a skilled dyeing and finishing job could yield superior stain resistance and color consistency for a briefcase or shoe upper without sacrificing all the natural character. It was a lesson in looking beyond the surface to understand the process.
Edge Cases and Advanced Techniques
The standard drum dyeing process is just that, standard. But leather is a craft, and sometimes the rules are bent for a specific effect or challenge.
Cold Dyeing: While most acid dyes need heat to drive penetration, research on plant-derived colorants has shown successful “cold-dyeing” of vegetable tanned leather for 24 hours in acidic conditions. This is a slow, niche process but demonstrates that time can sometimes substitute for temperature.
Double-Dyeing and Overdying: This is how you get complex, tonal colors. First, the leather is dyed one color (e.g., a yellow-brown). Then, often after drying, it’s dyed again with a different color (e.g., a red). The two colors blend within the leather to create a unique, deep shade that changes with viewing angle. It’s common for high-end cordovan and some antique-effect finishes.
Dyeing for Patina: Some tanneries, especially those producing heritage-style products, dye leather with the explicit goal of creating a base that will age dramatically. They might use a lighter aniline dye that is less lightfast, knowing that sunlight and use will darken it in specific areas, accelerating the development of a personalized patina. This philosophy is central to the appeal of traditional vegetable tanned leather.
Frequently Asked Questions
Can you dye leather any color?
Technically, yes, due to the vast range of synthetic dyes. Practically, the base color of the leather (especially vegetable-tanned leather’s pale brown) influences the final shade. Dyeing a dark brown leather a pastel pink is essentially impossible, you’d have to bleach it first, which damages the fibers.
What’s the difference between leather dye and leather paint?
Leather dye penetrates and bonds chemically with the fibers. Leather paint, like acrylic or oil-based paint, sits on top as a film. Dye changes the leather’s color; paint coats it. Paint is far more opaque and color-fast on the surface, but it can crack or peel with flexing.
Why does some dyed leather bleed color?
Bleeding indicates poor dye fixation, usually from an incomplete or rushed dyeing process where pH wasn’t properly controlled or the wrong dye type was used. It’s a sign of lower quality control. High-quality drum-dyed leather with proper fixation and finishing should not bleed under normal conditions.
Is it possible to re-dye leather at home?
It is possible, but with managed expectations. You can dye undressed, unfinished leather (like vegetable-tanned craft scraps) with alcohol- or water-based dyes. Re-dyeing a finished leather item (like a black jacket you want to make navy) is extremely difficult. The existing finishes and topcoats must be completely stripped without damaging the leather, which is a professional-level task with a high risk of ruining the item.
How does the tanning method affect dyeing?
It’s foundational. The tanning process determines the collagen’s charge. Chrome tanning’s positive charge dictates the use of anionic dyes (acid, metal complex). Vegetable tanning’s negative charge dictates cationic basic dyes. You cannot ignore this chemistry. The entire leather tanning stage sets the table for the dyeing stage.
Before You Go
Understanding dyeing reframes how you see leather. It’s not a surface treatment. It’s a middle chapter in the material’s story, sitting between leather making and finishing.
One rule that holds true across all quality leather: the color should feel like it’s from the leather, not on it. If you rub a damp white cloth on it and see significant color transfer, that’s a failed bond, a sign of a shortcut taken. Conversely, a leather where the color depth seems to come from within, that develops highlights with wear rather than just wearing off, speaks to a dyeing process done right.
The next time you admire a rich cordovan shoe or a buttery brown sofa, you’re not just seeing a color. You’re seeing the outcome of a precise chemical reaction, a carefully controlled immersion, and a bond designed to last for generations. That’s the real art behind the hue.
