
How to Use a Stitching Awl | A Complete Step-by-Step Guide
This post contains affiliate links. As an Amazon Associate, we earn from qualifying purchases.
This post contains affiliate links. As an Amazon Associate, we earn from qualifying purchases.
To use a stitching awl, thread the needle from the internal bobbin, push it through pre-punched holes, pull a loop, pass the free end through that loop, and pull tight to form a lock stitch. The tool excels in tight spaces on thick materials like leather and canvas but creates holes 47% larger in diameter than a traditional palm and needle, a trade-off that can weaken fine fabrics.
That hole-size difference is the whole story. A sailmaker’s palm driving a finer needle is faster, stronger, and kinder to your material in almost every situation you’d think to grab an awl. The awl isn’t bad, it’s just wildly oversold as a universal solution.
What follows is a straight run-through of how an awl works, when it’s the right tool, and the one repair job where its drawbacks don’t matter. We’ll also look at why most professional leatherworkers and sailmakers keep theirs in the bottom drawer.
Key Takeaways
- A stitching awl creates a lock stitch by forming a loop with each plunge; you pass a free thread end through this loop and pull tight.
- The awl’s needle is far thicker than a hand-sewing needle, creating holes 47% larger in diameter, great for letting thick thread through, terrible for preserving material strength.
- Use an awl for repairs where you can’t reach both sides (trampoline mesh, installed upholstery) or on materials where large holes close up (thick leather, vinyl).
- Never use an awl on sailcloth, waterproof canvas, Bimini tops, or rope; the oversized holes leak and cut fibers.
- For long, visible seams on bags, straps, or sails, a traditional hand stitching or saddle stitch with two needles is stronger, more repairable, and looks professional.
The Anatomy of a Common Awl
Let’s be clear about one thing: most people asking this question mean a tool like the Speedy Stitcher or Awl-for-All. It’s not a simple piercing awl; it’s a self-contained sewing machine in a handle. The basic design is consistent: a hollow handle holding a bobbin of thread, a tension post to control feed, a chuck that locks a heavy needle in place, and that needle itself, which has an eye near its tip.
The needle’s thickness is your first clue. To drive a length of waxed polyester thread, the needle on a common stitching awl measures about 0.081 inches in diameter. Compare that to the 0.055-inch needle you’d use with a sailmaker’s palm for the same thread. That’s not a small difference, it’s the reason an awl can feel like it’s ploughing through material rather than stitching it.
The stitching awl creates a hole with a 47% greater diameter and 217% larger area than a needle used with a palm for the same size eye and thread diameter. In canvas, this will leak. In sail cloth, it cuts fibers.
The Core Lock Stitch Cycle
The magic of a stitching awl is the lock stitch. Unlike a running stitch from a single needle, each awl stitch locks itself, which resists unraveling if the thread is cut. Here’s the cycle, assuming you’ve already punch holes in your leather or canvas.
- Thread and Start: Pull 6-8 inches of thread from the needle’s eye. Push the needle completely through your first pre-punched hole from one side of the work. Let that length of “free thread” hang out the other side.
- Form the Loop: Push the needle into the second hole. As the needle emerges on the opposite side, pull the awl back slightly, about a quarter-inch. This pulls a small, loose loop of thread from the bobbin up alongside the needle shaft.
- Lock It: Take the free thread end you left hanging from the first hole and pass it through that loop. Now pull the awl completely out of the second hole. As you pull, you’ll be pulling on both the free thread and the thread from the bobbin. Pull them with equal tension until the stitch snugs down against the material.
- Repeat: Move to the third hole, push through, pull back to form a new loop, pass the free end through, and pull tight. The free thread is now permanently woven through every loop, creating a continuous locked line.
Skip the loop-forming step, and you’ll just be making a loose, weak running stitch that pulls right out. The loop is the entire mechanism.
Threading, Tension, and the One Jam You’ll Meet
Most frustration starts before the first stitch. If the thread isn’t feeding freely from the bobbin inside the handle, the loop won’t form and the thread will snap. The manual for the Speedy Stitcher is adamant: you must route the thread from the bobbin, through the handle’s exit hole, and then under the thread coming from that hole before wrapping it around the external tension post.
Do that, and the thread pays out smoothly. Miss that under-and-around step, and the thread binds against itself inside the handle. You’ll get two stitches in before the awl seizes up. It’s a five-second fix that ruins a ten-minute job if overlooked.
As for thread choice, the included waxed polyester is fine for general repairs. For leather, many crafters prefer the flat, consistent look of Ritza Tiger Thread or the strength of Meisi linens. You can re-spool the bobbin with your preferred thread. Just remember: thicker thread needs a bigger needle, which means even larger holes.
The Stitching Awl’s Achilles’ Heel
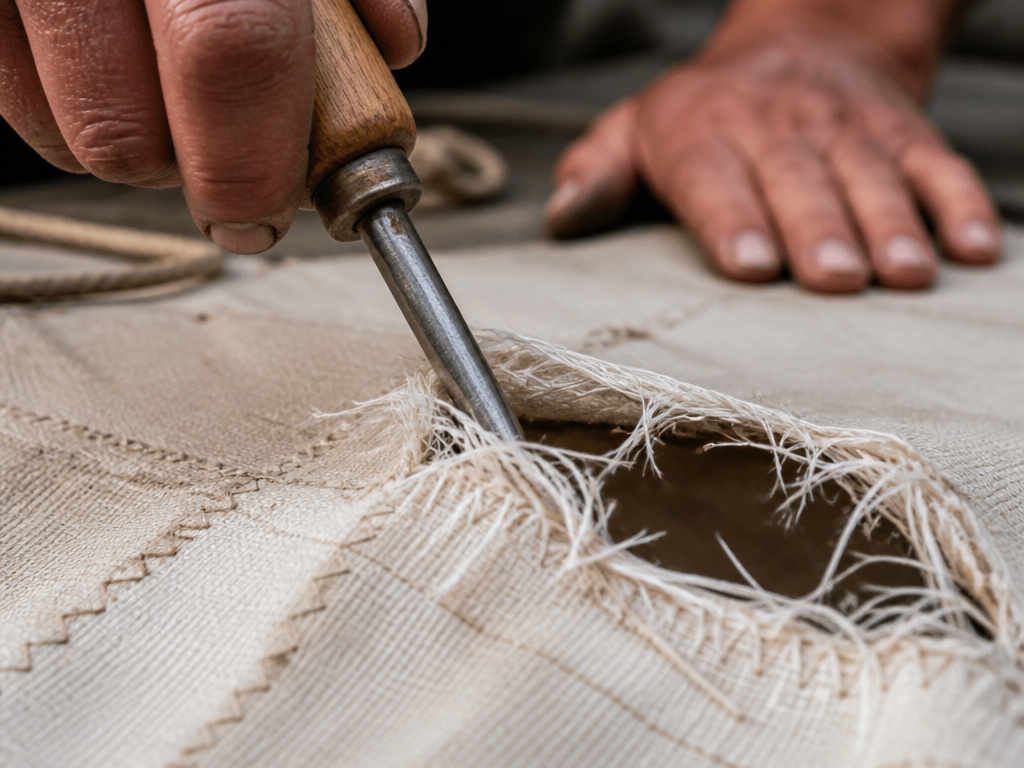 I learned the limits of this tool not on leather, but on a sailbag. The awl went through the heavy canvas easily, the lock stitches looked secure, and the job was done in twenty minutes. Six months later, the seam was leaking air and the material around the holes had started to fray. The holes were just too big.
That’s the documented trade-off. The awl’s brute-force approach sacrifices material integrity for mechanical advantage. A palm and needle is about two and a half times faster for a skilled hand, and because the pressure is in-line, you break far fewer needles. The resulting seam is tighter, the holes are smaller and cleaner, and the long-term strength of the fabric is preserved.
| Repair Scenario | Awl Assessment | Better Alternative |
|---|---|---|
| Sailcloth or Sunbrella | Poor. Cuts fibers, creates leak points, weakens the cloth. | Palm and needle, hand stitching. |
| Boot or Bag Upholstery | Good. Confined spaces favor the awl; vinyl/leather holes close. | Awl is often the best tool for the job. |
| Mesh Trampoline Fabric | Excellent. Large holes are inconsequential; access is one-sided. | Awl is the only practical choice. |
| Long Bag Strap Seam | Mediocre. Stitch is strong but slow and visually inconsistent. | Saddle stitch by hand for strength and looks. |
| Rope or Webbing | Poor. Excessive fiber damage, stitch can cut itself. | Palm and needle, or dedicated heavy-duty machine. |
Common mistake: Using an awl on a Bimini top or sail cover because it’s “heavy material.” The oversized holes will wick water straight through, and the cut fibers rot faster. Use a palm and needle or take it to a pro.
Finishing Your Work Securely
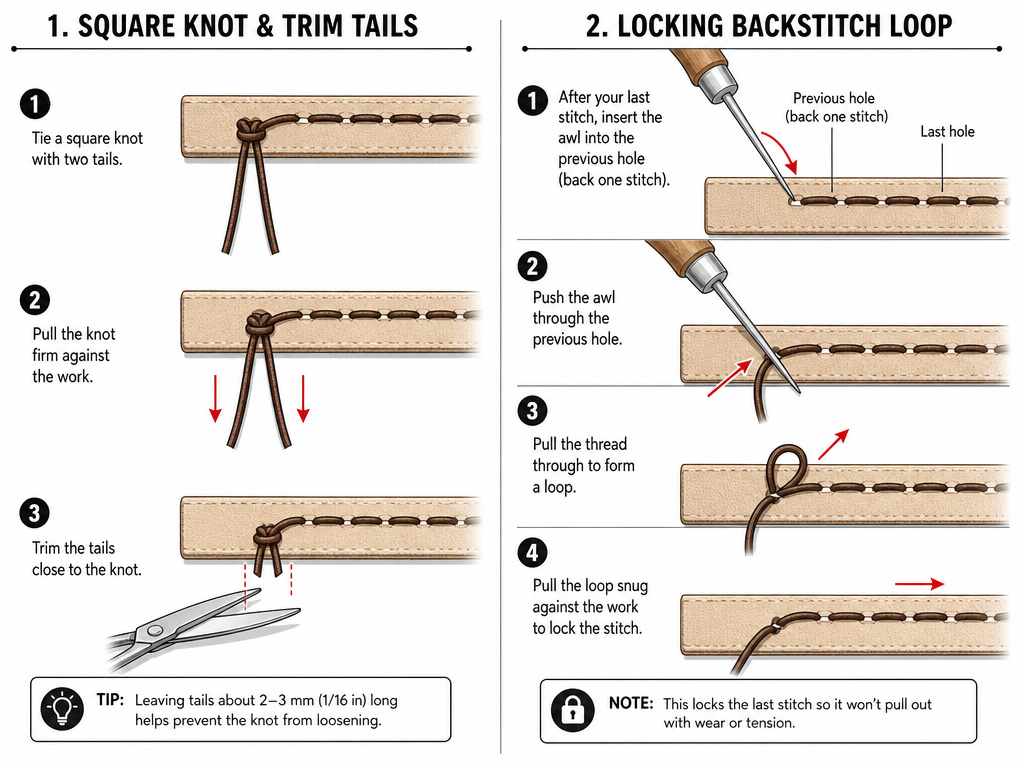 You’ve reached the last hole. Do not just cut the thread flush, the lock stitch can still pull back. You have two reliable finishes.
The knot method is simplest. For the final stitch, pull an extra 3-4 inches of thread through the needle after locking it. Cut the thread coming from the awl’s needle, leaving two long ends. Tie these together in a square knot, right over left, left over right, pulled tight against the material. Trim the tails.
The backstitch method is cleaner and stronger. For your final “real” stitch, stop before pulling the lock tight. Now, instead of moving forward, push the needle back into the previous hole you used. Form a loop, pass the free end through, and pull tight. You’ve now locked a stitch going backward. You can repeat this into one more prior hole for maximum security. Then trim both threads close.
Both methods work. The knot is faster; the backstitch is smoother and less bulky under tension.
When to Shelve the Awl Entirely
Here’s the practical takeaway from years of watching students and pros: a stitching awl is a repair specialist, not a construction tool. It shines in exactly two situations: when you cannot access the back of the work (like a trampoline already laced to a boat frame), or when the material is so thick and plastic (like some vinyls or certain leathers) that the hole closes tightly around the thread.
For every other job, building a bag, sewing a sail, making a belt, the traditional methods win. Hand stitching with two needles produces the revered saddle stitch, where two threads lock against each other inside the hole, eliminating any single point of failure. It’s repairable, adjustable, and with practice, faster. It’s also what you’ll see on any high-end leather good or well-made piece of canvas work.
If you’re new to leatherworking, the awl is a fantastic bridge. It lets you make strong repairs without mastering the two-needle dance. But view it as a stepping stone. The control, speed, and quality of a saddle stitching seam are worth the practice. A stitching pony to hold your work and a set of pricking irons to make perfect, consistent holes reduce the learning curve dramatically.
Frequently Asked Questions
Is a stitching awl good for leather?
Yes, but with a caveat. It’s excellent for repairs, especially in tight spots like reinforcing a bag corner or fixing a boot seam where you can’t get inside. For constructing a leather item from scratch, like sewing the sides of a wallet, a hand-sewn saddle stitch is stronger, more elegant, and more professional.
What is the difference between a stitching awl and a sewing awl?
This is where terminology gets muddy. What most people call a “stitching awl” (like a Speedy Stitcher) is a self-contained tool that makes a lock stitch. A “sewing awl” is often a simpler tool, sometimes just a handle that holds a straight needle, used in conjunction with a palm to hand-sew heavy materials. The latter is the pro’s choice for sail and canvas work.
Can you use a stitching awl without pre-punched holes?
Technically, yes, the sharp needle can pierce soft leather or canvas. But you shouldn’t. Pushing the thick awl needle through uncompressed material stretches and tears the fibers, creating a rough, weak hole. Always punch holes first with an appropriate pricking iron or rotary punch. The hole guides the needle and preserves the material’s integrity.
Why does my stitching awl keep jamming?
Two reasons. First, check the threading path around the tension post. The thread must go under the strand coming from the handle before wrapping the post. Second, you might be pulling the lock stitch too tight. Excessive tension can yank the thread back into the handle mechanism, causing a tangle. Pull until the stitch is snug, not guitar-string tight.
What thread should I use in my stitching awl?
The included waxed polyester is durable and fine for most tasks. For leather, many upgrade to a dedicated leather thread like Maine Thread or Serafil. The key is that the thread must be strong enough to withstand the pulling force of the lock stitch and slick enough (often waxed) to pass through the material repeatedly without fraying.
Before You Go
The stitching awl is a powerful tool that concentrates force in a handle. It lets one hand do the work of two. Remember, that leverage comes from a thicker needle, and that needle makes a bigger hole. So match the tool to the problem: confined-space repairs on forgiving materials.
If your goal is to make things rather than fix them, put the awl in your emergency kit. Invest the time in learning to stitch leather by hand. The saddle stitching technique is a fundamental skill that opens doors in leather craft. It turns effort into heirlooms. The awl turns effort into a serviceable patch. Know which outcome you’re after, and you’ll never grab the wrong tool again.
