
The Essential Guide on How to Use a Pricking Iron Effectively
This post contains affiliate links. As an Amazon Associate, we earn from qualifying purchases.
This post contains affiliate links. As an Amazon Associate, we earn from qualifying purchases.
To use a pricking iron, you mark a stitch line on your leather, align the tool vertically on that line, and strike it squarely with a mallet. The goal is not to punch through, but to create clean, evenly spaced guides for your awl to follow. A 3mm or 4mm spacing is the most forgiving for beginners, and you must work on a soft, thick surface like stacked leather to protect the tool’s teeth.
The difference between a neat stitch line and a crooked one often comes down to the first strike. This isn’t about raw force; it’s about a controlled, vertical hit on a properly supported piece of leather. Get that wrong, and you’ll fight the awl through every hole, ending up with a seam that looks amateurish no matter how careful your stitching is.
What follows is a breakdown of the setup, the four-step process, and the common errors that break it. We’ll also look at the ongoing debate about what a pricking iron actually is and how that changes your technique. By the end, you’ll know how to punch a straight line, every time.
Key Takeaways
- A pricking iron marks leather for stitching; a stitching chisel punches through it. Using one like the other changes your thread size and final finish.
- The working surface must be 8-10mm thick (like stacked leather) to absorb the strike and prevent the iron’s teeth from hitting a hard backing and snapping.
- For thick, dense leather, punch holes at least as far from the edge as the distance between the prongs (e.g., 3mm from the edge for a 3mm iron) to prevent the holes from drifting toward the edge on the backside.
- Always re-enter the last hole made with your pricking iron before moving forward. This is the only way to guarantee perfectly consistent spacing over a long seam.
- Keep the handle perfectly vertical and strike straight down. A tilted iron or an angled mallet hit is the root cause of misaligned, difficult-to-stitch holes.
What You’re Actually Doing With a Pricking Iron
Let’s be clear about one thing. The term “pricking iron” gets used for two different tools, and that confusion costs beginners time and money. A traditional pricking iron, like the one defined in the Wikipedia entry on pricking irons, is a marking tool. Its sharp teeth create precise dimples or slits in the leather’s surface to guide an awl. It does not punch a clean hole all the way through.
The other tool, often sold as a “stitching chisel,” has thicker, wedge-shaped teeth designed to displace leather and create a full channel in one go. You can stitch directly through those holes without an awl. The practical takeaway? If you’re using a marking iron, you need an awl. If you’re using a punching chisel, you don’t. Most of the frustration I see comes from someone buying a marking iron, trying to force it through the leather like a chisel, and then wondering why their thread won’t fit.
The part nobody mentions: Forcing a marking iron deep into the leather to avoid using an awl creates oversized, ragged holes. You’ll then need heavier thread to fill them, which throws off the proportions of a delicate project like a card holder.
The entire purpose of the tool is consistency. Hand-marking holes with an awl and a ruler is slow and almost guarantees slight variations. Those variations scream “beginner” on a finished piece. A pricking iron gives you machine-like spacing with a hand-tool feel, which is the foundation of quality hand stitching.
The Non-Negotiable Setup
Your technique can be perfect, but if your workstation is wrong, you’ll break tools. I learned this the hard way early on, tapping a pricking iron on what I thought was a firm surface. The teeth hit the granite below and developed a slight bend. The next project, every hole was off by a fraction. That fraction multiplied over a seam.
You need two layers: a soft strike surface and an immovable foundation. The ideal strike surface is an 8-10mm thick slab of firm, end-grain leather, glued up from scraps. This gives the teeth something to sink into without hitting bottom. If that’s too much work, a polyethylene cutting mat works. The foundation beneath it must be something that doesn’t give, a granite tile, a thick steel plate, a section of marble countertop. This combo absorbs the mallet’s energy safely and cleanly.
| Worksurface Layer | Purpose | What Happens If You Skip It |
|---|---|---|
| Soft Surface (8-10mm leather, poly mat) | To protect the iron’s teeth from hitting a hard stop. | The teeth snap or bend on the first hard strike against stone or metal. |
| Solid Foundation (Granite, steel) | To absorb and disperse the strike energy without bouncing. | The energy travels into your workbench, damaging it and causing the leather to shift under the iron. |
| Flat, Clean Workspace | To ensure the leather lies perfectly flat. | Any debris or warp under the leather causes the iron to strike at an angle, misaligning holes. |
Gather your other tools now: a non-marking ruler or wing divider, a mallet (a poly or rawhide head is best, it’s quieter and won’t mar your tools), a sharp awl, and your chosen leather thread. The leather awl is not optional if you’re using a true pricking iron.
Choosing Your Pricking Iron
Walk into this knowing you’ll likely need more than one. A single 4- or 6-prong iron is a great start for long, straight sections, but you’ll need a 2-prong and a 1-prong for corners and curves. The two main types dictate the look of your stitch.
Japanese (Diamond) Irons have teeth shaped like elongated diamonds. They create angled holes that naturally guide the needle for the classic, slanted saddle stitch. The diamond shape cuts cleanly and is my default for most fine work.
European (Irregular/Straight) Irons have chisel-like, straight teeth. They punch a straight, vertical slit. These are often the “stitching chisels” that punch through completely. They’re robust and great for heavy work like belts and bags.
Spacing is measured in millimeters between holes or stitches per inch (SPI). Here’s the straightforward guide:
| Spacing | SPI (approx.) | Best For | Beginner Note |
|---|---|---|---|
| 4mm | 6 SPI | Belts, bags, rustic work. | Most forgiving. Easier to see and stitch. |
| 3mm | 8-9 SPI | General purpose (wallets, journals). | The versatile middle ground. |
| 2.5mm | 10 SPI | Refined wallets, card holders. | Requires more precision. |
| 2mm or less | 12+ SPI | High-end, delicate items. | Difficult. Start here only if you have very steady hands. |
Start with a 3mm or 4mm diamond iron in a 4-prong size. Brands like KS Blade Punch offer excellent value for starters. If you find yourself doing this long-term, an investment in a set from Barry King Tools or C.S. Osborne will last a lifetime. Match the iron spacing to your project and leather thickness, thicker leather can handle wider spacing.
The Four-Step Pricking Process
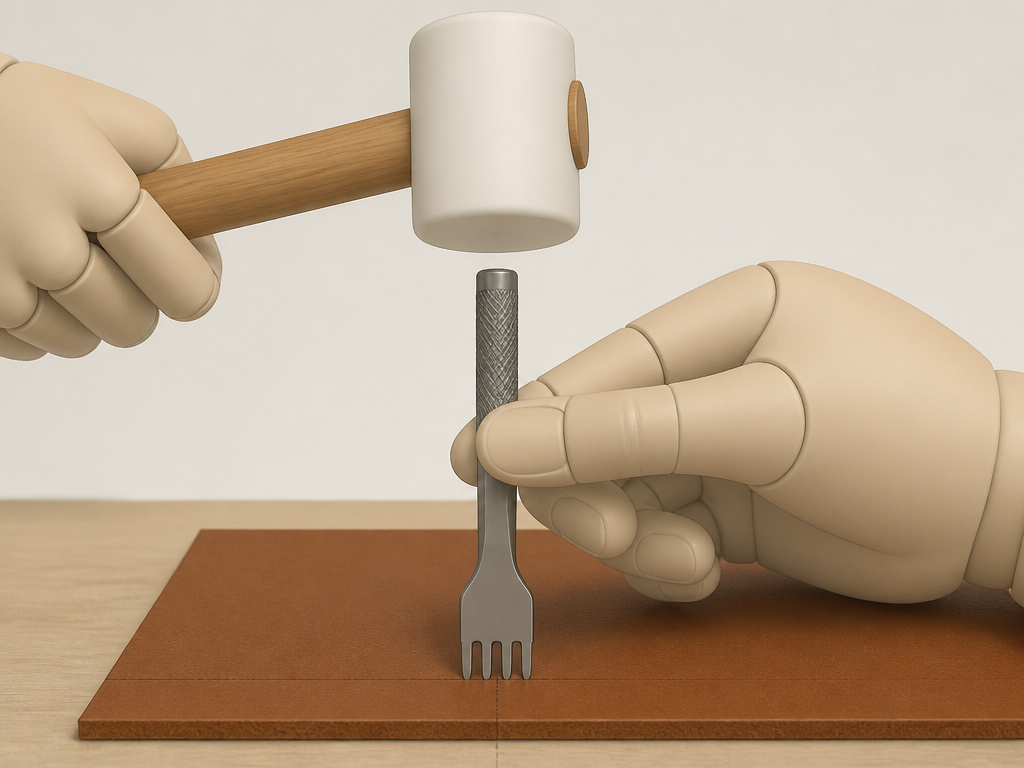
This is the core of it. Rushing any step here shows up in the final stitch.
1. Mark Your Stitch Line.
Use a wing divider or a ruler and an awl to scribe a light, straight line where the stitches will go. This line is your railroad track; the pricking iron follows it. If you’re sewing leather around a curve, mark the curve first.
2. Position the Iron.
Place the first tooth (or the first two teeth for stability) directly on your marked line. Now, look at the handle. It must be perfectly perpendicular to the leather. Any lean, even a slight one, creates an angled hole that’s a nightmare to stitch through. Your eyes are the best tool here, check from the front and the side.
3. Strike Squarely.
Raise your mallet and bring it straight down. Don’t swing from the side. Your elbow should be high, driving the force directly downward through the iron’s handle. One confident, medium-strength strike is usually enough to create a clear mark. You’re not trying to punch through the world.
4. Advance and Repeat.
Lift the iron and place its first tooth into the last hole you just created. This is the single most important trick for perfect spacing. It locks the iron into the existing pattern. Then align the tool with your stitch line again, check for vertical, and strike. This repeat, re-enter, align, strike, is the rhythm of a clean seam.
I’ve used the same set of diamond irons for years. That re-entry step is the reason. Their consistent spacing and sharpness create perfect guides every time, making the hand stitching process look clean and professional. Skip it, and you’ll spend the rest of the project trying to compensate for drift.
After marking the entire line, you’ll see a row of neat slits or dimples. Now take your sharp awl. Place its tip into each mark and push it through the leather with a twisting motion. The awl should follow the angle of the pricking iron’s teeth. You’ll feel a clean pop as it pierces the layers. This two-step process, iron then awl, gives you maximum control over the final hole size.
Common Pricking Iron Mistakes
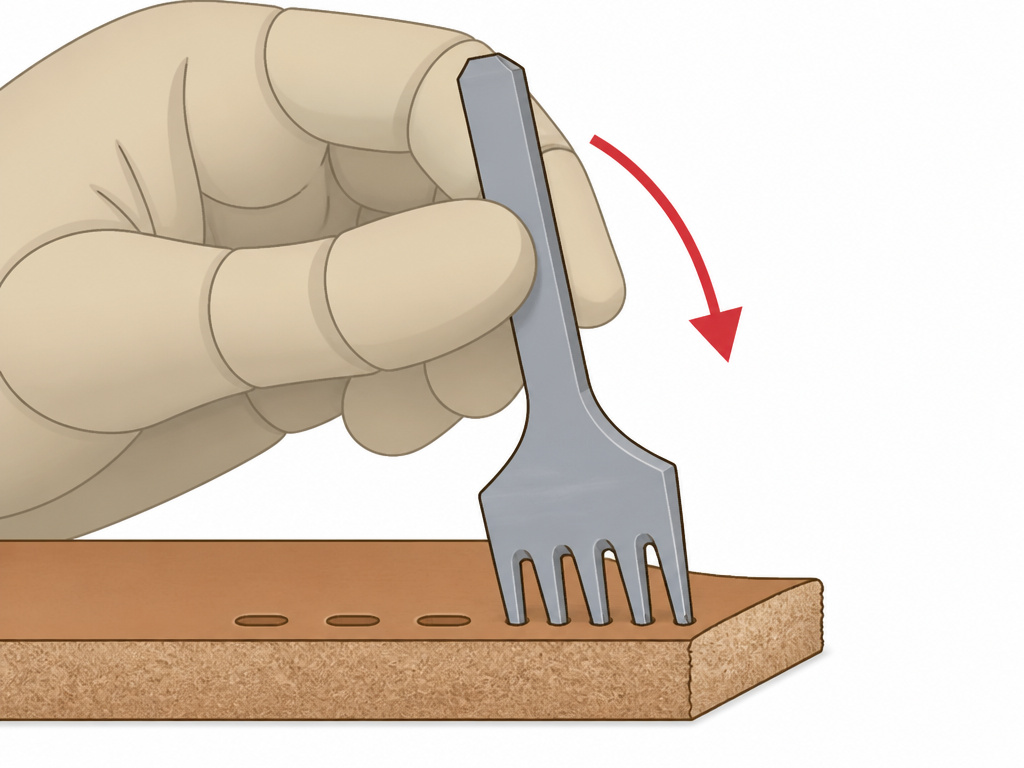
Most errors are failures of geometry or force. Let’s break down the usual suspects.
Where this goes sideways: Punching too close to the edge on thick leather. The iron displaces fibers as it cuts. If one side (the edge) has less material than the other, the tool drifts toward that path of least resistance. The front hole is 3mm from the edge, but the back hole might be nearly flush.
The Tilted Iron. This is the number one cause of crooked backside holes. You look straight down, but the handle is leaning forward or back. The holes are angled, so the awl has to fight to find a path. The fix is simple: pause before every strike and sight the handle like a carpenter checking a plumb line.
The Angled Strike. Your iron is vertical, but your mallet comes in from the side. This sideways force knocks the iron off its axis during the strike. The result is the same as a tilt, misaligned holes. Keep your elbow up and strike like you’re driving a nail straight down.
The Unsupportive Surface. If your leather isn’t flat on a solid base, it will flex or rock when struck. That movement translates into a jagged stitch line. Use the heel of your hand to press down on the workpiece away from the strike point, especially near edges.
The Wrong Thickness. Pricking irons work best on single layers up to 3-4mm. For a stacked leather wallet that’s 8mm thick, don’t try to punch through all at once. Mark with the iron, then use the awl to open each hole through the layers individually. Forcing the iron will bend the teeth.
When to Use an Awl vs. When to Punch Through
This decision changes your workflow. If your tool is a true marking iron, the awl is mandatory. The process is methodical: mark the entire line, then sit down with your stitching pony and awl each hole. It’s slower but offers the cleanest, smallest holes for fine thread.
If your tool is a stitching chisel that punches through, you can stitch directly after punching. It’s faster, but the holes are larger. You must use thicker thread, and the look is more robust than refined. For belts, straps, and bags, this is often the better choice.
Some craftspeople use a hybrid approach: they use a chisel to punch through the top layer of a project but use an awl to carefully open holes in the lining layer for a neater interior. This is an advanced technique, but it highlights the versatility of understanding both methods. For a deep dive on the awl work, see our guide on using a stitching awl.
Maintenance and Long-Term Care
A dull pricking iron tears leather instead of cutting it. You’ll see fuzzy, ragged marks instead of clean slits. Sharpening them is specialized work, you need fine diamond stones to hone each face of the diamond or chisel tooth without altering its profile. For expensive irons, I send them to a professional tool sharpener every few years of heavy use.
After every session, wipe the teeth clean with a dry cloth to remove any moisture or leather oils. Before storing, a tiny drop of camellia oil or a pass with a waxed cloth prevents rust, especially in a humid workshop. Store them in a tool roll or a block with individual slots. Throwing them in a drawer with other metal tools is a sure way to chip those precision-ground edges.
Frequently Asked Questions
What’s the difference between a pricking iron and a stitching chisel?
Pricking iron is designed to mark or lightly pierce the leather, creating guides for an awl to finish. A stitching chisel is built to punch completely through the leather in one strike, creating a hole ready for stitching. Many modern tools blur this line, so check the tooth design, thin, sharp points are for marking; thicker, wedge-shaped teeth are for punching.
Can I use a pricking iron on thick leather?
You can use it to mark thick leather. For leather stacks thicker than 4mm, do not try to force the iron through all layers. Use it to mark the top layer, then use an awl to pierce through the entire stack, following the guide marks. This preserves the tool and gives you cleaner holes through the lower layers.
Why are my holes not lining up on the back of the leather?
This is almost always due to the iron not being held perfectly vertical or striking at an angle. It can also happen if you’re punching too close to the edge on dense leather, as the iron drifts toward the path of least resistance. Ensure vertical alignment, strike straight down, and maintain the minimum edge distance.
How do I punch holes around a curve?
Switch to a 2-prong or single-prong iron. Use the last hole you created as your anchor point, re-enter it with the first prong of your iron, and then pivot the iron slightly to follow the curve. Advance one or two holes at a time. This maintains consistent spacing while allowing you to navigate the bend.
What mallet should I use with a pricking iron?
Poly or rawhide mallet is ideal. It delivers a solid strike without the loud clang of metal on metal, and it won’t damage the iron’s handle. A lightweight hammer can work, but it’s easier to accidentally strike at an angle. The dead-blow effect of a rawhide mallet gives you more control.
The Bottom Line
The pricking iron isn’t a magic wand, but it is the gatekeeper to professional-looking stitching. Its entire job is to remove the variable of human error from spacing. The real skill lies in the setup, the thick working surface, the granite slab, the vertical alignment, and the discipline to re-enter the last hole every single time.
If your stitches still look crooked after using one, go back to the basics. Film yourself from the side as you strike. You’ll likely see the tilt or the angled mallet swing. Fix that one mechanical action before you buy a more expensive tool. A $30 iron used correctly will outperform a $300 iron used poorly every day of the week.
For your first major project, commit to the two-step method: mark with the iron, then open every hole with an awl. It feels slow, but that slowness is where you build the muscle memory for verticality and consistent pressure. Speed is the last thing you add, not the first.
