
How Is Suede Made | From Hide to the Signature Nap
This post contains affiliate links. As an Amazon Associate, we earn from qualifying purchases.
Suede is made by taking a tanned animal hide, often cow, goat, or sheep, splitting it, and sanding or grinding the fibrous inner “flesh” layer to create a soft, fuzzy nap. The process begins with hides stabilized in a “wet blue” state, involves precise chemical re-tanning and dyeing, and ends with mechanical buffing to lift and refine the surface fibers.
That wet blue stage is your starting point. It’s not a color; it’s a state where raw hides have been chrome-tanned, washed, and stabilized, ready for a tannery like Charles F. Stead to begin their weeks-long transformation. The leather is essentially prepped but raw, pliable, uniform in thickness, and waiting for its character to be defined.
What follows is a walk through the specific machinery, chemical baths, and timing that turn wet blue into the suede you recognize. We’ll cover the five essential stages, why the split matters more than the animal, and the one patented method that starts with dry leather and a flame.
Key Takeaways
- Suede comes specifically from the flesh side of a split hide, not the tight-grained top layer. That inner layer’s loose fibers are what create the nap.
- The signature softness is mechanical, not chemical. It’s achieved by sanding or buffing the surface, not by applying a coating.
- Moisture control is a constant battle. Hides are repeatedly dehydrated and rehydrated to specific percentages (like 50% after rehydration, then down to 10%) to prepare them for each mechanical step.
- Shaving is where the texture is born. The angle and configuration of the blades in the shaving machine are often a tannery’s guarded secret, directly affecting the density and feel of the final suede.
- Not all suede processes start with wet blue. The patent CN1664114A method begins with dry leather, using flame to carbonize the flesh side before grinding, an alternative path for specific visual effects.
The Raw Material: It Starts with “Wet Blue”
You don’t start with a raw hide. You start with a wet blue one. This is the universal language of the leather industry. Hides arrive at a suede tannery already having undergone initial chrome tanning, which turns the collagen fibers a pale blue and stabilizes them against decay. They’re called “wet” because they retain moisture, and “blue” from the chromium salts.
This isn’t the tannery outsourcing the hard work. It’s a division of labor. The initial chrome tan is a commodity process; the artistry of suede-making begins with what happens next. The wet blue hide is uniform, stable, and ready to be rehydrated, split, and transformed. Think of it as a blank canvas that’s already been stretched and primed.
The Five-Step Path from Wet Blue to Finished Suede
While every tannery has its proprietary tweaks, the journey from a wet blue hide to a finished panel of suede follows a disciplined, five-stage sequence. Missing one or altering the order doesn’t just change the quality, it can ruin the batch.
The rehydration stage balances the hide’s moisture to a uniform 50–60% in preparation for splitting and shaving. This “wet samming” process involves pressing and flattening to remove excess water, creating the optimal fiber density for mechanical work.
1. Rehydration and Sam-Setting
The wet blue hides are dry to the touch but hold latent moisture. They’re loaded into large drums, some tanneries like CF Stead use 1400-kilo drums for efficiency, and flooded with water and mild cleansers. This isn’t just a rinse; it’s a recalibration. The goal is to bring every hide to the exact same moisture content, around 50-60%, a state known as “wet sammed.”
If the hides are too wet, they’ll gum up the splitting and shaving machines. Too dry, and the fibers won’t yield evenly, leading to a patchy nap. The samming machine acts like a giant, heated ironing press, squeezing out controlled amounts of water and flattening the hide. That precise moisture level is the first secret to consistency.
2. Splitting: Choosing the Suede Layer
Now the hide gets divided. It’s fed through a splitting machine, a fearsome apparatus with a razor-sharp blade that slices the hide horizontally. The top layer, with the tight grain pattern, is set aside for other types of leather. The lower, fleshier layer is the birthplace of split suede.
This is the decisive moment. The thickness of this split layer determines the destiny of the suede. A thin split, around 0.9-1.0mm, yields a delicate suede for gloves or linings. A thicker split, up to 3.0mm, becomes the robust suede used in hardwearing boots. The tanner makes this call based on the hide’s quality and the final product’s requirements.
3. Shaving: The Precision Thickness Pass
Splitting gets you close, but shaving gets you exact. The split layer passes under a cylindrical shaving head, where an arrangement of ultra-sharp blades skims off microscopic amounts to reach a precise, uniform thickness. This step, more than any other, releases the nap.
“Every tannery has its own configuration of the blades,” says Michael Crack, Technical Director at CF Stead. His grandfather developed their setup in the 1950s. That blade angle, pressure, and alignment directly dictate how the flesh-side fibers will later respond to buffing. It’s a guarded trade secret because it defines the suede’s hand-feel, the difference between a tight, pebbled nap and an airy, lofty one.
4. Re-tanning, Dyeing, and Fat Liquoring
With the thickness set, the hides return to the drums for chemistry. This is where color and character are locked in. The process outlined in patent CN108165678A is illustrative: after an acid wash to pH 3.2, a re-chroming step adds 8% chrome powder and syntans. Neutralization follows with sodium formate, bringing the pH to a stable 4.5–4.6 over 60 minutes.
Dyeing isn’t just about color; it’s about penetration. The drum rotates for 50 minutes as dyes seep into the fibers. Then comes fat liquoring, adding oils like sulfonated or fish oil. These aren’t conditioners; they’re lubricants that separate the individual fibers, making the leather supple and influencing how the nap will later reflect light. Without this step, the suede would be stiff and boardy.
5. Drying and Conditioning: The Final Settle
The wet, dyed hides must be dried without distorting the fibers or setting wrinkles. Two main methods exist: thermal hang-drying for delicate hides (taking over 24 hours) or tunnel drying on a conveyor for thicker ones (3–6 hours). The target is to reduce moisture content from about 60% down to 10–20%.
Where this goes sideways: Rushing the drying stage. If heat is too high or air flow uneven, the hide dries stiff and the fibers mat down. The resulting suede loses its suppleness and the nap won’t revive properly, feeling like sandpaper instead of velvet.
The final step is drum conditioning. The dried hides are tumbled in a large, slow-moving drum. This gentle mechanical action relaxes the fibers, evens out the color, and imparts the final, uniform softness. It’s the equivalent of letting a stew rest before serving; the fibers settle into their intended state.
How Shaving Unlocks the Nap
Shaving isn’t about making the hide thinner. It’s about preparing the fiber ends. The shaving blade cuts across the flesh-side fibers cleanly, leaving millions of tiny fiber ends standing at a uniform height just below the surface. When the later buffing stage sands across this surface, it doesn’t create the nap, it reveals and lifts these pre-cut fiber ends.
Think of it like mowing a lawn. Buffing is the lawnmower, but shaving set the blade height. If the shave is uneven, the buffing will produce a patchy, irregular nap. That’s why the shaving machine calibration is so proprietary. Get it right, and the buffing cylinders simply tease up a consistent, velvety surface. Get it wrong, and you’re left with bald spots and rough patches.
Buffing: The Final Sculpt
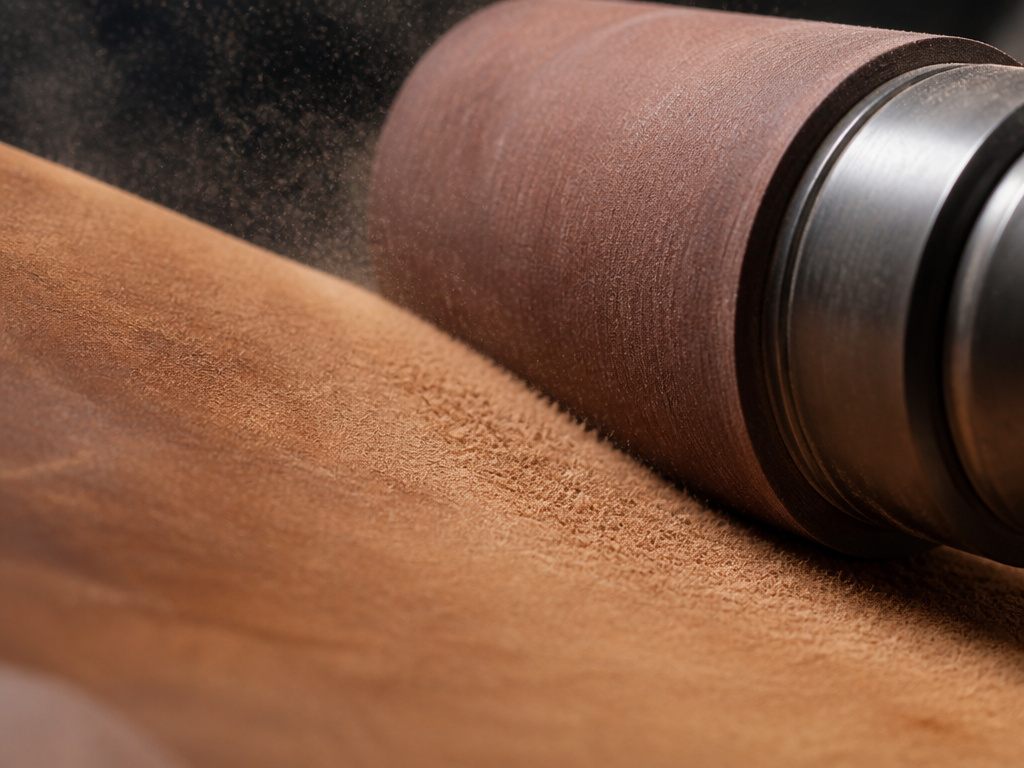
Buffing is where suede gets its signature feel. The hides pass under rotating cylinders wrapped in progressively finer grades of sandpaper, often starting with 320 grit and moving to 600 grit. This abrasion does three things: it lifts the fiber ends prepared by shaving, it smooths any remaining coarse bits, and it polishes the very tips of the fibers to create a subtle sheen.
The pressure and speed are everything. Too much pressure flattens the nap permanently. Too little leaves it uneven. Technicians read the leather by sight and touch, making micro-adjustments. After multiple passes, a fine dust is removed, leaving behind that temptingly touchable surface. This step is so critical it distinguishes a premium suede from a coarse one, and it’s why brands like Crockett & Jones have different buffing specifications than a brand making casual desert boots.
An Alternative Path: The Dry Leather Method
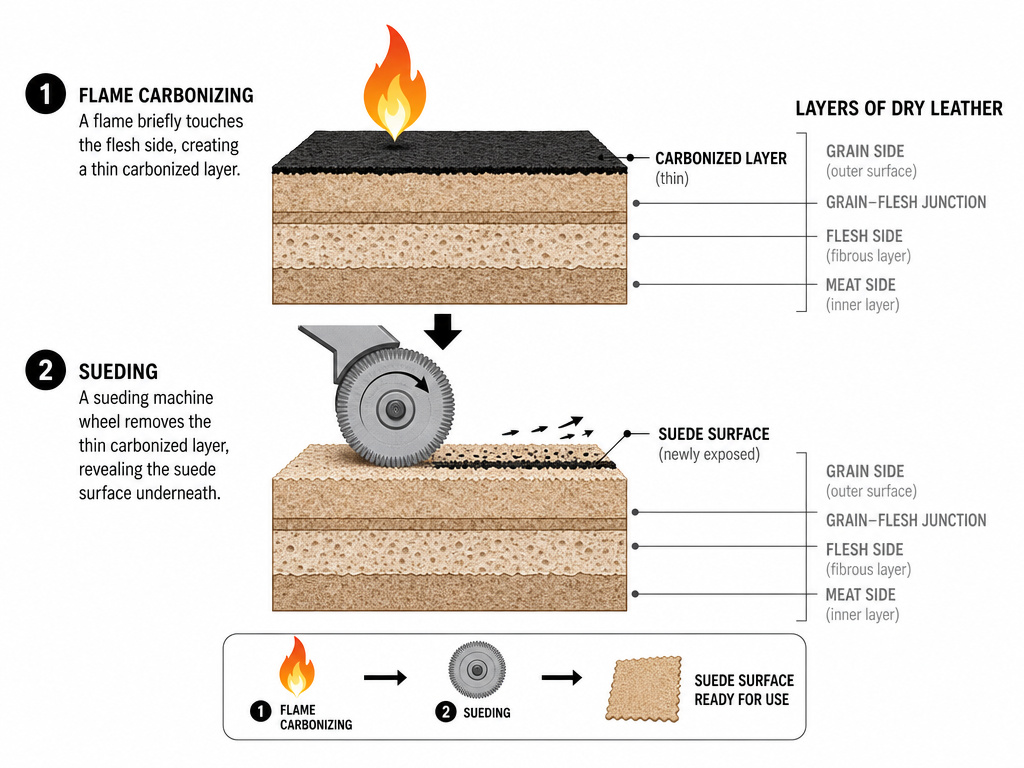
Not all suede comes from the wet blue path. Patent CN1664114A describes a completely different method. It starts with already-finished dry leather. The flesh side is incandesced with a flame, carbonizing the very top layer of fibers. This brittle, carbonized layer is then ground away with a sueder, revealing a new, uniform suede surface underneath.
The goal here isn’t to mimic the traditional softness. It’s to eliminate color variation in the flesh side and create a very specific, consistent matte effect reminiscent of wool or cloth. This method is less about the plush feel of traditional suede and more about achieving a particular aesthetic for fashion applications where a flawless, uniform appearance is paramount. It shows that “suede leather” is a finish, not a single material.
The Nubuck Distinction
It’s easy to confuse suede with its cousin, nubuck. Both have a napped surface, but their origins are opposites. Suede comes from the split flesh side. Nubuck leather starts with the premium top-grain layer. That tight, smooth surface is then sanded lightly to create a fine, velvety nap. The result is more durable and water-resistant than suede but less pliable. Understanding this difference is key when choosing between the two for a project, a point we explore in depth when comparing nubuck to suede.
Grading and the SATRASumm System
Before a square inch of suede leaves the tannery, it’s graded. This isn’t a casual inspection. At facilities like CF Stead, technicians use the industrial-standard SATRASumm software. Electronic pinwheels measure the hide’s dimensions with hair’s-breadth precision, while technicians manually check thickness, color consistency, and nap quality.
The software isn’t just for measurement; it’s for optimization. It calculates how to cut the irregular hide shape into panels for shoes or garments with minimal waste. This step ensures that a premium material isn’t ruined by inefficient cutting. A hide that passes this final audit is packed and shipped, ready to become part of the full leather production process that ends with a finished good.
Why Quality Varies So Wildly
The difference between a cheap suede jacket and a heirloom-quality suede boot isn’t just the animal. It’s the rigor of these steps. A low-cost suede might skip the precise re-tanning and neutralization, leading to higher residual chromium (VI) or formaldehyde, patent CN102304592B specifically addresses reducing these to under 3ppm and 20ppm, respectively. It might use a single, aggressive buffing pass, creating a nap that pills and wears flat quickly.
A high-quality suede, like Stead’s shrunken Rambler suede, undergoes additional steps like controlled shrinking for a denser fiber structure, or wax impregnation for weatherproofing. The time, chemistry, and skilled oversight at each stage are what you pay for. The leather will tell you what it needs, and a tannery like Horween listens.
Frequently Asked Questions
Is suede real leather?
Yes, genuine suede is 100% real leather. It is made from the inner split layer of an animal hide. The confusion often arises from synthetic alternatives, but true suede is a leather product with a distinct napped finish.
What’s the difference between suede and regular leather?
The core difference is which layer of the hide is used and how it’s finished. Regular leather, like full-grain, uses the top grain layer and is often smoothed and sealed. Suede versus full-grain leather comparisons show suede uses the inner split layer and is abraded to a soft nap, making it more porous and delicate but uniquely textured.
Can suede be made from any animal?
While cow, goat, and sheep are most common, suede can be made from any leather-producing animal, including deer, pig, and exotic hides like kudu. The animal affects the fiber structure, goat is strong and smooth, sheep is very soft, and cow is durable, but the fundamental process of making leather into suede remains the same.
What is “split suede”?
Split suede is the correct term for most suede. It specifically refers to suede made from the lower layer of the hide after it has been split. This distinguishes it from the much rarer “full-grain suede,” which uses the unsplit hide with the top grain sanded down, a different and more expensive process.
How is synthetic suede made?
Synthetic or faux suede, like Ultrasuede, is a different category altogether. It’s made from woven polyester microfibers that are then brushed, sanded, and treated with polyurethane to mimic the look and feel of real suede. Resources like the Sewing Synthetic Suedes guide detail the techniques for working with these man-made materials.
The Bottom Line
Suede isn’t a byproduct. It’s a deliberate creation. From the calibration of the shaving blades to the timed neutralization vats and the final buffing cylinders, every step is a controlled variable aiming for a specific texture, durability, and hand-feel. The next time you run your hand over a suede item, you’re feeling the result of that precise chain, a blend of traditional craft and controlled chemistry that turns a raw hide into a surface of lifted fibers.
That knowledge should change how you care for it. A nap created by abrasion is fragile. It responds to brushing, not oily conditioners. Understanding its origin as the inner layer of a split hide explains its porosity and why it darkens when wet. You’re not just maintaining a fabric; you’re preserving the outcome of a meticulous, multi-stage transformation.
