
How to Antique Leather Using a Museum-Grade Resist Method
This post contains affiliate links. As an Amazon Associate, we earn from qualifying purchases.
To antique leather, you seal the surface with a clear resist, apply a pigmented antique gel or paste, and immediately wipe the excess from the high spots. The resist prevents the antique from soaking into sealed areas, forcing it to remain only in tooling cuts, stamps, and texture to simulate age and depth. This three-step method, used by modern leatherworkers, is fundamentally different from applying oils or dressings to genuine antique objects, a practice museum conservators have documented as harmful for nearly a century.
The word “antique” here does two jobs. For a crafter, it’s a finishing technique. For a collector, it’s a condition. Mixing the two is how pieces get ruined. A 1978 treatment report on 19th-century children’s shoes at the Harpers Ferry Center found that leather dressings contributed to deterioration, weakening stitching and darkening the material. Modern antiquing is about controlled contrast; historic preservation is about stopping chemistry.
What follows is the workshop method for creating an aged look on new vegetable-tanned leather, the science behind why you should never “feed” a true antique, and the environmental specs that actually preserve leather for the long term.
Key Takeaways
- Antiquing is a topcoat technique, not a preservative. It uses a resist (like acrylic resolene) to trap pigment in low areas for contrast.
- Never use leather dressings (oils, waxes) on collectible antique leather. Primary sources from the National Park Service show they offer no preservative benefit and accelerate decay.
- Stable environment beats any product. For long-term preservation, maintain 40-60% relative humidity and temperatures at or below 70°F (20°C), with minimal fluctuation.
- Vegetable-tanned leather is the ideal canvas for antiquing because its porous, unfinished surface accepts dye and resist uniformly.
- Test first, always. The final look depends on your leather’s tannage, your resist, and your wipe-off pressure. Practice on scraps.
The Core Three-Step Process
Forget the muddy, all-over darkening you see on cheap belts. Professional antiquing is subtractive. You add color everywhere, then take most of it back off. The magic happens in the recesses.
The entire goal is to make your tooling pop. A geometric stamp or floral carve has shadows. Antique paste is just deliberate dirt for those shadows. Here’s the straightforward guide.
1. Seal with a Resist
After your leather is dyed and completely dry, brush on a thin, even coat of a clear sealer. I use acrylic resolene or Super Shene. This layer is essential. It makes the leather’s surface slick.
Think of the resist as a raincoat for the high spots. When you slather on the antique paste next, the sealed areas will repel it. The unsealed areas, your tooling cuts, will grab it. The number of resist coats is your contrast dial. One light coat gives a weathered, all-over grime. Two or three coats create crisp, gallery-level definition where only the deepest cuts hold color.
Let each coat dry bone dry. A tacky surface will streak when you apply the antique.
2. Apply & Work In the Paste
Use a gel antique like Fiebing’s Gel Antique for control. It has a longer working time than spirit-based pastes. Dab it on with a wool dauber or your gloved finger and scrub it into every crevice.
Don’t be shy. You want to pack the paste into the texture. If the paste starts to dry in the pot, you’re not using enough. The objective is complete coverage so every stamped line is filled.
This is where you’ll feel the difference the resist makes. On the sealed high areas, the paste sits on top like mud on a waxed car. In the cuts, it sinks in.
3. Wipe & Reveal the Contrast
Immediately grab a clean, dry cloth or paper towel. Fold it to create fresh surfaces. Wipe the leather with firm, even pressure, following the contours of the piece.
The high spots will come clean. The paste will stay in the lows. That transformation, from a flat, dark slab to a piece with depth, happens under your cloth. It’s the whole payoff.
Keep rotating to a clean part of your cloth. A dirty rag just smears paste back where you don’t want it. If a section dries before you wipe, a little fresh paste will re-wet it.
The technical snippet: Antiquing leather is a pigment-glazing technique reliant on surface tension differentials. A water-based acrylic resist (e.g., resolene) creates a hydrophobic barrier on the leather’s surface. When a pigmented oil- or gel-based antique (e.g., Fiebing’s Gel Antique) is applied, capillary action draws it into unsealed, porous recesses (tooling cuts, grain), while the sealed areas exhibit high contact angles, allowing the excess to be removed with minimal mechanical adhesion. The result is selective deposition enhancing topographic contrast.
The Biggest Lie in Leather Care
The instinct to “feed” dry, old leather with oil is almost universal. It feels like you’re doing something nourishing. For nearly 100 years, the science has said you’re doing the opposite.
Leather dressings, neatsfoot oil, saddle soap, British Museum Leather Dressing (BMLD), are blends of animal fats, oils, and waxes. The theory was they’d lubricate collagen fibers and restore flexibility. The 1935 study by Wallace, Critchfield, and Beek found chestnut-tanned leather treated with a sulphonated cod-liver oil dressing deteriorated faster than untreated leather. A 1969 British Leather Manufacturers study concluded the absence of dressing did not make leather more prone to decay.
Where this goes sideways: Applying dressings to historic leather. The oils oxidize and acidify over time, leading to a white, waxy bloom called fatty acid spew (often mistaken for mold), permanent darkening, and embrittled fibers. Once applied, the dressing cannot be removed.
The National Park Service leather dressing guide states it plainly: conservators discourage these treatments. The dressing penetrates deeply, moves within the leather matrix, and future adhesives won’t stick to the oily surface. That 1978 shoe treatment I mentioned? The conservator noted the dressing not only failed to help, it actively contributed to the damage.
This doesn’t mean all oils are bad. For a working saddle or baseball glove still in use, conditioning has a functional benefit. But for a collectible bag, jacket, or book on a shelf, the best treatment is a stable environment, not a product.
How to Handle a True Antique
So you have a piece that’s 80-plus years old, a true antique. Its color is faded, the surface is stiff, maybe it’s cracked. The antiquing process above is not for this item. That’s a craft technique for new leather. This is a conservation issue.
Your first step is not cleaning. It’s assessment. Is it vegetable-tanned or chrome-tanned? What’s the natural patina like? Is the stiffness from age or from a previous, failed “treatment”? If the piece has significant value, consult a professional conservator. Full stop.
If you proceed with cleaning, understand the risks. Aged leather is incredibly susceptible to water. I use a dry, soft brush first. For grime, a slightly damp cloth with a drop of neutral pH soap. The goal is surface cleaning, not saturation. Let me share what I’ve learned: wetting stiff, antique leather often sets the stiffness permanently as it dries.
Common mistake: Using saddle soap on antique leather furniture or bags. Saddle soap is designed for sweaty, dirty, oil-rich work gear. On dry, aged leather, it can deposit soap residue inside cracks and accelerate drying.
After cleaning, the question of “conditioning” arises. Based on the evidence, I don’t. I focus on the environment. According to the curatorial care of leather objects, preservation is about control: * Temperature: At or below 70°F (20°C). * Relative Humidity (RH): Keep it between 40% and 60%. * Stability is critical: Avoid RH swings greater than 5% in a day or more than ±8% over a year.
Store it away from direct sunlight, heat vents, and damp basements. That does more than any bottle of oil ever could.
Choosing Your Materials: What Works & What Doesn’t
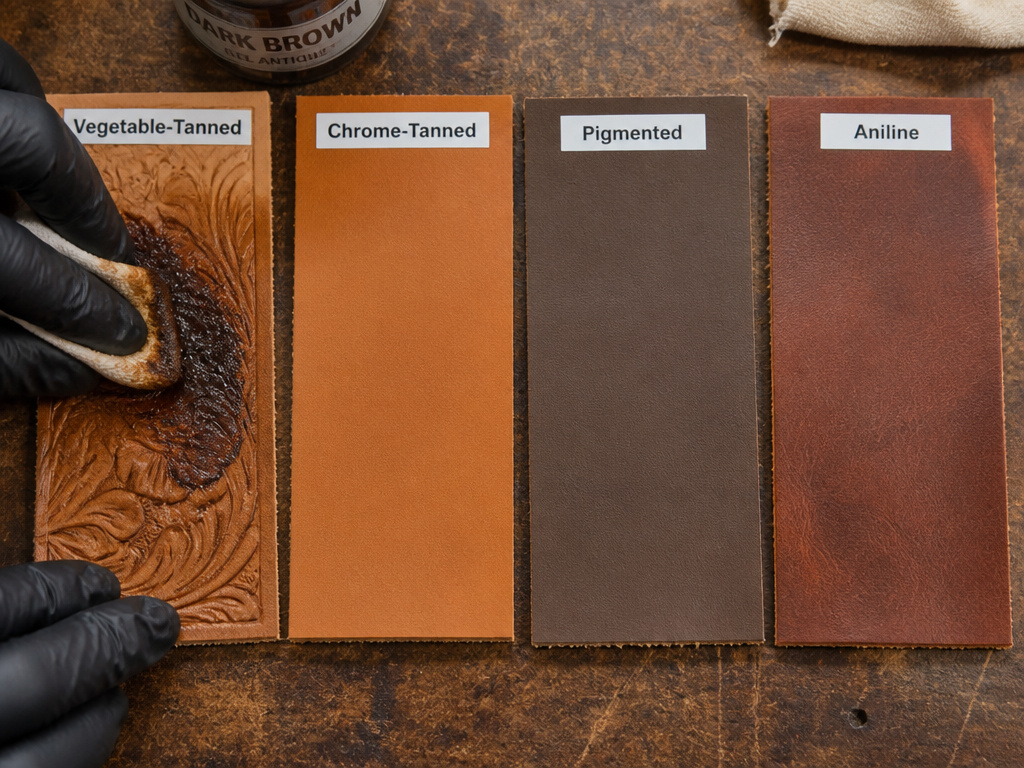 Not all leather is created equal, and your materials must match. This is based on years of practical experience.
| Material | Best For Antiquing? | Why | Key Consideration |
|---|---|---|---|
| Vegetable-Tanned Leather | Yes, the ideal candidate. | Unfinished, porous surface readily accepts dye and resist. Tooling is crisp and deep. | Ensure it’s fully dry before applying resist. |
| Chrome-Tanned Leather | Difficult, often not recommended. | Factory-applied topcoats and finishes repel antique pastes. | May require heavy deglazing; results are unpredictable. |
| Pigmented Leather | No. | The solid pigment topcoat has no porosity for the antique to grip. | Antiquing will sit on top and rub off. |
| Aniline Leather | No, and risky. | The porous, unprotected dye layer will soak up antique unevenly, causing dark blotches. | Test on a hidden area; expect a very dark, saturated result. |
Your vegetable tanned leather is the perfect blank canvas. Its open pores allow the antique to penetrate the tooling for a permanent effect. If you’re trying to assess leather quality for a project, start with a good veg-tan side.
For the antique itself, I prefer Fiebing’s Gel Antique in a shade like Light Brown or Dark Brown. The gel format is forgiving. Pastes can be messier but offer intense pigment. Always have latex or nitrile gloves and a stack of clean, lint-free cloths.
Troubleshooting Common Antiquing Problems
 Even with the right steps, things can go sideways. Here’s what to do when they do.
- The antique looks streaky or blotchy on the high spots. You didn’t wipe enough, or your cloth was dirty. The resist layer might have been too thin or uneven. Fix: Once dry, lightly sand the high spots with fine grit (600+) sandpaper and reapply resist and antique to the whole piece.
- No color is staying in the tooling. Your resist layer is too thick or you used too many coats. The sealed surface is so slick nothing can grip. Fix: On your next piece, use fewer resist coats. For this piece, you may need to dye the tooling cuts directly with a thin brush before the final resist and antique.
- The antique rubs off after drying. You didn’t use a resist, or you used an oil-based antique on top of an incompatible finish. The antique is sitting on the surface. Fix: Seal the entire piece with a topcoat like a leather finisher or resolene to lock in the color.
- The leather feels sticky days later. The antique or resist was not allowed to dry fully between steps, or humidity was too high during application. Fix: Time and airflow. Place it in a warm, dry room with a fan. It may take several days to fully cure.
The leather will tell you what it needs. If a step feels wrong, stop. Let it dry completely before deciding your next move.
Frequently Asked Questions
Can you antique any color of leather?
You can antique over any base color, but the result is a combination. Antique over red dye will create brownish-red shadows. Over black, the effect is subtle. For the classic look, antique over a medium brown or natural tan base. The processes for coloring leather set the stage.
What’s the difference between antique paste and leather dye?
Dye penetrates and colors the leather fibers themselves. Antique paste is a pigmented coating that sits on top of the leather, specifically in low areas. You often dye first, then antique. They are different steps in the leather dyeing process.
How do I fix an antique job that’s too dark?
If the piece is still wet, wipe more aggressively with a clean, damp cloth. If it’s dry, your options are limited. You can try lightly sanding the high spots to remove some pigment, or apply a lighter antique over the top to blend it. Prevention is easier, use less antique paste or a lighter shade.
Is “antiquing” the same as “distressing”?
No. Antiquing specifically refers to adding a darker color to recesses. Distressing is a broader term for simulating wear, including scratches, scuffs, and edge wear, often done before or after antiquing.
Can I use this method on a leather jacket or bag?
On a new vegetable-tanned jacket or bag, yes. On a finished, factory-made garment, no. Most commercial bags and jackets are made from chrome tanned leather with protective topcoats that will reject the antique. Test on an inside seam.
Before You Go
The practical takeaway is this split: for your craft projects, antiquing is a powerful tool for depth. For your heirlooms, preservation is a science of environmental control, not product application.
If your goal is to make a new belt look old, follow the three-step resist method on vegetable-tanned leather. If your goal is to care for your grandfather’s briefcase, put down the oil bottle. Measure the humidity in the room where you keep it. Keep it out of the sun. That’s the real work.
Understand leather better to make confident choices. Knowing the different tanning processes and why a museum conservator would never use BMLD today is what separates a good finish from a lasting one.
