How to Laser Engrave Leather: Mastering Settings and Techniques
This post contains affiliate links. As an Amazon Associate, we earn from qualifying purchases.
Laser engraving leather requires three things: the right leather (vegetable-tanned is best), a properly focused and ventilated machine, and a test-run to dial in power and speed settings before committing to your final piece. The goal is a dark, crisp mark without excessive burning or charring around the edges.
That “without excessive burning” clause is where most guides stop being useful. You can follow every step and still end up with a smudged, smoky mess if you miss one of two mechanical details: air flow and heat dissipation. The laser doesn’t just mark; it vaporizes the top layer of the hide. If that vaporized material—smoke and soot—isn’t blown away instantly, it settles back onto the hot, engraved surface and bakes in, leaving a permanent, dirty stain. And if the leather can’t shed the intense local heat from the beam, it chars.
This guide walks through the seven-step process, but it frames each step around the specific failure it prevents. Your leather choice dictates your entire setup. This guide explains how to manage the unavoidable fumes and the adjustment that turns a sooty engraving into a clean one.
What follows: a breakdown of leather types and laser sources, the essential safety rules, the seven-step engraving sequence, and how to troubleshoot the three most common problems.
Key Takeaways
- Vegetable-tanned leather reacts best to laser engraving, producing a high-contrast, clean mark. Chrome-tanned and synthetic leathers can produce toxic fumes and poor results.
- Air assist is not optional. A steady stream of compressed air blows vaporized material away from the engraving path, preventing soot from redepositing and staining the surface.
- Always use a honeycomb panel. This lifts the leather off the solid metal bed, allowing heat to dissipate and preventing severe back-side charring.
- Lower power with multiple passes almost always yields a cleaner, deeper engraving than a single high-power pass, which tends to scorch.
- Test on a scrap piece first. Leather thickness, finish, and even color affect how the laser interacts with it. Your first run should never be on your final workpiece.
The Foundation: Leather and Lasers
Not all leather is created equal for this process, and not all lasers interact with it the same way. Getting this pairing wrong is the root cause of about half the “my engraving looks terrible” posts you’ll see online.
The Best (and Worst) Leathers for Laser Engraving
The laser beam is essentially a very focused heat source. How the leather absorbs and reacts to that heat determines everything.
Vegetable-tanned leather is the undisputed champion for laser work. Its natural, unfinished surface absorbs the beam’s energy cleanly, vaporizing evenly to produce a dark brown to black engraved mark with excellent contrast. It’s also free of the metallic salts and heavy chemicals found in other tanning methods, which means fewer toxic byproducts when heated. To learn why this traditional method is so predictable, read our article on vegetable-tanned leather covers the chemistry.
Chrome-tanned leather is trickier. The chrome salts used in tanning can cause the engraving to be shallow and less distinct. More critically, when heated, these materials can release harmful fumes. You might get a passable mark, but the risk-to-reward ratio isn’t great. Understanding the chrome tanning process explains why.
Synthetic leathers (PU, Pleather, Vinyl) are a hard “no” for laser cutting and a cautious “maybe” for very light engraving, with extreme ventilation. Many contain Polyvinyl Chloride (PVC). When laser-cut, PVC releases hydrochloric acid gas, which is highly toxic to breathe and will corrode the internal components of your machine. Always verify the material is 100% polyurethane (PU) and even then, ensure massive ventilation. If you’re unsure, our guide on how to tell real leather from fake includes burn tests that can help identify PVC.
Where this goes sideways: Assuming all “leather” is the same. Laser a PVC-coated faux leather, and within seconds you’ll smell a sharp, acrid chlorine-like odor. That’s hydrochloric acid gas forming. Stop the job immediately, ventilate the area, and don’t run the machine again until the chamber is fully cleared.
CO2 vs. Diode Lasers: Which One Should You Use?
Your laser source dictates your speed, depth, and the range of materials you can work with.
CO2 lasers are the professional standard for leather. They operate at a 10.6-micron wavelength, which organic materials like leather absorb exceptionally well. This means faster engraving speeds, deeper marks, and cleaner cuts. Machines like those from Epilog or Trotec are built for high-volume production. For a complete list, see our review of the best laser engravers for leather.
Diode lasers (like the xTool D1 Pro or TwoTrees models) are accessible and capable for hobbyists. They can engrave leather, but they lack the raw power and optimal wavelength absorption of a CO2 system. Engraving will be slower, and cutting through anything thicker than 2-3mm becomes a multi-pass chore. They are, however, a fantastic and safer entry point for learning the fundamentals.
| Laser Type | Best For | Key Limitation | Typical Power Range |
|---|---|---|---|
| CO2 Laser | Professional shops, high contrast/deep engraving, fast cutting. | Higher cost, larger footprint, requires more maintenance (like tube replacement). | 40W – 120W+ |
| Diode Laser | Hobbyists, beginners, light to moderate engraving, prototyping. | Slower engraving speed, struggles with thick material cutting, limited by wavelength on some materials. | 5W – 40W (optical) |
Safety First: The Non-Negotiable Rules
Laser engraving is not a casual craft. You are directing concentrated energy that can permanently damage eyesight and create hazardous airborne particles. These rules aren’t suggestions.
- Laser Safety Goggles: These must be matched to your laser’s specific wavelength (e.g., 10.6µm for CO2, 450nm for blue diode). Ordinary sunglasses or shop glasses offer zero protection. The lens should have an Optical Density (OD) rating high enough to block both direct and reflected beams.
- Ventilation & Respiratory Protection: You are vaporizing material. With natural leather, this is primarily smoke and soot. With synthetics, it can be toxic chemicals.
- For small batches: Use a well-sealed enclosure with an exhaust fan vented outdoors. Wear a KN95 or N95 mask to filter particulates.
- For any volume of synthetic leather or high-volume production: You need a half-face respirator with organic vapor cartridges. A dust mask is not sufficient for chemical fumes.
- Never Leave the Machine Unattended: A misaligned focus, a curled piece of leather, or a software glitch can cause a fire in seconds. Always be present and ready to hit the emergency stop.
The 7-Step Process for Laser Engraving Leather
Here is the sequence, with the “why” attached to each step. Skipping the “why” is how you waste good leather.
Step 1: Prepare Your Design File
Use vector software like Adobe Illustrator, CorelDRAW, or dedicated laser software like LightBurn. Your design should be in a vector format (SVG, DXF, AI) for clean lines. Raster images (JPEG, PNG) can be engraved but will transfer any pixelation.
Step 2: Prepare the Leather
The leather must be clean, dry, and flat. Any dust, oils, or finishes will engrave unevenly. If you’ve just conditioned a piece, let it fully absorb and dry for 24 hours before lasering. For valuable items, always test on a scrap of the same leather first. This is also the time to assess your material’s quality; our methods for how to test leather quality can help.
Step 3: Secure the Workpiece
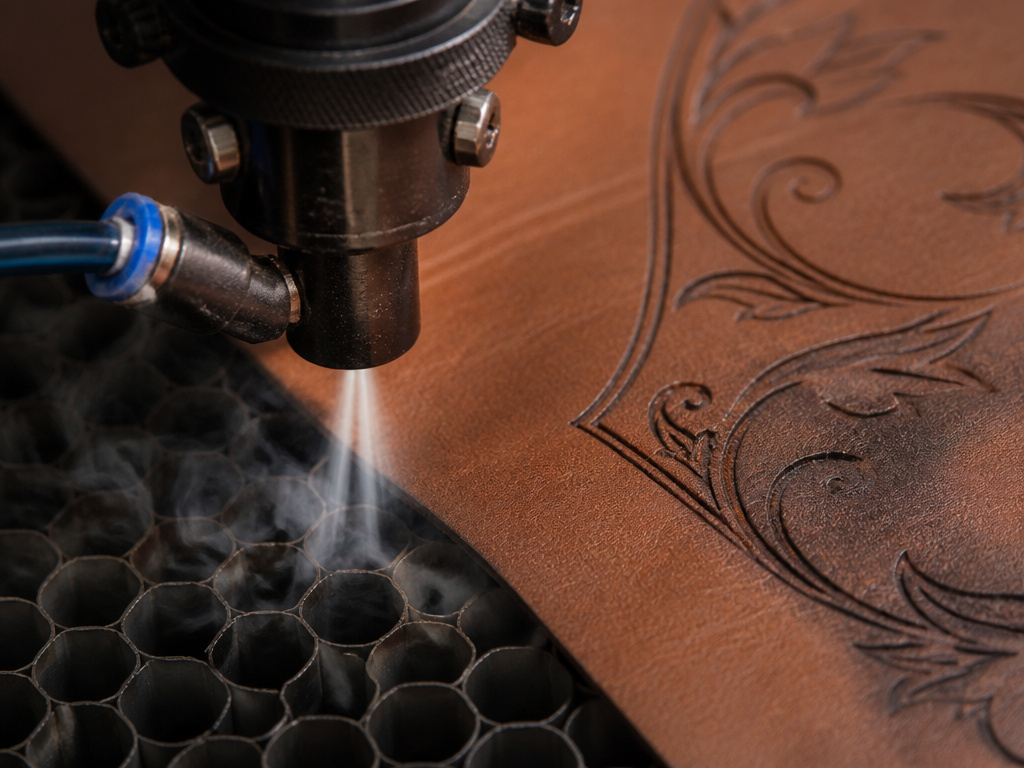
This is where the honeycomb panel becomes critical. Never place leather directly on the machine’s solid metal bed. The honeycomb allows air and debris to fall through, preventing heat from being trapped and causing the underside to char severely. Secure the leather flat onto the honeycomb using low-tack masking tape or small magnets at the corners. Any warp or lift will defocus the beam.
Step 4: Focus the Laser
Every machine has a focusing method. For the xTool D1 Pro, it’s a fixed-focus lever you lower until it touches the material, then lock. For others, you may manually adjust the lens height to a specified distance (like 2 inches). An out-of-focus beam is a wider, less powerful beam, resulting in a faint, blurry engraving and increased surface scorching.
The technical snippet: Laser focusing ensures the beam converges at its smallest possible point (the focal point) on the material’s surface. This maximizes energy density for a clean vaporization cut. A defocused beam spreads this energy over a larger area, heating and burning the surface rather than cleanly removing material.
Step 5: Run a Test on Scrap
This is the most important step you’ll be tempted to skip. Create a test grid or a small section of your design. Run it on your scrap leather.
- Adjust Power: Controls how much energy is delivered. Too high, and you’ll burn through or char heavily. Too low, and the mark will be faint.
- Adjust Speed: Controls how long the beam dwells on one spot. Too slow, and it burns; too fast, and it barely marks.
Start with manufacturer-recommended settings as a baseline. For example, OMTech suggests 15% power at 200 mm/s for engraving on a 60W CO2 machine. Then, adjust based on your test. The goal is a crisp, dark mark without black soot around the edges.
Step 6: Engrave the Final Piece
Once your test is perfect, load your final design. Double-check the positioning using your machine’s camera preview or a low-power framing function. Ensure your air assist is on and flowing strongly. Hit start, and monitor the first 30 seconds to ensure nothing is amiss.
The Two-Pass Secret: If your test shows slight charring at the power needed for a dark mark, try this. Reduce the power by 20-30%, and set the job to run two identical passes. The first pass lightly scores and cleans the surface. The second pass deepens the mark without dumping all the heat at once. It takes longer but almost always looks cleaner.
Step 7: Post-Processing and Cleaning
After engraving, there will be soot. Do not wipe it with a wet cloth—you’ll smear it into the pores.
- Let it cool for a minute.
- Use low-tack masking tape (blue painter’s tape). Press it firmly over the engraved area and peel it off. Repeat 2-3 times. The tape lifts the dry soot from the crevices without pushing it deeper.
- For a final clean, use a soft, dry brush (like a horsehair brush) to gently remove any remaining dust.
- Optionally, apply a light coat of leather conditioner to the entire piece, avoiding a heavy build-up in the engraved grooves.
Troubleshooting Common Laser Engraving Problems
 Here’s how to diagnose and fix the issues you’re most likely to encounter.
| Problem | Likely Cause | The Fix |
|---|---|---|
| Faint, shallow engraving | Laser power too low, speed too high, or laser is out of focus. | Re-focus the laser. Increase power by 5-10% increments or decrease speed. |
| Excessive charring / burning | Power too high, speed too slow, or lack of air assist. Leather is also too close to a solid bed. | Enable or increase air assist flow. Ensure honeycomb bed is used. Decrease power and/or increase speed. Try the two-pass method. |
| Uneven engraving depth | Leather surface is uneven (wrinkled, oily, or inconsistent finish) or not secured flat. | Clean and dry leather thoroughly. Secure firmly with tape/magnets. Test a different, more uniform piece of leather. |
| Sooty residue baked onto surface | Air assist is off, clogged, or too weak. Smoke is recirculating and settling on hot leather. | Clean air assist nozzle. Increase air flow. Ensure enclosure exhaust fan is on and venting properly. |
Why Air Assist is Your Most Important Setting
I abandoned using certain adhesives for leather because they left a residue that ruined later finishing steps. That same principle of “clean process, clean result” applies tenfold here. Air assist isn’t just blowing away dust. During engraving, the vaporized leather forms a plume of hot carbon particles. Without a constant, focused stream of air blowing this plume down and away through the honeycomb, it floats and settles back onto the still-hot engraved lines. There, it fuses into a sticky, black stain that tape can’t remove. It’s the difference between a crisp, brown engraved line and a fuzzy, dirty grey one. This is why results look so different between an open-frame diode laser without an air pump and an enclosed CO2 system with one.
Frequently Asked Questions
Can any laser engraver work on leather?
Technically, yes, but with major caveats. Diode lasers can mark leather, but they are slower and struggle with depth and clean cutting. CO2 lasers are purpose-built for organic materials like leather and will produce superior results in less time. Your choice should be guided by your desired output quality and volume. Our resource on the best laser cutters for leather compares these capabilities in detail.
What software is best for laser engraving leather?
For hobbyists and small shops, LightBurn is the industry favorite for its robust features, device compatibility, and excellent material test settings. Many machines also come with proprietary software (like xTool’s XCS) that is simplified and user-friendly for beginners. Professional CO2 systems often use their own advanced dedicated software.
How do I get a darker engraving without burning?
This is the core challenge. The answer is almost never “more power.” It’s better absorption and clean evacuation. First, use a natural, unfinished leather like vegetable-tanned, which darkens nicely. Second, ensure perfect focus. Third, use strong air assist. Fourth, try the two-pass method with moderate power. Finally, after cleaning, you can very carefully rub a small amount of leather dye or antique paste into the engraved lines with a cotton swab, then immediately wipe the surface clean.
Is the smell from laser engraving leather dangerous?
Engraving natural vegetable-tanned leather produces a smell akin to burning hair or wood. It’s unpleasant and the smoke is an irritant, but with proper exhaust ventilation, it’s not considered highly toxic. Engraving or cutting synthetic or chrome-tanned leather can release hazardous chemicals. Always err on the side of extreme ventilation and respiratory protection, and know your material. The process of laser cutting leather generates even more smoke and fumes, making these precautions even more critical.
Can I laser engrave colored or finished leather?
You can, but the results are unpredictable. The laser will burn through the topcoat or dye, often resulting in a mark that is a different color than the base leather. The finish can also melt or bubble, creating an uneven texture. Always test on a scrap piece first. The type of finish matters greatly; understanding the leather grain and surface layer will help you predict how a finished leather might react.
The Bottom Line
Laser engraving leather transforms a hands-on craft with a digital tool, but it doesn’t replace the craftsperson’s judgment. The machine follows orders; you provide the context. That context is knowing that a honeycomb bed isn’t just a recommendation—it’s what stops the back of a belt from turning to charcoal. It’s knowing that air assist isn’t an extra feature; it’s the difference between a clean line and a smudged one.
Start with vegetable-tanned leather. It’s the most forgiving and produces the classic look people want. Invest in ANSI Z87.1-certified safety goggles and a ventilation system rated for your workshop’s square footage. Then, before you ever load a finished piece, burn test after test on scraps. Dial in that two-pass technique. Once you have a process that works, document your settings for that specific leather type and thickness. Your next project will thank you.
The real skill isn’t just in operating the laser; it’s in preparing the material and interpreting the results of that small, sacrificial scrap. That’s where the control lies.
